Deluxe Air Fryer
Best Air Fryer for a Family
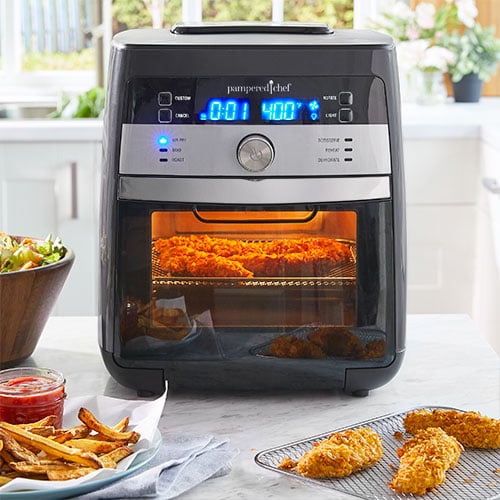
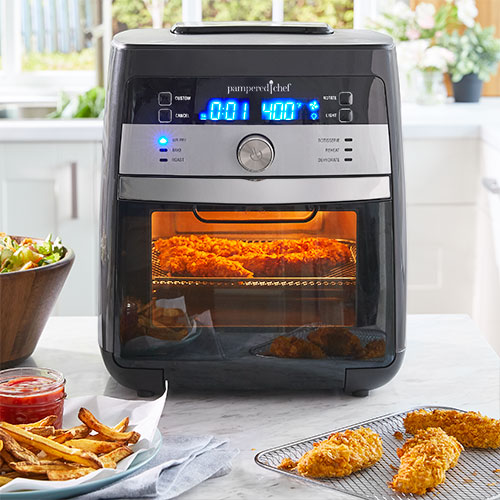
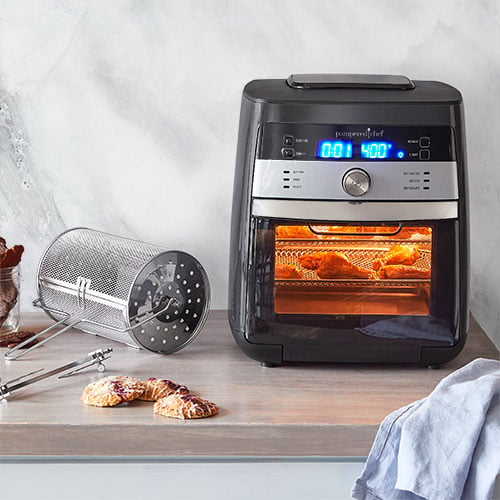
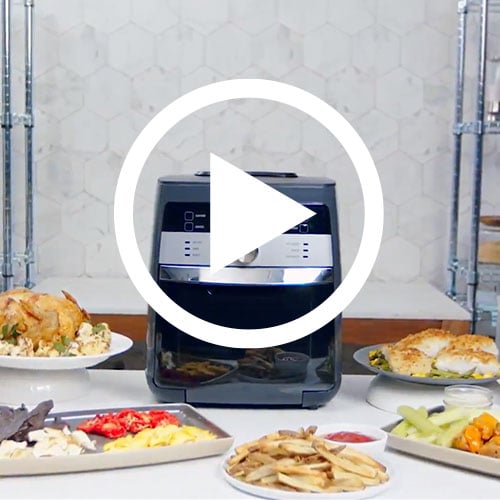
Enjoy fried foods at home without all the mess, hassle, and oil of deep frying but with all the flavor and texture you love. Ours is family-sized to quickly cook up to six servings, a whole chicken or roast, or appetizers for a crowd. Like a convection oven, superheated air circulates giving food a crispy texture. No preheating is necessary, saving you precious time. Conveniently fits under kitchen cabinets.
Air Fryer, Rotisserie, & Dehydrator All-in-One
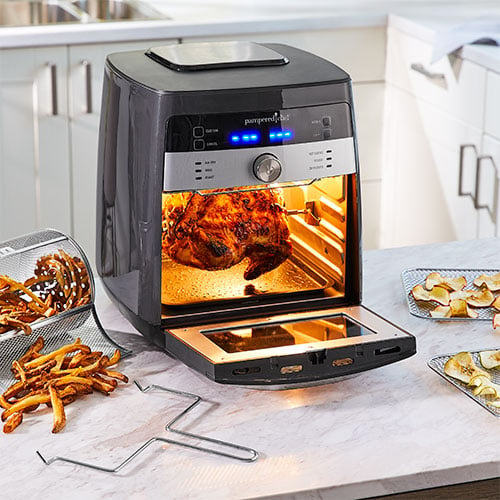
Ours does more than just better-for-you air frying. It makes perfectly-cooked rotisserie chicken, crispy outside and tender inside, so you can skip the hit-or-miss ones at the grocery store. And it dehydrates fruits, veggies, and herbs so you can enjoy their fresh flavors well beyond the season.
Product Details
- Family-sized 11.6-qt. capacity fits up to a 4 lb. whole chicken.
- Eight programmed settings: Air Fry, Bake, Roast, Rotisserie, Reheat, Dehydrate, Custom, and Rotate
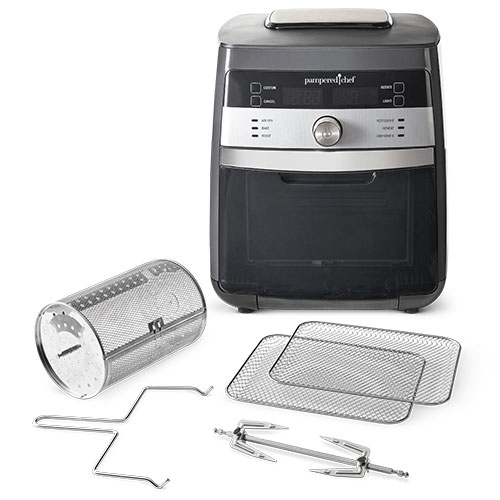
- Includes two cooking trays, basket, rotisserie set, drip tray, retrieval tool, removable shield, and a cooking guide.
- 14½" tall x 12 3/4" x 14 1/4"
How to Clean
- The removable shield, cooking trays, rotating basket, retrieval tool, and rotisserie set are dishwasher-safe.
- The drip tray is hand wash.
- Use a damp, non-abrasive cloth or sponge to wipe clean the outside, inside, and door.
Recommended:
-
Use & Care
Use & Care
Use & Care

When using electrical appliances, basic safety precautions should always be followed, including:
1. Please read all instructions. Save these instructions.
2. Do not touch hot surfaces. Use the handles on the bottom of the unit.
3. Do not use the air fryer for anything other than the intended use as outlined in this use and care.
4. This unit is for household use only; it is not intended for commercial use.
5. Do not use outdoors; intended for countertop use only.
6. Do not place the unit on, near, or inside an external heat source (Ex. on a hot gas or electric burner or in a heated oven).
7. Only use accessories that are sold by Pampered Chef and are recommended for use with this unit. Do not use the accessories with, or in, other appliances like an oven, microwave, stovetop, grill, or refrigerator, as this may cause deformations in the product which can negatively affect performance of the unit.
8. The use of non-Pampered Chef or non-approved accessories may cause injuries or damage to the unit. Any accessory that has been damaged in any manner should not be used.
9. Close supervision is necessary when any appliance is used by or near children.
10. Keep out of the reach of children and individuals whose physical, sensory, or mental abilities may prevent safe use of this product.
11. To protect against electrical shock, do not immerse or operate the unit, cord, orplugs in water or other liquids.
12. Do not put liquid of any kind into the cooking chamber.
13. Unplug when not in use. Allow the air fryer to cool completely before adding or removing parts or accessories, and before cleaning by hand. To unplug, grasp the plug and pull from the outlet; never pull from the power cord.
14. Proper maintenance is recommended after each use. Refer to the Cleaning section. After each use, let the air fryer cool completely before removing grease or other debris, cleaning, and storing.
15. Avoid contact with moving parts such as the rotisserie set, basket, trays, or door when hot.
16. Do not operate the unit if any part of the product is damaged or if the unit malfunctions in any manner. Call the Solution Center at (888) 687-2433 (United States) or (800) 342-2433 (Canada) for assistance.
17. Do not let the cord hang over the edge of a countertop. Do not let the cord touch hot surfaces.
18. Extreme caution must be used when handling this unit, especially if the air fryer or its contents are hot. Spilling of hot contents could result in burns or injuries.
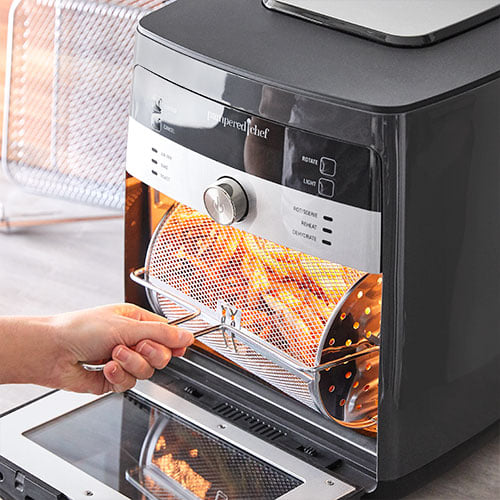
19. Use the retrieval tool to remove the basket or rotisserie set, as they will be hot.
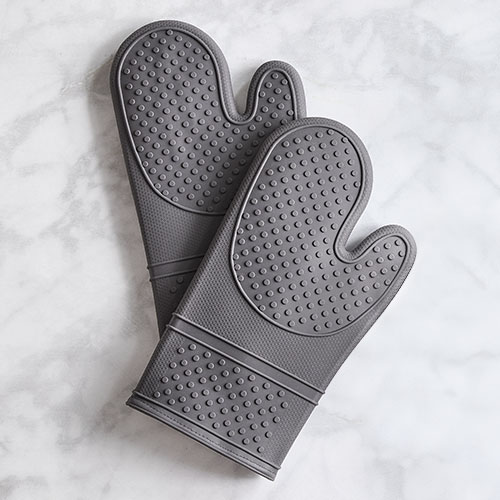
20. Use caution when opening the air fryer door. Keep your face away from air fryer and do not touch hot surfaces. Always use oven mitts when interacting with the unit.
21. Use caution when pouring or removing hot contents from the air fryer, including the basket and rotisserie set.
22. Do not fill the basket more than two-thirds full. Overfilling may cause food to come in contact with the heating coil, which may result in fire and/or personal injury.
23. Never cover the air vents. Doing so will prevent even cooking, and cause overheating and damage to the air fryer.
24. Never pour oil into the cooking chamber. Thermal events and personal injuries could result. This unit is not intended for deep frying foods.
25. When in use, the internal temperature of the air fryer reaches several hundred degrees. To avoid personal injury, never place unprotected hands inside the unit until it has cooled completely.
26. When in use, do not place the air fryer against a wall or against other appliances. Leave at least 6" (15 cm) of free space on the back, sides, and above the air fryer. Do not operate the unit on or near combustible materials such as tablecloths and curtains. Do not place anything on top of the air fryer.
27. When in operation, hot air is released through the air vents. Keep your hands and face away from the air vents and take extreme caution when removing items from the air fryer.
28. Should the unit emit black smoke, press Cancel and unplug immediately. Wait until it stops smoking before opening the door. Then clean thoroughly.
29. Do not leave the air fryer unattended while in use.
30. Never connect this unit to an external timer switch or separate remotecontrolsystem.
31. Use extreme caution when removing hot accessories from the cooking chamber.
32. Oversized foods and/or non-approved metal utensils must not be inserted into the cooking chamber as they may cause risk of fire and/or personal injury. Oversized foods are those that touch the internal surfaces of the air fryer.
33. Do not store anything other than the accessories included with this unit in the cooking chamber when not in use.
34. Do not place any combustible materials in the cooking chamber, such as paper, cardboard, plastic, Styrofoam, or wood.
35. The included accessories are not to be used in a microwave, toaster oven, convection or conventional oven, nor on a ceramic, electric, induction or gas cooktop, or an outdoor grill.
36. Do not cover or wrap any air fryer accessory or food with metal foil.
37. Always use the drip tray when using the air fryer.
38. Place the basket, cooking tray(s), or rotisserie set in the cooking chamber before starting a cooking cycle.
39. Close the door immediately after using. Never leave the door open after use.
See operating instructions on the following pages.
PLEASE READ ALL INSTRUCTIONS THOROUGHLY. SAVE THESE INSTRUCTIONS
• Hot contents can cause serious burns or scalds in less than one second.
• Do not touch hot surfaces without using appropriate heat-resistant hand protection (Ex. oven mitts and pot holders).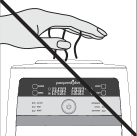
• Do not touch the door window while the unit is on or after use. The air fryer will be hot.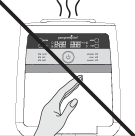
• Certain exterior surfaces of the unit may remain hot after cooking. Do not touch these areas without using appropriate heat-resistant protection until the unit has cooled completely.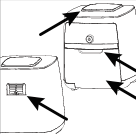
• Position the air fryer away from any overhangs, walls, and table or countertop edges.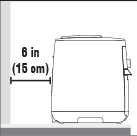
• Do not move the air fryer while in use.
• Never cover the air vents.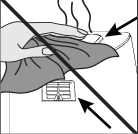
• Always use the retrieval tool to remove the basket or rotisserie set as they will be hot.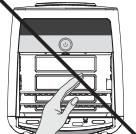
• Keep the cord away from children.
• A short power-supply cord is used to reduce the risk of it being grabbed by children, becoming entangled, or getting tripped over. For child safety, never drape the cord over the edge of a counter. Never use an outlet below a counter or with an extension cord.
• Other than approved accessories, do not leave or store anything, such as baking pans and kitchen utensils, in the air fryer (even when not in use) as this will damage interior components when starting the unit and ma cause injury.
• Do not operate the unit on an unstable surface.
• Never operate the unit on or near flammable materials such as newspapers or paper plates.
• Do not operate the air fryer adjacent to or inside sinks and other sources of water.
• Do not put foreign objects into any gaps and crevices of the unit. This may cause an electric shock or a thermal event which could result in death or serious injury.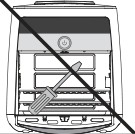
• Always place hot contents on a trivet or a cooling rack after cooking.
• Failure to abide by these specific instructions may cause electrical shock or a thermal event, and could lead to death or serious injury:
• Only use with accessories that are sold by Pampered Chef and are recommended for use with this unit.
• Always unplug when not in use.
• Do not use anything other than a 120V–60Hz power outlet.
• Do not immerse, submerge, or sprinkle the unit with liquids.
• Do not attempt to modify the plug in any way.
• If the plug fits loosely into the outlet, or if the outlet feels warm, do not use that outlet.
• Do not insert or remove the plug with wet hands. In order to avoid injuries due to electric shock, make sure your hands are dry before plugging and unplugging the unit.
• Do not plug into a power strip or an outlet with another appliance. This unit should be used with a dedicated outlet. A grounded socket of more than 15A rated current must be used alone.
• This unit has a polarized plug (one blade is wider than the other). To reduce the risk of electric shock, this plug is intended to fit into a polarized outlet only one way. If the plug does not fit fully into the
outlet, reverse the plug. If it still does not fit, contact a qualified electrician. Do not attempt to modify the plug in any way.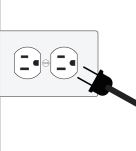
• Persons with pacemakers or users of hearing aids or cochlear implants should consult with authorized medical personnel before use. Refer to the instructions of medical equipment providers.
• Before moving the air fryer, ensure it’s not in use, it’s at room temperature, and the door is closed.
• Do not use excessive force with this unit. It could damage the unit or injure the user.
• Never remove the door to clean while the heat is on. Allow the unit to cool completely before cleaning.
• Do not store the unit in direct sunlight.
• When cooking in high-altitude areas, adjust the cooking time/temp as needed.
• Do not remove, bend, or stretch the silicone door seal, as this may cause the unit to malfunction.
PARTS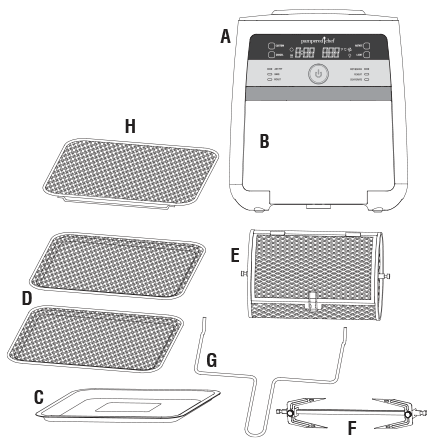
A. Air Fryer unit
B. Door
C. Drip tray
D. Cooking trays (2)
E. Basket
F. Rotisserie set (includes spit, 2 forks, and 2 tightening screw sets)
G. Retrieval tool
H. Removable Shield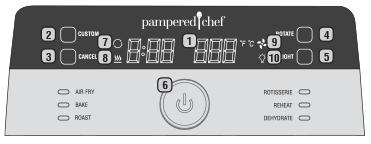
1. Display
• Shows the cooking time, cooking temperature, and standby mode.
2. Custom Button
• Lets you manually select the cooking time and temperature.
3. Cancel Button
• Cancels any operation at any time while the air fryer is in use. The air fryer will go into standby mode and the display will have 6 center lines blinking.
4. Rotate Button
• Press when using the basket or rotisserie set accessories. (When using the Rotisserie setting, the accessories will automatically rotate.)
5. Light Button
• Press the Light button to turn on the light inside air fryer. Press again to turn the light off.
Note: The Light button will not work when the air fryer is in standby mode.
6. Wheel
• Turn the wheel to change settings, cook time, or temperature. Press the wheel to start or pause an operation.
7. Rotate Icon
• When the rotisserie is spinning, the rotate icon will be lit.
8. Heat Icon
• Anytime the heating coil is on, the heat icon will be lit.
9. Fan Icon
• The fan will automatically run during and after cooking cycles. While running, the fan icon will be lit.
10. Light Icon
• Anytime the light is on in the air fryer, the light icon will be lit. Once a program is done, the light will turn off.
CLEANING
• Unplug the air fryer and allow all parts of the unit and accessories to cool completely before cleaning.
• Clean the unit and accessories before using the first time and after each use.
• To clean the inside of the unit, use a damp cloth to ensure the heating coil, chamber walls, and all other areas inside are free of grease and food debris. Use a nonabrasive sponge to remove stubborn grease residue. After cleaning, wipe the interior with a nonabrasive dry cloth to ensure the air fryer is dry.
• To clean the outside, wipe clean with a nonabrasive damp cloth.
• To clean the door, wipe clean with a nonabrasive damp cloth. Do not submerge in water or machine wash. To remove the door, open fully and push the tabs in, then lift away at the hinges. After cleaning, make sure the door is completely dry before placing back on the unit.
• The drip tray is hand-wash only.
• The removable shield, cooking trays, basket, rotisserie set, and retrieval tool are dishwasher-safe when placed away from the heating element.
• To remove baked-on grease and food residue from the accessories and the cooking chamber, spray with a mixture of equal parts baking soda and vinegar and wipe clean with a damp cloth. For stubborn stains, allow the mixture to sit on the affected area for several minutes before scrubbing clean with a nonabrasive sponge.
Before first use:
1. Remove all packaging in and around the air fryer.
2. Read through this document.
3. Clean each part per cleaning instructions.
4. Read the Important Safeguards in this use and care manual before using the air fryer. Failure to read and follow Important Safeguards may result in damage to the unit, damage to property, or personal injury.
Before each use:
• Inspect the interior of the air fryer to ensure it’s clean and free of food and grease residue.
• Ensure there are no foreign objects in the air fryer.
• Place on a stable, level surface, away from combustible material and external heat sources. Leave at least 6" (15 cm) of space around the air fryer.
• Properly close the air fryer door by ensuring the door is flush with the rest of the unit. If the door is not shut or attached properly, the interior light will remain on. The light should not turn on unless the door is open or the Light button is engaged.
• Do not place anything on top of the air fryer.
• Do not block the air vents.
1. Plug the cord into a 120V power source. Be sure the outlet is designated for just the air fryer and has nothing else plugged into it. Six blinking centerlines indicate the air fryer is on and in standby mode.
2. The unit defaults to Fahrenheit. To switch to Celsius, turn the wheel to Air Fry. Press and hold the Light and Cancel buttons at the same time for 3 seconds. Repeat to switch back to Fahrenheit.
3. Open the air fryer door and place the drip tray on the bottom of the cooking chamber. Close the door. For this test run, do not add food to the chamber.
4. Turn the wheel until the Reheat indicator is lit. Press the wheel and you will hear 1 beep. The time will blink and the temperature will be solidly lit. Turn the wheel
counterclockwise to set the time for 3 minutes. Press the wheel. You will hear three beeps, the time will be solidly displayed, and the countdown begins. Halfway through the cycle, you’ll hear a series of beeps reminding you to switch the cooking trays when cooking.
5. When time ends, you will hear 3 beeps and “End” will be displayed. The heat will turn off and the fan will remain on for 30 seconds to help cool the unit down.
WARNING: The air fryer will be hot during and after cooking. Do not touch hot surfaces. Always use oven mitts to remove all contents (accessories and food). Allow the air fryer to cool completely before cleaning the accessories and cooking chamber. See the Cleaning section for further instructions.
HOW TO INSERT AND REMOVE ACCESSORIES
WARNING: All accessories will be hot during and after cooking. Always use the retrieval tool to remove the rotisserie set and basket. Allow to cool slightly and exercise extreme caution when removing
hot accessories from the cooking chamber. Always use oven mitts when disassembling or retrieving hot accessories.
CAUTION: Ensure food is able to rotate freely. Do not allow foods to touch the heating coil or sides.
Trays
WARNING: Always place the trays into the cooking chamber before beginning a cooking cycle.
• Drip tray: Place the drip tray in the bottom of air fryer cooking chamber prior to each use. Use caution when handling if it’s hot.
• Cooking trays (2): Align the cooking trays with the slots on the inside of the air fryer. Push the cooking trays back until they are fully seated in the air fryer.
• Removable shield: Align the removable shield with the top of the slots on the inside of the air fryer. The removable shield is intended to separate the cooking chamber from the heating coil. The removable shield is NOT intended to be used as a cooking tray.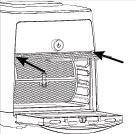
Basket
WARNING: Always fill the basket before placing into the cooking chamber and before beginning a cooking cycle in the air fryer. Always use the retrieval tool and oven mitts when removing the basket.
To place the basket into the air fryer cooking chamber:
1. Place the food items into the basket; make sure not to overfill.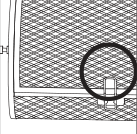
2. Align the tab on the basket with the notch on the side and then close the basket.
3. Make sure the basket is closed and fully secure before placing in the air fryer.
4. Align the side of the basket with the slot on the left inside of the air fryer.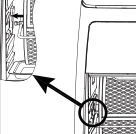
5. Slide the other side of the basket along the track on the right inside of the air fryer until it is seated.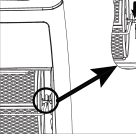
6. Do not allow foods to touch the heating coil.
7. Close the air fryer door.
To remove the basket from air fryer chamber:
1. Use caution when opening the air fryer door; the door and basket will be hot.
2. Position the retrieval tool lift hooks beneath the left and right arms of the basket inside the unit.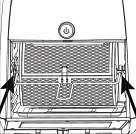
3. With the lift hooks in place, push the basket with the hooks to the right to release the basket.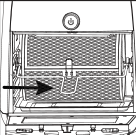
4. Carefully lift up and out with two hands to remove from the cooking chamber.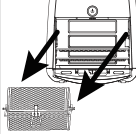
Rotisserie Set (includes spit, 2 forks, and 2 tightening screw sets)
WARNING: Always place the rotisserie set with food on it into cooking chamber before beginning a cooking cycle. Always use the retrieval tool and oven mitts when removing the rotisserie set.
To place food on the spit and forks:
1. Unscrew tightening screws.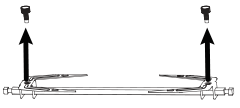
2. Remove the forks from the spit.
3. Push the food onto the spit.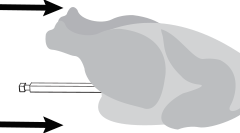
4. Slide the forks onto both ends of the spit with the prongs facing inward.
Ensure that the prongs are inserted into the food item.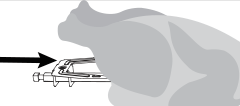
5. Tighten the screw sets to securethe forks.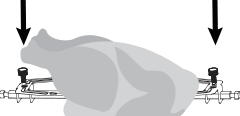
To insert into the cooking chamber:
1. Align the side of the spit with the slot on the left inside of the air fryer.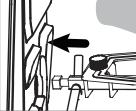
2. Slide the other side of the spit along the track on the right inside of the air fryer until it is seated. Do not allow food to touch the heating coil.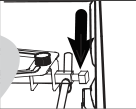
3. Close the air fryer door.
To remove food from the air fryer cooking chamber:
1. Use caution when opening the air fryer door. The door and rotisserie set will be hot.
2. Position the retrieval tool lift hooks beneath the left and right arms of the rotisserie.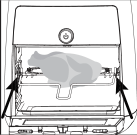
3. With the lift hooks in place, push the rotisserie to the right with the retrieval tool to release.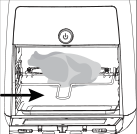
4. Carefully lift up and out with two hands to remove from the cooking chamber.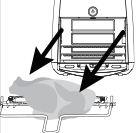
PREPARING TO COOK
1. Plug the cord into a 120V power source. Be sure the outlet is designated for the air fryer and has nothing else plugged into it.
2. Open the air fryer door and place the drip tray on the bottom of the cooking chamber. Be sure the center of the drip tray is raised.
3. Place the food in the desired air fryer accessory.
4. Place the accessory in the air fryer.
5. Turn the wheel to the desired setting and press the wheel to start.
HOW TO USE THE CUSTOM SETTING
1. The air fryer will default to the standby mode. You will see the display light up with 6 blinking center lines. Ensure the product is plugged into its own dedicated outlet.
2. Place the accessory into the chamber and close the door.
3. Press the Custom button.
4. The time will blink 0:15 minutes and 350°F (180°C) will be solidly displayed.
Turn the wheel to adjust the time in 1-minute intervals. Once the desired time is displayed, press the wheel to select. You will hear 1 beep.
5. The temperature (350°F/180°C) will now blink. Turn the wheel to adjust the temperature in 5°F (5°C) intervals. Once the desired temperature is displayed, press the wheel to select. You will hear 3 long beeps.
6. Halfway through cooking, there will be a series of beeps. This indicates that the cooking trays should be switched for even cooking.
7. The time will start to countdown. Once the time runs out, “End” will display and you will hear 3 beeps.
8. Press Cancel or open the door to return to standby mode.
HOW TO USE PRESETS
1. The air fryer will default to standby mode. When plugged into a 120V power source, you will see the display light up with 6 blinking center lines. Ensure the product is plugged into its own dedicated outlet.
2. Place the desired accessory into the chamber and close the door.
3. Turn the wheel to select a setting (see the chart below). Once the blue light is next to the desired setting, press the wheel and you’ll hear 1 beep. When using a preset (except Dehydrate, see instructions below), you can adjust the time but not the temperature. If you would like to adjust the temperature, use the Custom setting. See How to Use the Custom Setting.
4. On the display, the time will blink and the temperature will remain solidly lit. Adjust the time by turning the wheel if needed. Once the time needed is displayed, press the wheel. You will hear 3 long beeps and the countdown will begin.
• For Dehydrate: After you select the time, you will see the time remain solidly lit and the temperature blink. Turn the wheel to the desired temperature and press to select. You will then hear 3 long beeps and the countdown will begin.
5. Halfway through cooking, there will be a series of beeps. This indicates that the cooking trays should be switched for even cooking. After switching the trays, once you close the door, the cooking cycle will continue.
6. If desired, press Rotate if using the basket or rotisserie set. Rotate can be engaged at any time during any setting. If using the Rotisserie setting, these accessories will automatically rotate.
7. Once the countdown ends, you will hear 3 long beeps and “End” will be displayed. The air fryer will turn off and the fan will continue running for 30 seconds.
8. Once the oven door is opened or Cancel is pressed, the air fryer will default to standby mode and show 6 blinking lines.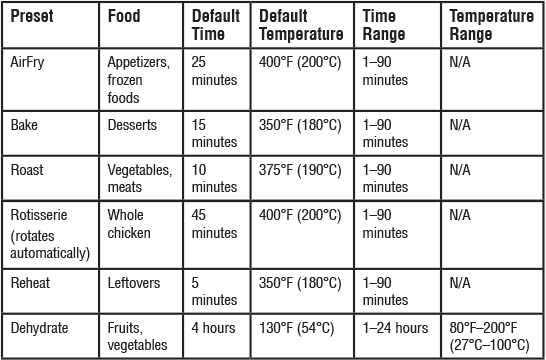
TROUBLE SHOOTING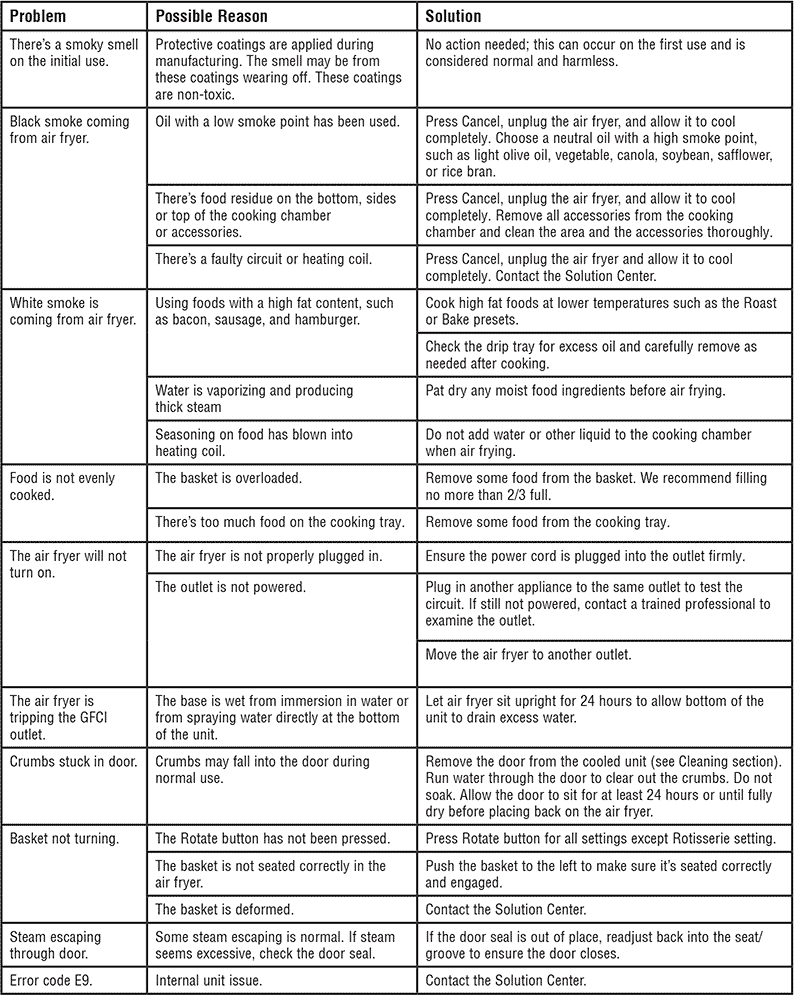
If the problem persists or for any unresolved issues, stop using the product and
contact Solution Center at (888) 687–2433 (United States) or (800) 342–2433
(Canada) for assistance.
GUARANTEE
• One-year guarantee for noncommercial use. Refer to our website or sales receipt
for details.
For information about our products, visit our website. 03/20
© 2020 Pampered Chef used under license. Pampered Chef, Pampered Chef and Spoon design, Spoon design,
and Spoon design are trademarks used under license.Made in China
Use & Care

When using electrical appliances, basic safety precautions should always be followed, including:
1. Please read all instructions. Save these instructions.
2. Do not touch hot surfaces. Use the handles on the bottom of the unit.
3. Do not use the air fryer for anything other than the intended use as outlined in this use and care.
4. This unit is for household use only; it is not intended for commercial use.
5. Do not use outdoors; intended for countertop use only.
6. Do not place the unit on, near, or inside an external heat source (Ex. on a hot gas or electric burner or in a heated oven).
7. Only use accessories that are sold by Pampered Chef and are recommended for use with this unit. Do not use the accessories with, or in, other appliances like an oven, microwave, stovetop, grill, or refrigerator, as this may cause deformations in the product which can negatively affect performance of the unit.
8. The use of non-Pampered Chef or non-approved accessories may cause injuries or damage to the unit. Any accessory that has been damaged in any manner should not be used.
9. Close supervision is necessary when any appliance is used by or near children.
10. Keep out of the reach of children and individuals whose physical, sensory, or mental abilities may prevent safe use of this product.
11. To protect against electrical shock, do not immerse or operate the unit, cord, orplugs in water or other liquids.
12. Do not put liquid of any kind into the cooking chamber.
13. Unplug when not in use. Allow the air fryer to cool completely before adding or removing parts or accessories, and before cleaning by hand. To unplug, grasp the plug and pull from the outlet; never pull from the power cord.
14. Proper maintenance is recommended after each use. Refer to the Cleaning section. After each use, let the air fryer cool completely before removing grease or other debris, cleaning, and storing.
15. Avoid contact with moving parts such as the rotisserie set, basket, trays, or door when hot.
16. Do not operate the unit if any part of the product is damaged or if the unit malfunctions in any manner. Call the Solution Center at (888) 687-2433 (United States) or (800) 342-2433 (Canada) for assistance.
17. Do not let the cord hang over the edge of a countertop. Do not let the cord touch hot surfaces.
18. Extreme caution must be used when handling this unit, especially if the air fryer or its contents are hot. Spilling of hot contents could result in burns or injuries.
19. Use the retrieval tool to remove the basket or rotisserie set, as they will be hot.
20. Use caution when opening the air fryer door. Keep your face away from air fryer and do not touch hot surfaces. Always use oven mitts when interacting with the unit.
21. Use caution when pouring or removing hot contents from the air fryer, including the basket and rotisserie set.
22. Do not fill the basket more than two-thirds full. Overfilling may cause food to come in contact with the heating coil, which may result in fire and/or personal injury.
23. Never cover the air vents. Doing so will prevent even cooking, and cause overheating and damage to the air fryer.
24. Never pour oil into the cooking chamber. Thermal events and personal injuries could result. This unit is not intended for deep frying foods.
25. When in use, the internal temperature of the air fryer reaches several hundred degrees. To avoid personal injury, never place unprotected hands inside the unit until it has cooled completely.
26. When in use, do not place the air fryer against a wall or against other appliances. Leave at least 6" (15 cm) of free space on the back, sides, and above the air fryer. Do not operate the unit on or near combustible materials such as tablecloths and curtains. Do not place anything on top of the air fryer.
27. When in operation, hot air is released through the air vents. Keep your hands and face away from the air vents and take extreme caution when removing items from the air fryer.
28. Should the unit emit black smoke, press Cancel and unplug immediately. Wait until it stops smoking before opening the door. Then clean thoroughly.
29. Do not leave the air fryer unattended while in use.
30. Never connect this unit to an external timer switch or separate remotecontrolsystem.
31. Use extreme caution when removing hot accessories from the cooking chamber.
32. Oversized foods and/or non-approved metal utensils must not be inserted into the cooking chamber as they may cause risk of fire and/or personal injury. Oversized foods are those that touch the internal surfaces of the air fryer.
33. Do not store anything other than the accessories included with this unit in the cooking chamber when not in use.
34. Do not place any combustible materials in the cooking chamber, such as paper, cardboard, plastic, Styrofoam, or wood.
35. The included accessories are not to be used in a microwave, toaster oven, convection or conventional oven, nor on a ceramic, electric, induction or gas cooktop, or an outdoor grill.
36. Do not cover or wrap any air fryer accessory or food with metal foil.
37. Always use the drip tray when using the air fryer.
38. Place the basket, cooking tray(s), or rotisserie set in the cooking chamber before starting a cooking cycle.
39. Close the door immediately after using. Never leave the door open after use.
See operating instructions on the following pages.
PLEASE READ ALL INSTRUCTIONS THOROUGHLY. SAVE THESE INSTRUCTIONS
• Hot contents can cause serious burns or scalds in less than one second.
• Do not touch hot surfaces without using appropriate heat-resistant hand protection (Ex. oven mitts and pot holders).
• Do not touch the door window while the unit is on or after use. The air fryer will be hot.
• Certain exterior surfaces of the unit may remain hot after cooking. Do not touch these areas without using appropriate heat-resistant protection until the unit has cooled completely.
• Position the air fryer away from any overhangs, walls, and table or countertop edges.
• Do not move the air fryer while in use.
• Never cover the air vents.
• Always use the retrieval tool to remove the basket or rotisserie set as they will be hot.
• Keep the cord away from children.
• A short power-supply cord is used to reduce the risk of it being grabbed by children, becoming entangled, or getting tripped over. For child safety, never drape the cord over the edge of a counter. Never use an outlet below a counter or with an extension cord.
• Other than approved accessories, do not leave or store anything, such as baking pans and kitchen utensils, in the air fryer (even when not in use) as this will damage interior components when starting the unit and ma cause injury.
• Do not operate the unit on an unstable surface.
• Never operate the unit on or near flammable materials such as newspapers or paper plates.
• Do not operate the air fryer adjacent to or inside sinks and other sources of water.
• Do not put foreign objects into any gaps and crevices of the unit. This may cause an electric shock or a thermal event which could result in death or serious injury.
• Always place hot contents on a trivet or a cooling rack after cooking.
• Failure to abide by these specific instructions may cause electrical shock or a thermal event, and could lead to death or serious injury:
• Only use with accessories that are sold by Pampered Chef and are recommended for use with this unit.
• Always unplug when not in use.
• Do not use anything other than a 120V–60Hz power outlet.
• Do not immerse, submerge, or sprinkle the unit with liquids.
• Do not attempt to modify the plug in any way.
• If the plug fits loosely into the outlet, or if the outlet feels warm, do not use that outlet.
• Do not insert or remove the plug with wet hands. In order to avoid injuries due to electric shock, make sure your hands are dry before plugging and unplugging the unit.
• Do not plug into a power strip or an outlet with another appliance. This unit should be used with a dedicated outlet. A grounded socket of more than 15A rated current must be used alone.
• This unit has a polarized plug (one blade is wider than the other). To reduce the risk of electric shock, this plug is intended to fit into a polarized outlet only one way. If the plug does not fit fully into the
outlet, reverse the plug. If it still does not fit, contact a qualified electrician. Do not attempt to modify the plug in any way.
• Persons with pacemakers or users of hearing aids or cochlear implants should consult with authorized medical personnel before use. Refer to the instructions of medical equipment providers.
• Before moving the air fryer, ensure it’s not in use, it’s at room temperature, and the door is closed.
• Do not use excessive force with this unit. It could damage the unit or injure the user.
• Never remove the door to clean while the heat is on. Allow the unit to cool completely before cleaning.
• Do not store the unit in direct sunlight.
• When cooking in high-altitude areas, adjust the cooking time/temp as needed.
• Do not remove, bend, or stretch the silicone door seal, as this may cause the unit to malfunction.
PARTS
A. Air Fryer unit
B. Door
C. Drip tray
D. Cooking trays (2)
E. Basket
F. Rotisserie set (includes spit, 2 forks, and 2 tightening screw sets)
G. Retrieval tool
H. Removable Shield
1. Display
• Shows the cooking time, cooking temperature, and standby mode.
2. Custom Button
• Lets you manually select the cooking time and temperature.
3. Cancel Button
• Cancels any operation at any time while the air fryer is in use. The air fryer will go into standby mode and the display will have 6 center lines blinking.
4. Rotate Button
• Press when using the basket or rotisserie set accessories. (When using the Rotisserie setting, the accessories will automatically rotate.)
5. Light Button
• Press the Light button to turn on the light inside air fryer. Press again to turn the light off.
Note: The Light button will not work when the air fryer is in standby mode.
6. Wheel
• Turn the wheel to change settings, cook time, or temperature. Press the wheel to start or pause an operation.
7. Rotate Icon
• When the rotisserie is spinning, the rotate icon will be lit.
8. Heat Icon
• Anytime the heating coil is on, the heat icon will be lit.
9. Fan Icon
• The fan will automatically run during and after cooking cycles. While running, the fan icon will be lit.
10. Light Icon
• Anytime the light is on in the air fryer, the light icon will be lit. Once a program is done, the light will turn off.
CLEANING
• Unplug the air fryer and allow all parts of the unit and accessories to cool completely before cleaning.
• Clean the unit and accessories before using the first time and after each use.
• To clean the inside of the unit, use a damp cloth to ensure the heating coil, chamber walls, and all other areas inside are free of grease and food debris. Use a nonabrasive sponge to remove stubborn grease residue. After cleaning, wipe the interior with a nonabrasive dry cloth to ensure the air fryer is dry.
• To clean the outside, wipe clean with a nonabrasive damp cloth.
• To clean the door, wipe clean with a nonabrasive damp cloth. Do not submerge in water or machine wash. To remove the door, open fully and push the tabs in, then lift away at the hinges. After cleaning, make sure the door is completely dry before placing back on the unit.
• The drip tray is hand-wash only.
• The removable shield, cooking trays, basket, rotisserie set, and retrieval tool are dishwasher-safe when placed away from the heating element.
• To remove baked-on grease and food residue from the accessories and the cooking chamber, spray with a mixture of equal parts baking soda and vinegar and wipe clean with a damp cloth. For stubborn stains, allow the mixture to sit on the affected area for several minutes before scrubbing clean with a nonabrasive sponge.
Before first use:
1. Remove all packaging in and around the air fryer.
2. Read through this document.
3. Clean each part per cleaning instructions.
4. Read the Important Safeguards in this use and care manual before using the air fryer. Failure to read and follow Important Safeguards may result in damage to the unit, damage to property, or personal injury.
Before each use:
• Inspect the interior of the air fryer to ensure it’s clean and free of food and grease residue.
• Ensure there are no foreign objects in the air fryer.
• Place on a stable, level surface, away from combustible material and external heat sources. Leave at least 6" (15 cm) of space around the air fryer.
• Properly close the air fryer door by ensuring the door is flush with the rest of the unit. If the door is not shut or attached properly, the interior light will remain on. The light should not turn on unless the door is open or the Light button is engaged.
• Do not place anything on top of the air fryer.
• Do not block the air vents.
1. Plug the cord into a 120V power source. Be sure the outlet is designated for just the air fryer and has nothing else plugged into it. Six blinking centerlines indicate the air fryer is on and in standby mode.
2. The unit defaults to Fahrenheit. To switch to Celsius, turn the wheel to Air Fry. Press and hold the Light and Cancel buttons at the same time for 3 seconds. Repeat to switch back to Fahrenheit.
3. Open the air fryer door and place the drip tray on the bottom of the cooking chamber. Close the door. For this test run, do not add food to the chamber.
4. Turn the wheel until the Reheat indicator is lit. Press the wheel and you will hear 1 beep. The time will blink and the temperature will be solidly lit. Turn the wheel
counterclockwise to set the time for 3 minutes. Press the wheel. You will hear three beeps, the time will be solidly displayed, and the countdown begins. Halfway through the cycle, you’ll hear a series of beeps reminding you to switch the cooking trays when cooking.
5. When time ends, you will hear 3 beeps and “End” will be displayed. The heat will turn off and the fan will remain on for 30 seconds to help cool the unit down.
WARNING: The air fryer will be hot during and after cooking. Do not touch hot surfaces. Always use oven mitts to remove all contents (accessories and food). Allow the air fryer to cool completely before cleaning the accessories and cooking chamber. See the Cleaning section for further instructions.
HOW TO INSERT AND REMOVE ACCESSORIES
WARNING: All accessories will be hot during and after cooking. Always use the retrieval tool to remove the rotisserie set and basket. Allow to cool slightly and exercise extreme caution when removing
hot accessories from the cooking chamber. Always use oven mitts when disassembling or retrieving hot accessories.
CAUTION: Ensure food is able to rotate freely. Do not allow foods to touch the heating coil or sides.
Trays
WARNING: Always place the trays into the cooking chamber before beginning a cooking cycle.
• Drip tray: Place the drip tray in the bottom of air fryer cooking chamber prior to each use. Use caution when handling if it’s hot.
• Cooking trays (2): Align the cooking trays with the slots on the inside of the air fryer. Push the cooking trays back until they are fully seated in the air fryer.
• Removable shield: Align the removable shield with the top of the slots on the inside of the air fryer. The removable shield is intended to separate the cooking chamber from the heating coil. The removable shield is NOT intended to be used as a cooking tray.
Basket
WARNING: Always fill the basket before placing into the cooking chamber and before beginning a cooking cycle in the air fryer. Always use the retrieval tool and oven mitts when removing the basket.
To place the basket into the air fryer cooking chamber:
1. Place the food items into the basket; make sure not to overfill.
2. Align the tab on the basket with the notch on the side and then close the basket.
3. Make sure the basket is closed and fully secure before placing in the air fryer.
4. Align the side of the basket with the slot on the left inside of the air fryer.
5. Slide the other side of the basket along the track on the right inside of the air fryer until it is seated.
6. Do not allow foods to touch the heating coil.
7. Close the air fryer door.
To remove the basket from air fryer chamber:
1. Use caution when opening the air fryer door; the door and basket will be hot.
2. Position the retrieval tool lift hooks beneath the left and right arms of the basket inside the unit.
3. With the lift hooks in place, push the basket with the hooks to the right to release the basket.
4. Carefully lift up and out with two hands to remove from the cooking chamber.
Rotisserie Set (includes spit, 2 forks, and 2 tightening screw sets)
WARNING: Always place the rotisserie set with food on it into cooking chamber before beginning a cooking cycle. Always use the retrieval tool and oven mitts when removing the rotisserie set.
To place food on the spit and forks:
1. Unscrew tightening screws.
2. Remove the forks from the spit.
3. Push the food onto the spit.
4. Slide the forks onto both ends of the spit with the prongs facing inward.
Ensure that the prongs are inserted into the food item.
5. Tighten the screw sets to securethe forks.
To insert into the cooking chamber:
1. Align the side of the spit with the slot on the left inside of the air fryer.
2. Slide the other side of the spit along the track on the right inside of the air fryer until it is seated. Do not allow food to touch the heating coil.
3. Close the air fryer door.
To remove food from the air fryer cooking chamber:
1. Use caution when opening the air fryer door. The door and rotisserie set will be hot.
2. Position the retrieval tool lift hooks beneath the left and right arms of the rotisserie.
3. With the lift hooks in place, push the rotisserie to the right with the retrieval tool to release.
4. Carefully lift up and out with two hands to remove from the cooking chamber.
PREPARING TO COOK
1. Plug the cord into a 120V power source. Be sure the outlet is designated for the air fryer and has nothing else plugged into it.
2. Open the air fryer door and place the drip tray on the bottom of the cooking chamber. Be sure the center of the drip tray is raised.
3. Place the food in the desired air fryer accessory.
4. Place the accessory in the air fryer.
5. Turn the wheel to the desired setting and press the wheel to start.
HOW TO USE THE CUSTOM SETTING
1. The air fryer will default to the standby mode. You will see the display light up with 6 blinking center lines. Ensure the product is plugged into its own dedicated outlet.
2. Place the accessory into the chamber and close the door.
3. Press the Custom button.
4. The time will blink 0:15 minutes and 350°F (180°C) will be solidly displayed.
Turn the wheel to adjust the time in 1-minute intervals. Once the desired time is displayed, press the wheel to select. You will hear 1 beep.
5. The temperature (350°F/180°C) will now blink. Turn the wheel to adjust the temperature in 5°F (5°C) intervals. Once the desired temperature is displayed, press the wheel to select. You will hear 3 long beeps.
6. Halfway through cooking, there will be a series of beeps. This indicates that the cooking trays should be switched for even cooking.
7. The time will start to countdown. Once the time runs out, “End” will display and you will hear 3 beeps.
8. Press Cancel or open the door to return to standby mode.
HOW TO USE PRESETS
1. The air fryer will default to standby mode. When plugged into a 120V power source, you will see the display light up with 6 blinking center lines. Ensure the product is plugged into its own dedicated outlet.
2. Place the desired accessory into the chamber and close the door.
3. Turn the wheel to select a setting (see the chart below). Once the blue light is next to the desired setting, press the wheel and you’ll hear 1 beep. When using a preset (except Dehydrate, see instructions below), you can adjust the time but not the temperature. If you would like to adjust the temperature, use the Custom setting. See How to Use the Custom Setting.
4. On the display, the time will blink and the temperature will remain solidly lit. Adjust the time by turning the wheel if needed. Once the time needed is displayed, press the wheel. You will hear 3 long beeps and the countdown will begin.
• For Dehydrate: After you select the time, you will see the time remain solidly lit and the temperature blink. Turn the wheel to the desired temperature and press to select. You will then hear 3 long beeps and the countdown will begin.
5. Halfway through cooking, there will be a series of beeps. This indicates that the cooking trays should be switched for even cooking. After switching the trays, once you close the door, the cooking cycle will continue.
6. If desired, press Rotate if using the basket or rotisserie set. Rotate can be engaged at any time during any setting. If using the Rotisserie setting, these accessories will automatically rotate.
7. Once the countdown ends, you will hear 3 long beeps and “End” will be displayed. The air fryer will turn off and the fan will continue running for 30 seconds.
8. Once the oven door is opened or Cancel is pressed, the air fryer will default to standby mode and show 6 blinking lines.
TROUBLE SHOOTING
If the problem persists or for any unresolved issues, stop using the product and
contact Solution Center at (888) 687–2433 (United States) or (800) 342–2433
(Canada) for assistance.
GUARANTEE
• One-year guarantee for noncommercial use. Refer to our website or sales receipt
for details.
For information about our products, visit our website. 03/20
© 2020 Pampered Chef used under license. Pampered Chef, Pampered Chef and Spoon design, Spoon design,
and Spoon design are trademarks used under license.Made in China


 Canada (en)
 Germany (de)
 Austria (de)
