Digital Kitchen Timer
Set 4 Timers at the Same Time
Instead of running separate cooking times on your oven and microwave our digital timer lets you run four timers at the same time. Just a press of the button switches between timers so you can easily track progress, plus each timer has a different number of beeps when time is up. You can set each timer in seconds, minutes, and hours.
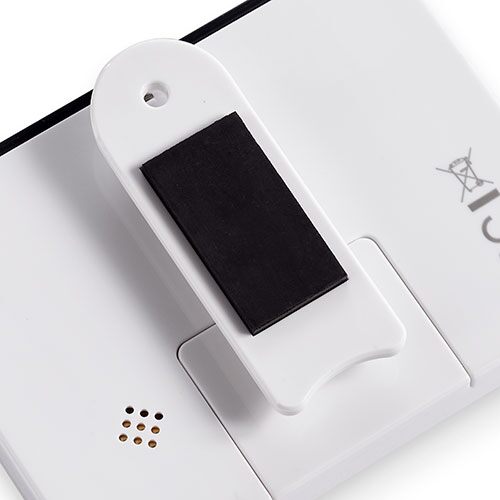
The back of the timer has a magnet so you can place it on your refrigerator or any magnetized surface. It also has a dual function clip and kickstand so you can wear it while on the go or flip open to stand on the counter for easy viewing. The clock can be set to either 12- or 24-hour setting. Just press the Clock button to see what time it is.
Product Details
- Includes one CR2032 (3v) lithium battery
- Wipe clean with a damp cloth and dry thoroughly
- 2½" x 3½" (6 cm x 9 cm)
Guarantee
- Three-year guarantee

-
Use & Care
Use & Care
Use & Care
SAFETY AND USE INSTRUCTIONS
- • Read, understand, and follow all Safety and Use Instructions to avoid injury.
WARNING
- • Adult supervision is required when using around children or persons with lack of experience and knowledge.
- • Keep out of the reach of children.
- • Choking hazard: This product contains small parts.
- • This product contains a magnet which may pose risks for persons with pacemakers or users of hearing aids or cochlear implants. Consult authorized medical personnel before use and refer to the instructions of medical equipment providers.
CLEANING
- • Wipe with a damp cloth and dry thoroughly.
USE AND CARE
- • Activate the battery by pulling the protective strip on the back of the display. Discard the protective strip.
- • The magnetic strip on the clip attaches to metal surfaces.
- • The clip can attach to a belt or can flip open as a stand.
DISPLAY
A. Seconds: Set the seconds
B. Minute: Set the minutes
C. Hour: Set the hours
D. Clear: Reset to 0
E. Go-Stop: Start/pause timer
F. Clock: Enter clock setting
G. T1: Enter Timer 1 setting
H. T2: Enter Timer 2 setting
I. T3: Enter Timer 3 setting
J. T4: Enter Timer 4 setting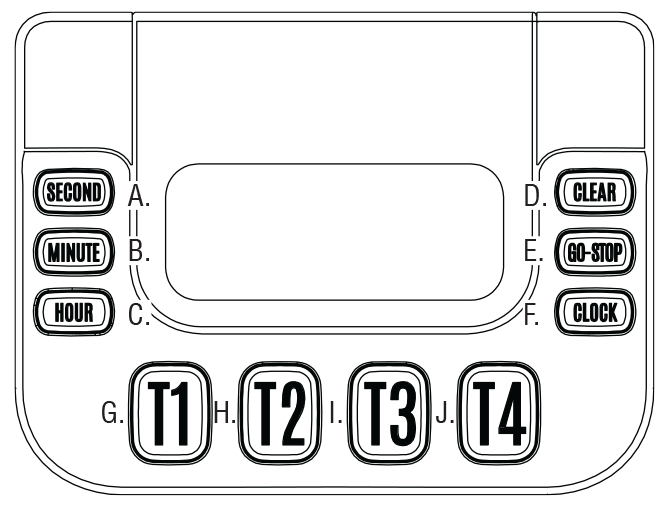
TO SET THE TIMER
- • Press T1 to set Timer 1. T1 will light up on the screen
- • Press the HOUR button to increase in 1-hour increments. Press and hold the HOUR button for 1 second to increase in 5-hour increments. Range: 0–99 hours.
- • Press the MINUTE button to increase in 1-minute increments. Press and hold the MINUTE button for 1 second to increase in 5-minute increments. Range: 0–59 minutes.
- • Press the SECOND button to increase in 1-second increments. Press and hold the SECOND button for 1 second to increase in 10-second increments. Range: 0–59 seconds.
- • Press GO-STOP to start the timer.
- • Pressing GO-STOP while the timer is running will stop the timer. Press GO-STOP to resume the timer. To cancel, press GO-STOP, then press the CLEAR button.
- • Repeat steps for T2, T3, and T4 timers. NOTE: Multiple timers can run at one time. To see each timer while multiple timers are running, press the button of which timer you would like to see. The timer will remain on that setting until another button is pressed.
- • To stop the alarm when it sounds, press GO-STOP. When the alarm sounds, the timer will begin counting back up until GO-STOP is pressed to stop it. This feature keeps track of the amount of time the alarm has been sounding. Note: The alarm only sounds for one minute. At that point, the “counting up” function will continue until GO-STOP has been pressed.
- • Each timer has a different number of beeps to indicate the timer is done: T1 has 1 beep, T2 has 2 beeps, T3 has 3 beeps, and T4 has 4 beeps.
- • Upon pressing GO-STOP to stop the alarm sound, the timing period just completed will appear.
- • To clear the timer, press CLEAR; the time will reset to zero.
TO SET THE CLOCK
- • Press the CLOCK button.
- • Press and hold the CLOCK button for 1 second and HH:MM will flash.
- • Press the HOUR button to increase in 1-hour increments.
- • Press the MINUTE button to increase in 1-minute increments. NOTE: Holding down the MINUTE button will increase in 5-minute increments.
- • Press and hold the CLOCK button for 1 second to exit this setting.
- NOTE: The clock defaults to a 12-hour setting. To change to a 24-hour setting, press and hold the CLOCK and HOUR buttons simultaneously while in the clock setting. AM/PM is displayed in the 12-hour setting, not in the 24-hour setting.
TO REPLACE THE BATTERY
- • Slide the battery cover off and remove the old battery. Insert one CR2032 (3v) lithium battery by sliding the battery under the four plastic prongs to hold it into place.
- • Slide the cover back over the battery into the locking position.
GUARANTEE
- • Three-year guarantee for noncommercial use.
Made in China
Guarantee
Use & Care
SAFETY AND USE INSTRUCTIONS
- • Read, understand, and follow all Safety and Use Instructions to avoid injury.
WARNING
- • Adult supervision is required when using around children or persons with lack of experience and knowledge.
- • Keep out of the reach of children.
- • Choking hazard: This product contains small parts.
- • This product contains a magnet which may pose risks for persons with pacemakers or users of hearing aids or cochlear implants. Consult authorized medical personnel before use and refer to the instructions of medical equipment providers.
CLEANING
- • Wipe with a damp cloth and dry thoroughly.
USE AND CARE
- • Activate the battery by pulling the protective strip on the back of the display. Discard the protective strip.
- • The magnetic strip on the clip attaches to metal surfaces.
- • The clip can attach to a belt or can flip open as a stand.
DISPLAY
A. Seconds: Set the seconds
B. Minute: Set the minutes
C. Hour: Set the hours
D. Clear: Reset to 0
E. Go-Stop: Start/pause timer
F. Clock: Enter clock setting
G. T1: Enter Timer 1 setting
H. T2: Enter Timer 2 setting
I. T3: Enter Timer 3 setting
J. T4: Enter Timer 4 setting
TO SET THE TIMER
- • Press T1 to set Timer 1. T1 will light up on the screen
- • Press the HOUR button to increase in 1-hour increments. Press and hold the HOUR button for 1 second to increase in 5-hour increments. Range: 0–99 hours.
- • Press the MINUTE button to increase in 1-minute increments. Press and hold the MINUTE button for 1 second to increase in 5-minute increments. Range: 0–59 minutes.
- • Press the SECOND button to increase in 1-second increments. Press and hold the SECOND button for 1 second to increase in 10-second increments. Range: 0–59 seconds.
- • Press GO-STOP to start the timer.
- • Pressing GO-STOP while the timer is running will stop the timer. Press GO-STOP to resume the timer. To cancel, press GO-STOP, then press the CLEAR button.
- • Repeat steps for T2, T3, and T4 timers. NOTE: Multiple timers can run at one time. To see each timer while multiple timers are running, press the button of which timer you would like to see. The timer will remain on that setting until another button is pressed.
- • To stop the alarm when it sounds, press GO-STOP. When the alarm sounds, the timer will begin counting back up until GO-STOP is pressed to stop it. This feature keeps track of the amount of time the alarm has been sounding. Note: The alarm only sounds for one minute. At that point, the “counting up” function will continue until GO-STOP has been pressed.
- • Each timer has a different number of beeps to indicate the timer is done: T1 has 1 beep, T2 has 2 beeps, T3 has 3 beeps, and T4 has 4 beeps.
- • Upon pressing GO-STOP to stop the alarm sound, the timing period just completed will appear.
- • To clear the timer, press CLEAR; the time will reset to zero.
TO SET THE CLOCK
- • Press the CLOCK button.
- • Press and hold the CLOCK button for 1 second and HH:MM will flash.
- • Press the HOUR button to increase in 1-hour increments.
- • Press the MINUTE button to increase in 1-minute increments. NOTE: Holding down the MINUTE button will increase in 5-minute increments.
- • Press and hold the CLOCK button for 1 second to exit this setting.
- NOTE: The clock defaults to a 12-hour setting. To change to a 24-hour setting, press and hold the CLOCK and HOUR buttons simultaneously while in the clock setting. AM/PM is displayed in the 12-hour setting, not in the 24-hour setting.
TO REPLACE THE BATTERY
- • Slide the battery cover off and remove the old battery. Insert one CR2032 (3v) lithium battery by sliding the battery under the four plastic prongs to hold it into place.
- • Slide the cover back over the battery into the locking position.
GUARANTEE
- • Three-year guarantee for noncommercial use.
Made in China
Guarantee


 Canada (en)
 Germany (de)
 Austria (de)