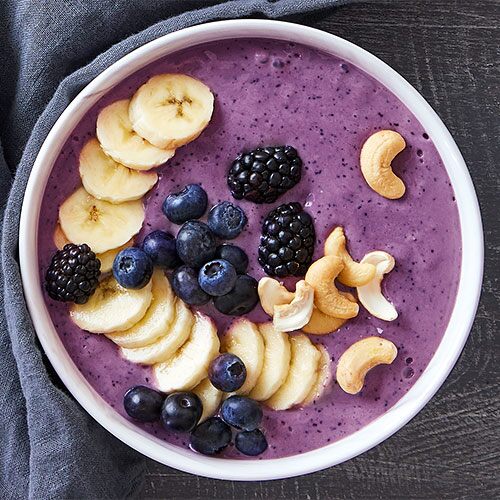
Deluxe Cooking Blender
Best Blender for Smoothies—and Soup!
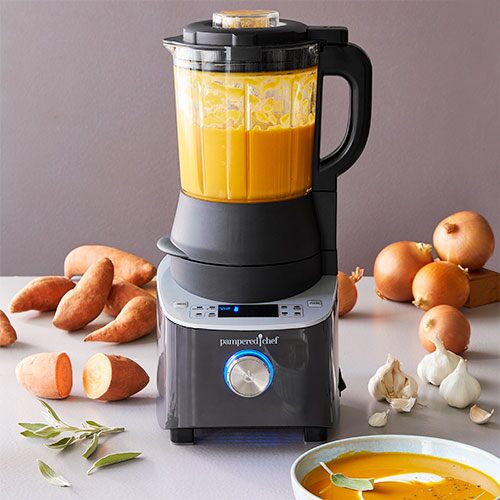
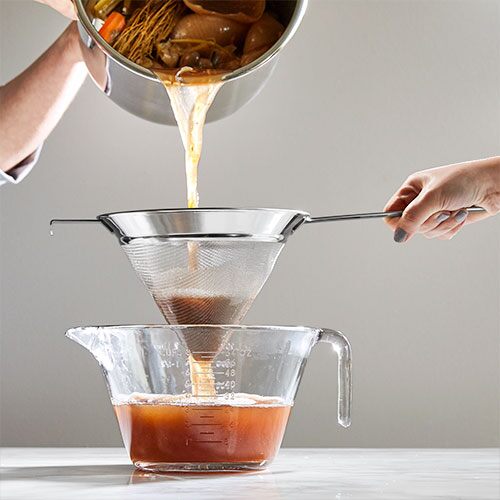
Blenders aren’t just for smoothies anymore. Our innovative blender has settings that heat up to 220˚F (104˚C), which means it doesn’t just blend—it cooks.
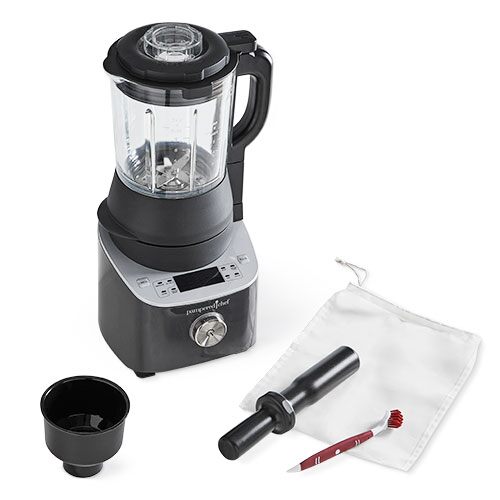
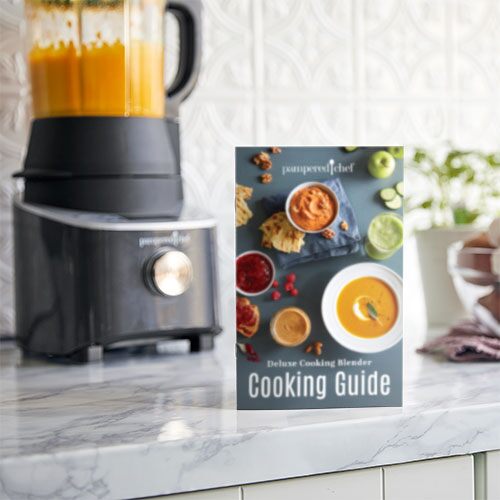
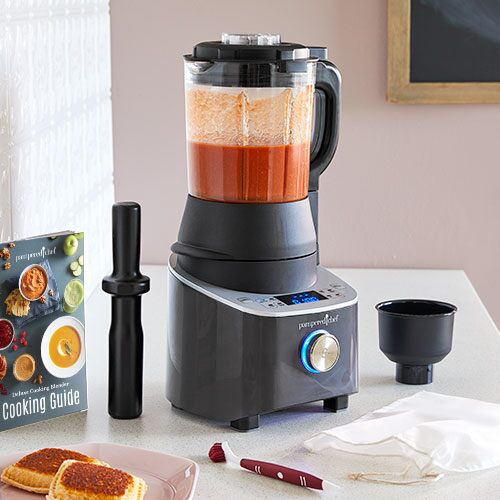
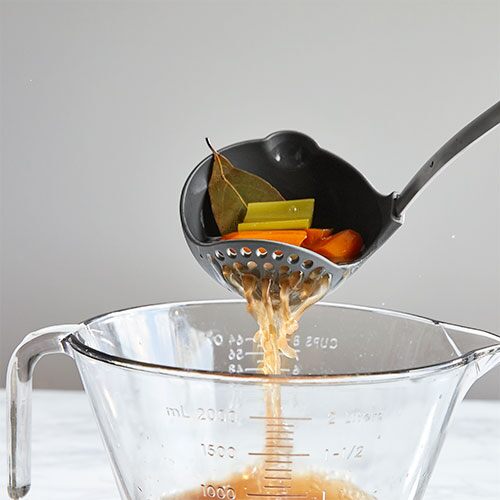
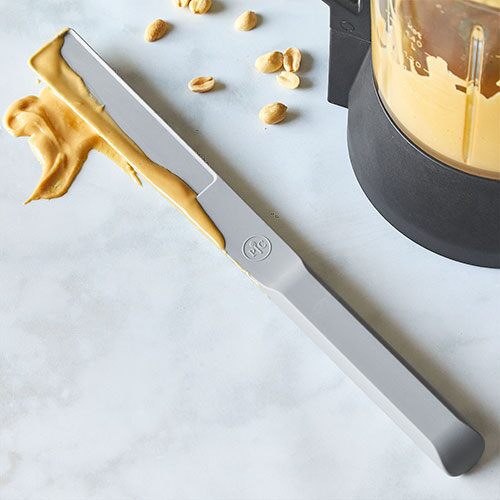
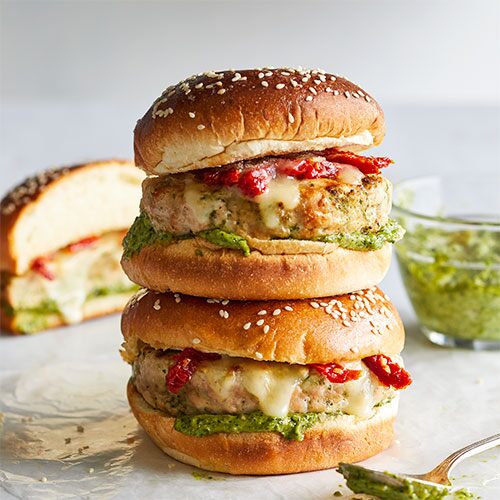
With a cooking blender, you can make everything from smoothies and milkshakes to soups, jams, alternative milks, and nut butters. With eight preprogrammed settings and two custom settings, there’s no guesswork. The pitcher has a 6-cup capacity for hot food and 7-cup capacity for cold food, and comes with a tamper, dual-sided cleaning brush, strainer bag, boil-over guard, and a cooking guide with more than 60 recipes.
Product Details
- 6-cup capacity for hot food.
- 7-cup capacity for cold food.
- Includes: Tamper, Dual-Sided Cleaning Brush, Strainer Bag, Boil-Over Guard, and the Deluxe Cooking Blender Cooking Guide which includes more than 60 recipes.
- 8 preprogrammed settings including: Smoothie, Alt Milk, Grind, Soup, Heated Puree, Sauce, Jam, and Custom Blend.
- 17½" x 9½" x 9¾".
- 2 peak horsepower†
How to Clean
- Use the programmed Heated Wash setting to clean the blender pitcher.
- CAUTION: Do not submerge the base of pitcher in water. This pitcher contains electrical components.
- Lid, vented lid cap, lid gasket, tamper, and boil-over guard are dishwasher-safe on the top rack only.
- Refer to Use & Care for full details.
Warranty
- Three-year guarantee for noncommercial use.
†Peak horsepower refers to the maximum output of a motor achieved in laboratory testing. In actual use, the blender does not operate at the peak horsepower.
Recommended:
-
Use & Care
Use & Care
Use & Care

- Please read all instructions. Save these instructions.
- This unit is for household use, it is not intended for commercial use.
- Do not use outdoors. Intended for countertop use only.
- Do not place the unit on, near, or inside an external heat source. (Ex. hot gas or electric burner and a heated oven.)
- Only use the pitcher provided with this product. Do not use the pitcher with or in other appliances. (Ex. oven, microwave, stovetop, grill, refrigerator, or dishwasher), as this may cause deformations, which can negatively affect future performance of the unit.
- Keep out of the reach of children and individuals whose physical, sensory, or mental abilities may prevent safe use of the product.
- To protect against electrical shock, do not immerse or operate the unit, cord, or plugs in water or other liquid.
- Unplug from outlet when not in use and before cleaning by hand.
- Prior to cleaning by hand, allow the product to come to room temperature and the blade to come to a stop before putting on or taking off the lid, vented lid cap, or pitcher.
- Do not operate the unit if any part of the base, lid, pitcher, or plug is damaged or if the unit malfunctions or has been damaged in any manner. Call the Solution Center at (888) 687-2433 (United States) or (800) 342-2433 (Canada) for assistance.
- Only use accessories that are sold by Pampered Chef and are recommended for use with this unit. The use of accessory attachments not sold or recommended by Pampered Chef may cause injuries. Any accessory that has been damaged in any manner should not be used.
- Do not let cord hang over edge of a countertop.
- Do not let the core touch hot surfaces.
- Do not use the product for anything other than the intended use as outlined in this use and care.
- Extreme caution must be used when handling this unit, especially if it contains hot contents. Spilling or splashing of hot contents could result in burn injuries.
- To disconnect, flip the on/off switch to off. After turning the appliance off, unplug from the outlet when not in use before assembling or disassembling parts and before cleaning by hand. To unplug, grasp the plug and pull from the outlet. Never pull from the power cord.
- Use the pitcher handle and helper handle when lifting the pitcher as glass may be hot.
- When opening the lid and the vented lid cap, lift them away from your body to release the steam away from you.
- Use caution when pouring hot contents into vessels or drains as not all foods are drain appropriate.
- When making nut butters or oil-based foods, do not run the blender for more than 1 minute after the mixture turns into a paste in the pitcher. Processing for longer periods can cause motor overheating.
PLEASE READ ALL INSTRUCTIONS THOROUGHLY

- Hot contents can cause serious burns. Content temperatures can cause serious scalds in less than 1 second.
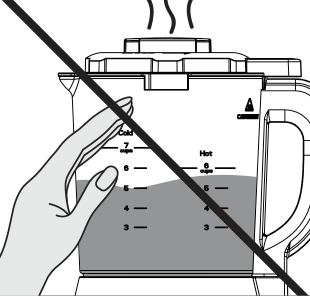
- Do not touch hot surfaces without appropriate heat-resistant hand protection (Ex. oven mitt and pot holder) on.
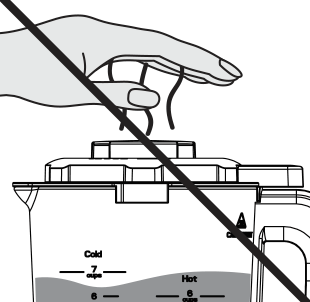
- When blending hot liquids or ingredients use caution and stand away from the blender, as hot steam or splashing liquids may come out of the lid opening.
- During use, keep hands and exposed skin away from spraying or escaping steam from the lid openings, as this may cause scalding and burns.
- When using a heated setting, always keep the vented lid cap in place. Do not cover with a cloth or other item.
- After use, remove the lid away from your body to allow steam to escape away from your face.
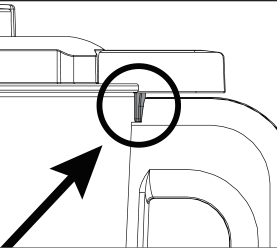
- Inspect the lid safety switch on the handle for any food or debris that may be caught and could interfere with the operation of the switch. If the switch is not operating properly, this may cause serious product damage or injury. You will hear a click when the safety switch is engaged.
- The pitcher is heavy. Use care when lifting and pouring contents.
- Always start custom blending on a lower speed before turning the speed up to prevent splashing.
- Never fill the unit over the 6-cup (1.4-L) line for hot foods and the 7-cup (1.75-L) line for cold foods. See the "Hot" and "Cold" markers on the pitcher and the illustration on p. 11 for maximum fill lines.
- Position the product away from any overhangs, walls, and table or countertop edges.
- Make sure all lid components are properly assembled and the lid is properly closed before operating. See the Important Before Use section for assembly instructions (p. 10).
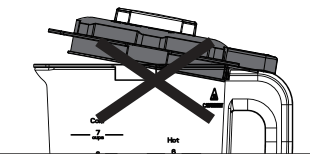
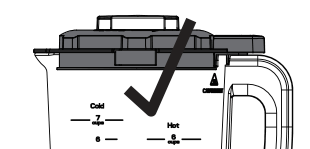
- To properly close the lid, ensure the lid's notches are fully locked onto pitcher's tabs.
- Always operate the product with the lid and vented cap firmly in place. The vented lid cap should only be removed when adding the ingredients during a non-heated setting and before using the tamper. Never remove the vented lid cap while a heated setting is running.
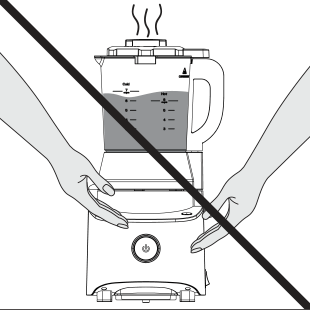
- Do not move this product while it's in use.
- Keep the cord away from children.
- A short power-supply cord is used to reduce the risk of it being grabbed by children, becoming entangled, or getting tripped over. For child safety, never drape the cord over the edge of a counter. Never use the outlet below a counter or with an extension cord.
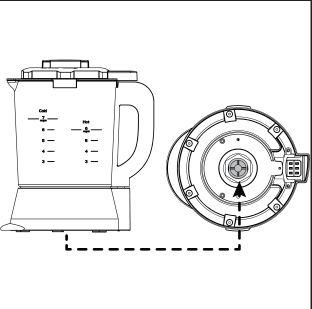
- After use, do not touch the metal nut underneath the pitcher as it may be hot for up to an hour after a blending cycle.
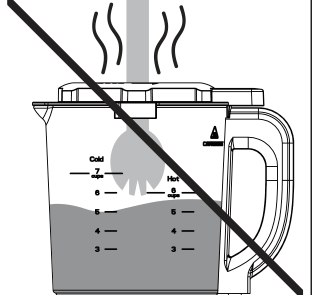
- Keep body parts and unauthorized utensils (Ex. silverware, spatulas, ladles, wooden spoons, etc.) out of the pitcher while blending to reduce the risk of injury to person or damage to the blender.
- The tamper provided is an authorized accessory of this product. This accessory must only be used during a non-heated setting. The tamper provided must be used only when the main part of the lid is in place and the vented lid cap is removed. (See the Tamper Section.)
- The blades are sharp. Avoid contact with moving blades. Do not remove the blade from the pitcher. Use caution when cleaning. Never attempt to operate with damaged blades.
- Do not leave or store anything like spoons, forks, or the vented lid cap in the container (even when not in use) as this will damage the blades and other components when starting the machine and may cause injury.
- Do not deep fy in the product. It is dangerous and may cause a thermal event, serious product damage, or injury.
- Do not operate the product on an unstable surface.
- Never operate the product on or near flammable materials such as newspapers or paper plates.
- Do not operate the product adjacent to or inside of water (Ex. sinks, pools, lakes, etc.).
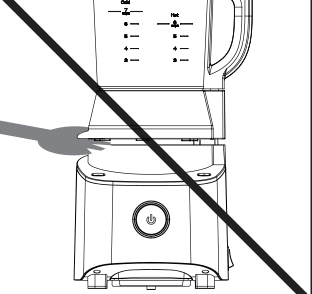
- Do not put foreign objects into gaps and crevices of the unit. This may cause electric shock or a thermal event, which could result in death or serious injury.
ELECTRICAL HAZARDS- Failure to abide by these specific instructions may cause electrical shock or a thermal event and could lead to death or serious injury:
- Only use with the provide removable pitcher.
- Always unplug when not in use.
- Do not use anything other than a 120V–60Hz power outlet.
- Do not immerse, submerge, or sprinkle with liquids.
- Do not attempt to modify the plug in any way.
- If the plug fits loosely into the outlet, or if the outlet feels warm, do not use that outlet.
- Do not insert or remove the plug with wet hands. In order to avoid injuries due to electric shock, make sure hands are dry before plugging and unplugging the unit.
- Do not plug into a power strip or an outlet with another appliance. The product should be used with a dedicated outlet; do not share the outlet with other appliances. A ground socket of more than 15A rated current shall be used alone.
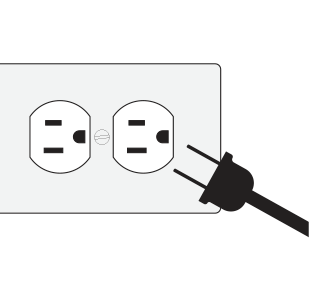
- This unit has a polarized plug (one blade is wider than the other). To reduce the risk of electric shock, this plug is intended to fit into a polarized outlet only one way. If the plug does not fit fully into the outlet, reverse the plug. If it still does not fit, contact a qualified electrician.
- Persons with pacemakers or users of hearing aids of cochlear implants should consult with authorized medical personnel before use. Refer to the instructions of medical equipment providers.

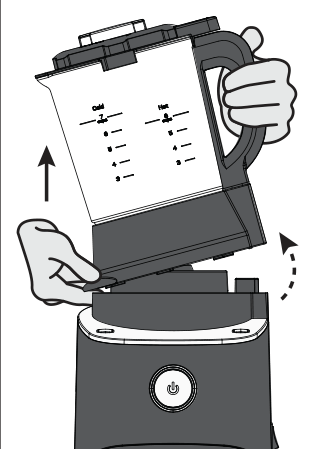
- Before moving the product, ensure the pitcher is cool and the lid is secure. Then, separate the pitcher from the base.
- Do not use excessive force with this product. It could cause damage, break, or injure the user.
- Never remove the pitcher while in a blending or heating cycle.
- Do not store the product in direct sunlight.
- When cooking in high-altitude areas, use the boil-over guard in place of the vented lid cap with heated settings.
PARTS
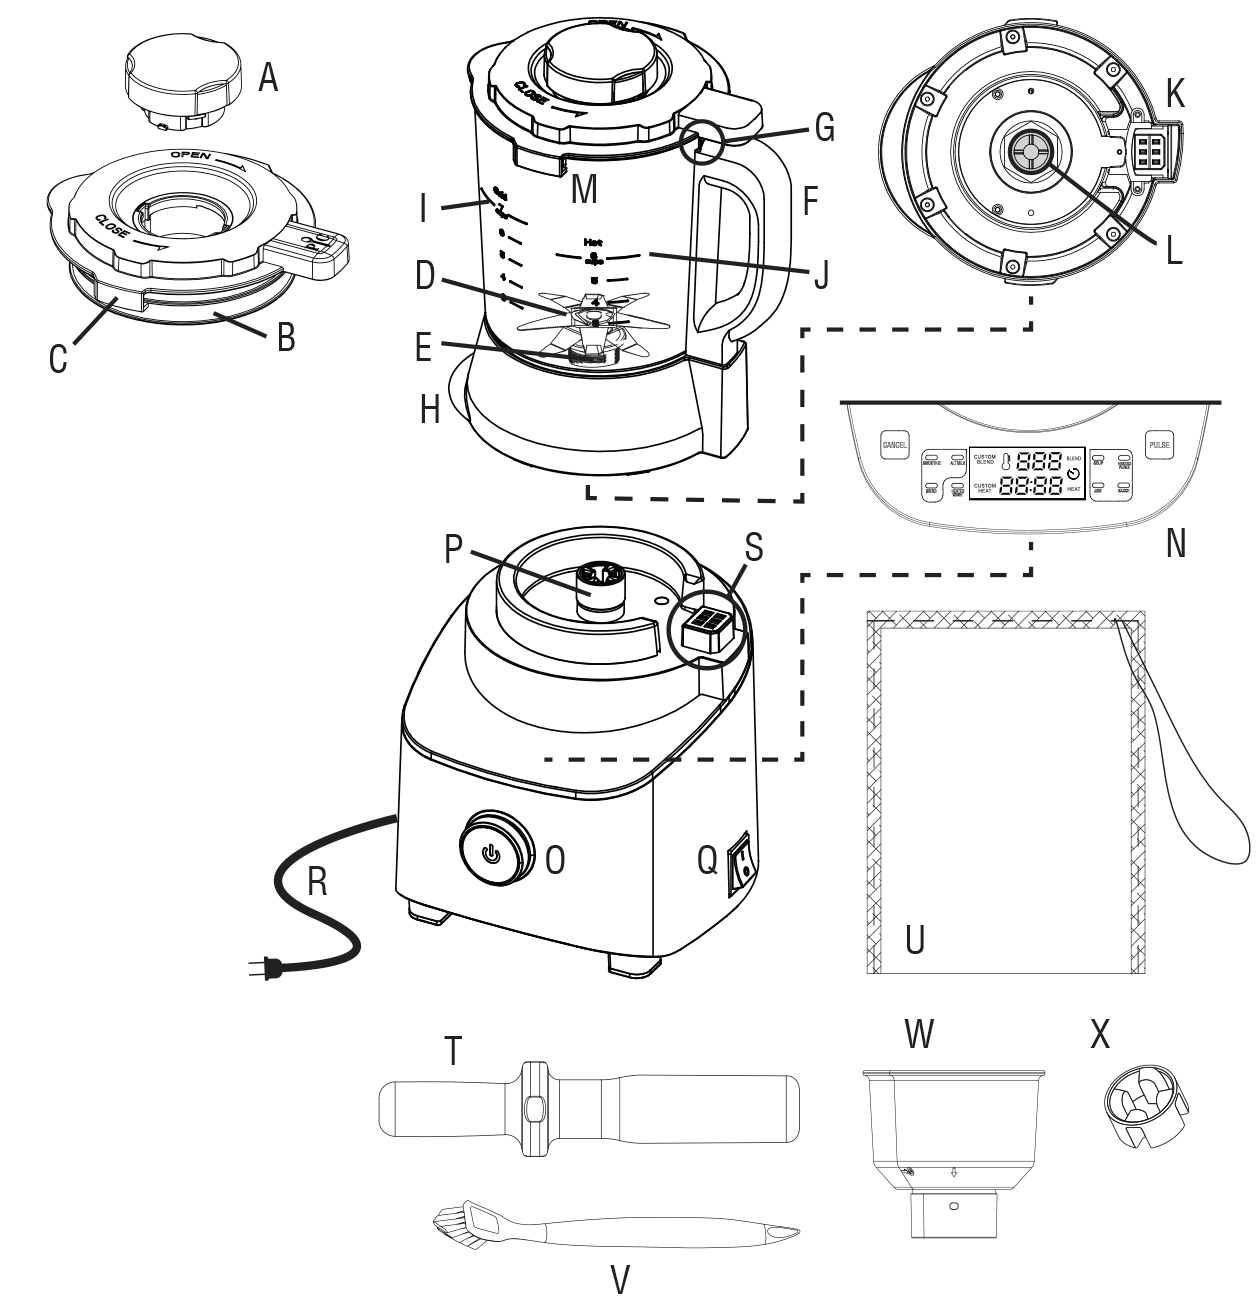
Lid
A. Vented lid cap
B. Lid gasket
C. Lid notches
Pitcher
D. Blade
E. Heating element
F. Pitcher handle
G. Lid safety switch
H. Helper handle
I. Max-fill line (Cold)
J. Max-fill line (Hot)
K. Pitcher electrical interface
L. Metal nut
M. Pitcher tabs
Base
N. LED display
O. Wheel
P. Noise reducing motor plug
Q. On/off switch
R. Electrical cord/plug
S. Base electrical interface
Accessories
T. Tamper
U. Strainer bag
V. Dual-sided cleaning brush
W. Boil-over guard
(Note: Use it for high-altitude cooking.)
X. Noise reducing motor plug replacement
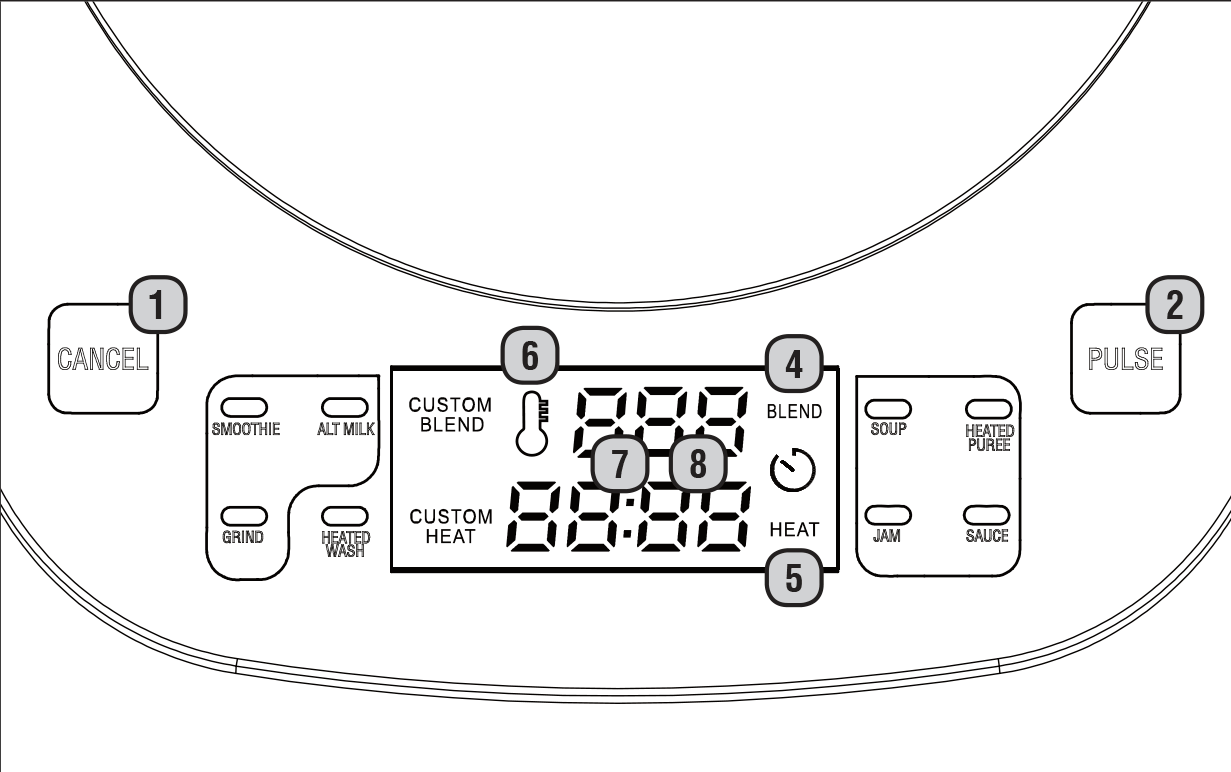
1. Cancel Button
Use the button to cancel any operation at any time while the product is in use and you will be brought to the setting.
2. Pulse Button
Press the button to pulse the ingredients in the setting.
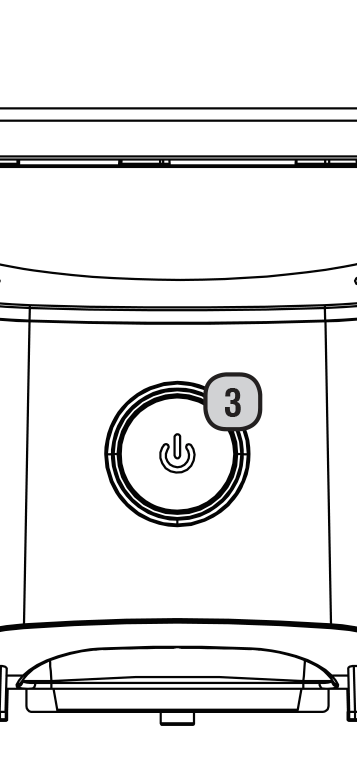
3. Wheel
Rotate the wheel to move through the settings, change the blender speed, change the temperature, or press the wheel to start and pause.
4. Blend Icon
Any time the blades are moving, the icon will be lit.
5. Heat Icon
Any time the heating element is on, the icon will be lit.
6. Thermometer Icon
Any time the temperature reads above 140°F (60°C), the thermometer icon will be lit .
WARNING: When this icon is lit, contents will be hot enough to scald.
7. Speed/Temperature Display
In cold settings, the speed will be displayed. In hot settings, the temperature will be displayed.
To switch from Fahrenheit to Celsius, press and hold both the and buttons at the same time for 3 seconds.
8. Time Display
In the cold setting, the time will automatically display. After the temperature is reached in a hot setting, the time will display.
BLENDER STATUS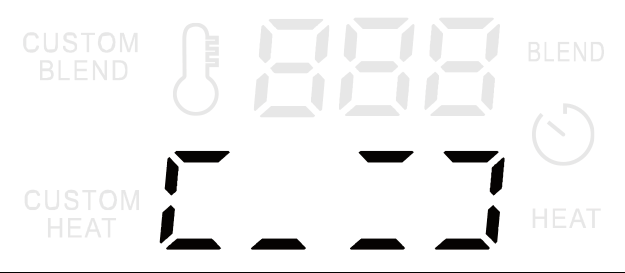
Preheating
While the blender heats up, 12 dashes will show moving in a circular pattern.Pause
If you paused a function, the display screen will blink.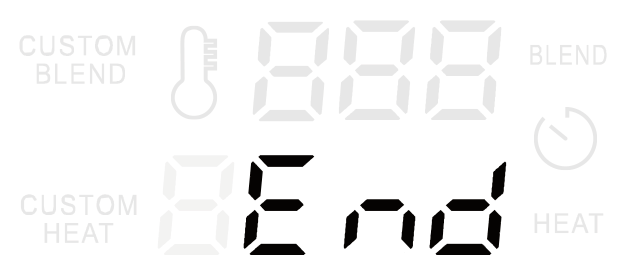
Complete
When a preset or custom function is complete, the LED display will show "End". Hit the Cancel button, remove the lid, or remove the pitcher to return to the Custom Blend setting.CLEANING
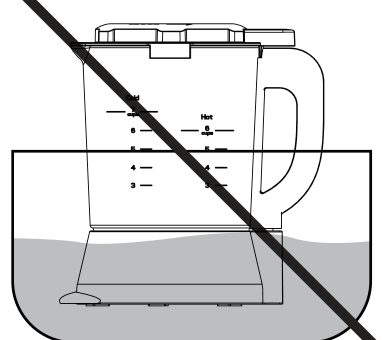
- CAUTION: Do not submerge the base of pitcher in water. This pitcher contains electrical components.
- WARNING: After running the blender's Heated Wash cycle, unplug the power cord and let the product cool completely before storing it as the hot glass pitcher may damage other products.
- WARNING: Use care when cleaning by hand. Blades are sharp and can lead to serious injury.
- Clean before using for the first time and after each use.
- Lid, vented lid cap, lid gasket, tamper, and boil-over guard: Dishwasher-safe on the top rack only.
- Dual-Sided Cleaning Brush: Dishwasher-safe in the utensil basket.
- Strainer bag: Hand wash and air dry.
- Pitcher: Use the blender’s Heated Wash cycle to clean the interior (refer to the Heated Wash cycle in the Initial Test Run section on p. 10). Use a damp cloth to clean the exterior.
- To deep clean: Minerals in water may deposit at the bottom of the pitcher. Periodic deep cleaning will ensure the longevity of the blender.
- Add 1 cup (250 mL/8 oz.) of white vinegar or citric acid like lemon juice and 1 cup (250 mL/8 oz.) of warm water to the pitcher.
- Allow the solution to sit for at least 1 hour.
- Empty the solution from the pitcher and rinse with warm, clear water.
- For stubborn stains, unplug the blender and add 1 cup (250 mL/8 oz.) of white vinegar to the pitcher, then scrub with a sponge. Repeat this process as necessary.
- For residue on the bottom of the pitcher, use a soft bristle brush to clean.
- NOTE: Blades are not meant to be removed. Do not attempt to disassemble.
- To deep clean: Minerals in water may deposit at the bottom of the pitcher. Periodic deep cleaning will ensure the longevity of the blender.
- Base: Wipe clean with a damp cloth.
- Make sure to keep liquids away from electrical interface.
- Do not use harsh chemicals, scouring pads, or other abrasive cleaners.
- When the blender is in storage or not in use, do not fold or kink the power cord.
- Make sure the base of the pitcher is dry and clean before placing it on the blender base.
- Do not store foods in the pitcher.
IMPORTANT BEFORE USE
Before first use:
1. Remove all packaging.
2. Read through this document.
3. Clean each part and run the blender on the Heated Wash setting before the first use and after each use. See the Initial Test Run section below for more information.Before each use:

• Inspect the lid, pitcher, base, and plug for any damage. Do not operate if any of these parts are damaged.
WARNING: Inspect the lid safety switch on the handle for any food or debris that may be caught and could interfere with the operation of the switch. If the lid safety switch is not operating properly, this may cause serious product damage or injury.• Ensure there are no foreign objects in the pitcher.
• Ensure the lid gasket is properly oriented on lid.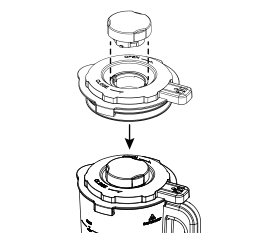
• Properly seat and lock the vented lid cap into the lid. • Properly close the lid by ensuring the lid's notches are fully locked onto pitcher's tabs. The blender will not start if the lid is not seated on the pitcher correctly. See troubleshooting if "Lid" appears and the lid or pitcher is not place properly.
INITIAL TEST RUNBefore using for the first time, we recommend running the heated wash cycle to clean the pitcher and lid. This also helps you become familiar with the product and ensure it is working properly. The heated wash cycle will take an average of 5–10 minutes to complete.
- Place the pitcher on the base with the handle positioned to the right.
- Plug in the blender. Turn on the blender with the on/off switch on the right side of the unit. You will see the LED display light up. Ensure the product is plugged into its own dedicated outlet.
- Fill the pitcher with 3 cups (750 mL) of warm water and 1–2 drops of liquid dish soap or 1 tsp (5 mL) of dishwashing powder.
- Place the lid on the pitcher.
- Vented lid cap: Align the slots on the lid with the tabs on the vented lid cap. Place in and turn counterclockwise to close. Check that the vented lid cap is on the lid completely.
- Lid: Properly close the lid by ensuring the lid’s notches are fully locked onto pitcher’s tabs. The lid’s safety switch prevents the product from starting when the lid is not seated properly on the pitcher. If the lid is not correctly aligned, the blender won’t start and will display “Lid”. You will hear a click when the safety switch is engaged.
- The product will automatically be set to when turned on. Turn the wheel until the blue light is lit above the setting.
- Press the wheel. There will be three slow beeps. The LED display will show the current temperature at the top of the display with 12 dashes moving in a circular pattern below it. This notes that the unit is preheating.
- Once the temperature is reached, the display will show a run time and begin counting down. During the Heated Wash cycle, some bubbles may appear, this is normal and expected. The more concentrated the soap is, the more bubbles it will yield. Bubbles should not spill over the side. If you’re using highly concentrated soap and bubbles start to bubble over, press the wheel to pause the Heated Wash cycle, remove the lid, and add about 1 tsp (5 mL) of vegetable oil to reduce bubbling.
- When blending is complete, three audible beeps will sound. The blender will continue to beep two times every 1 minute until is pressed or the pitcher is removed from the base. Some bubbles may form on top of the lid, that’s OK.
- To remove the pitcher from the base, ensure the lid is secure on the pitcher. When facing the front of the blender, use the pitcher handle to tilt the pitcher slightly to the left and lift away from the base. Discard the soapy water and rinse with clean water.
- Now you're all set to blend!
PREPARING TO COOK
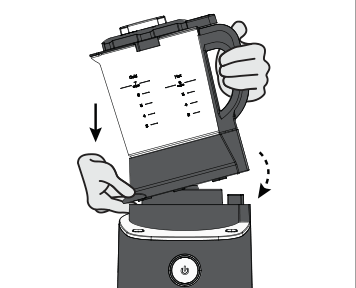
1. Place the pitcher on the base with the handle positioned to the right side. 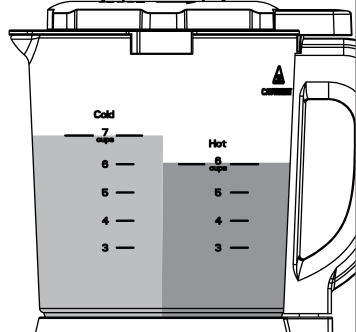
2. Fill the pitcher.
WARNING: The total amount of food or liquid contents should never exceed the 6-cup (1.4-L) line for hot foods and the 7-cup (1.75-L) line for cold foods. Overfilling the pitcher may cause spills, damage to the unit, or other dangerous accidents.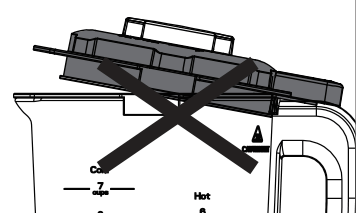
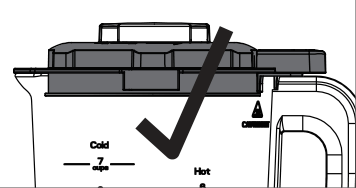
3. Put the lid on and close completely.
Vented lid cap: Align the slots on the lid with the tabs on the vented lid cap. Place in and turn counterclockwise to close. Check that the vented lid cap is on the lid completely.
Lid: Properly close the lid by ensuring the lid's notches are fully locked onto the pitcher's tabs. The lid and pitcher are intended to prevent the product from starting when they are not seated properly. If the lid is not correctly aligned or the pitcher is not on properly, the blender won't start and will display "Lid". you will hear a click when the safety switch is engaged.HOW TO USE CUSTOM SETTINGS
Custom Blend
- Follow the steps in the Preparing to Cook section above.
- Plug in the unit. Turn on the blender with the on/off switch on the right side of the unit. You will see the LED display light up. Ensure the product is plugged into its own dedicated outlet.
- The unit will be automatically set to Custom Blend when it’s turned on.
- Press the wheel to enter or use the pulse button to begin blending right away.
- The LED display will show the blending speed (1–9). Turn the wheel to the desired blending speed.
- Custom Blend will shut off after 3 minutes.
- Press the wheel to blend or press the pulse button for quick, short bursts.
- Once done, turn the unit off and allow the pitcher to be cool to the touch.
- Ensure the lid is secure. Then, remove the pitcher from the base.
Note: When the pitcher has hot contents, the blender will slowly increase the speed to keep the contents from splashing out of the lid. Stand away from the blender while blending.
Custom Heated Blend
- Follow the steps in the Preparing to Cook section above.
- Plug in the unit. Turn on the blender with the on/off switch on the right side of the unit. You will see the LED display light up. Ensure the product is plugged into its own dedicated outlet.
- Turn the wheel so lights up on the LED display and press the wheel to start.
- The LED display will show the temperature blinking on top of the screen. Turn the wheel to the desired temperature and press the wheel to set the temperature. It will no longer blink, and the temperature will be solidly lit.
- The LED display will then show the time blinking. Turn wheel to the desired cook time and press the wheel to confirm. The time will then be solidly lit, and the unit will begin heating.
- There will be three slow beeps. The LED display will show the current temperature at the top of the display with 12 dashes moving in a circular pattern below it. This notes that the unit is preheating.
- NOTE: Until the contents reach the necessary temperature, the blender will occasionally mix the food to prevent scorching.
- Once the temperature is reached, the heat icon will appear. The displayed temperature will maintain, and the countdown timer will begin. DO NOT touch the pitcher’s hot glass.
- When the timer is complete, three audible beeps will sound. The blender will continue to beep two times every 1 minute until is pressed or the pitcher is removed from the base. Wait until the pitcher is cool to the touch before removing from the base.
HOW TO USE PRESET SETTINGS
- Follow steps in the Preparing to Cook section (p. 11).
- Plug in the unit. Turn on the blender with the on/off switch on the right side of the unit. You will see the LED display light up. Ensure the product is plugged into its own dedicated outlet.
- Turn the wheel to select your setting (see the chart below). Once the blue light is above the selected setting, press the wheel. When using a preset setting, you cannot adjust the time, blending speed, heat, or use the pulse button.
NOTE: The preset time cannot change. The overall estimated run time includes the time it takes the blender to come to temperature, if needed.
Setting Preset Time Overall
Estimated
Run TimeNotes NON-HEATED
SETTINGSmoothie 1 minute 1 minute This setting is designed to work for a 12–16 oz. (350–475 mL) serving. When making a larger batch, run the setting twice. Grind 2 minutes
20 seconds2 minutes
20 secondsWhen grinding difficult foods like nut butters, do not use the tamper for more than 30 seconds at a time and no more than 1 minute after a paste has formed. Otherwise the motor will overheat and automatically stop operating. If the motor stops, turn off the blender and allow it to cool down for 1 hour. If this issue persists, please see the Troubleshooting Chart (p. 15).
Do not blend any nut butters back-to-back.
Alt. Milk 5 minutes 5 minutes For best results, strain after blending using the included Strainer Bag. Refer to the Deluxe Cooking Blender Cooking Guide for more details. HEATED SETTING
(Use a minimum of 1/4 cup (60 mL) liquid)Heated Puree 30 seconds* 15–20 minutes Softens and purees hard and soft raw vegetables when used with a minimum of 1/2 cup (125 mL) water.
NOTE: Using lesser amounts of liquids may cause scorching on the bottom of the pitcher.
High-fat ingredients like cream and cheese will cause scorching. When including these ingredients, add them after the cycle is complete. See recipes in the Deluxe Cooking Blender Cooking Guide for further instructions.
Sauce The program runs until it reaches the target temperature. Stage one: 176˚ F (80˚C)
Stage two: 205˚F (96˚C)30–40 minutes This setting has two stages. The first stage heats the blender's contents gently and at a lower temperature to make foods like hot chocolate and custards.
The second stage is for thickened sauces like gravy. This is when you add in a thickener.Here's how to use the Sauce setting:
Stage One
Add your sauce ingredients according to the recipe.
ILLUSTRATION 1
Stage Two
The blender will pause and display "Add". Some recipes will be done at this time. If what you're making is done, press Cancel. Refer to your recipe if you're unsure if it's done.
If your sauce is using a thickener like a roux or cornstarch, open the vented lid cap carefully and add it at this point. Replace and lock the vented lid cap; press the wheel to resume cooking. The blender will heat up to 205˚F (96˚C).Jam The program runs until it reaches 220˚F (104˚C), or for a maximum of 40 minutes.* 45–50 minutes Stage One
For use with fruit jams, start the program with Pectin and fresh fruit. Do not add in sugar at this time. If using a fruit with lower water content like rhubarb or frozen peaches, add 1/4 cup (60 mL) water.
ILLUSTRATION 2
Stage Two
When the contents reach boiling, the program will beep, pause, and display "Add".
Open the vented lid cap carefully, do not touch the glass, and add the sugar. Replace and lock the cap; press the wheel to resume cooking.Refer to the Deluxe Cooking Blender Cooking Guide for details.
Soup 15 minutes
36 seconds25–30 minutes Cooks and purees hard and soft raw vegetables into soup when used with liquid.
High-fat ingredients like cream and cheese can cause scorching. When including these ingredients, add them after the cycle is complete.
See recipes in the Deluxe Cooking Blender Cooking Guide for further instructions.
Heated Wash 2 minutes
18 seconds*5–10 minutes Fill the pitcher with water to the 3-cup (750-mL) line and add 1–2 drops of liquid dish soap or 1 tsp (5 mL) of dishwashing powder. Using more than this amount may cause foam to run down the sides of the pitcher. Some residue may still remain in the pitcher from blending certain foods like hard cheese or dried-on dairy. Use the included Dual-Sided Cleaning Brush or a sponge to scrub any remaining hard-to-remove residue.
See the Cleaning section (p. 9) for further instructions.
*This preset timer starts when the product has reached cooking temperature.
FOOD TAMPERING
WARNING: Do not use the tamper with hot contents or during heated cycles. Damage to the product or serious injury may occur.
A food tamper is provided with the blender as an authorized accessory for the product. Use it only when blending cold food and liquid ingredients. During blending, you may use the tamper to push down food from the sides of the pitcher or release air bubbles that may form.
How to Tamper Ingredients
1. Remove the vented lid cap from the lid.
2. Insert the food tamper through the lid opening. During blending, do not tamper for longer than 30 consecutive seconds to prevent the motor from overheating. If the motor starts to struggle spinning, stop tampering to prevent the motor from overheating.
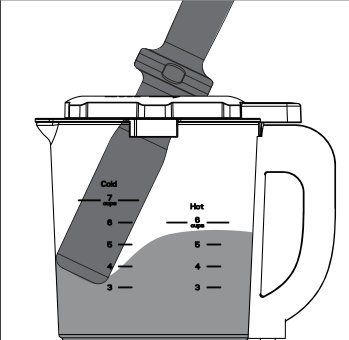
3. Push food down from the sides of the pitcher toward the blades.
Note: The guard near the top of the tamper prevents the tamper from coming into contact with the blades. When inserted in the lid opening, the tamper should not come in contact with the blades from any angle.WARNING: Rotating blades can cause death, serious injury, or damage. Only use the tamper included with your blender. Do not force the tamper deeper into the pitcher. Do not reach into the pitcher with hands or utensils while the blender is running.
TROUBLESHOOTING
The cases in the following tables do not always indicate a faulty blender.
Problem Possible Reason Solution There's a smoky smell on the initial use. Protective coatings are applied during manufacturing. The smell may be from these coatings wearing off. These coatings are non-toxic. This can occur on the first use and is considered normal and harmless. If the smoky smell persists or visual smoke is observed, stop using and contact the Solution Center. The program is running, but the motor isn't working. The motor has overheated. Overusing the tamper or blending very thick foods for too long like nut butters can cause the motor to overheat. Unplug the product and let it cool down for an hour. If the motor still doesn't work, stop using and contact the Solution Center.
Do not blend any nut butters back-to-back.
The display shows "Err 1 or 2". The thermometer is malfunctioning. Take the pitcher off the base and place it back on the motor. The display shows "Err 3". The heating element in the pitcher is overheating. Make sure that there is food in the pitcher before starting and there is enough liquid added when using a heated function. The display shows "Lid". The lid or pitcher is not placed on correctly. Ensure all notches on the lid are aligned properly with the pitcher and the lid is rotated in the fully locked position.
You will hear a click when the safety switch is engaged.
Ensure the pitcher is fully seated onto the base.
The blender will not power on. The on/off switch is not turned on. Turn on the blender with the on/off switch located on the right side of the base.
The power cord is not plugged into the outlet. Ensure the cord is plugged fully into the outlet.
Check the blender on a different outlet.
The contents stop
blending.The contents are too thick. • Add liquid to the recipe.
• Use the tamper to mix contents.
• Pulse food.The motor overheated. Unplug the product and let it cool down for an hour. The food is too watery. The food is overprocessed. Pulse the food on the Custom Blend setting to prevent over blending. Add additional food to thicken. There is too much liquid. Reduce the liquid in the recipe. See How to Use Preset Settings (p. 12–14) for recommended amounts of liquid. Add additional food to thicken. The food is scorched
on the bottom of
the pitcher.There wasn't enough liquid used.
The foods used on the Soup or Heated Puree setting contained high-fat/high-sugar.
To clean, make a salt and oil paste with 1 cup (250 mL) salt and 1/2 cup (125 mL) oil. Pour it in the blender, lock the lid, and select the Custom Blend setting. Blend on the lowest speed to break up the burnt-on food. Rinse and run a Heated Wash cycle (p. 14).
A soft bristled brush can also be used to scrape any burnt-on food after the pitcher has cooled down.
If you're still having difficulty removing scorched food, stop using and contact the Solution Center.
The food isn't
fully blending.The speed is too high for the food being blended.
There isn't enough liquid, or the food is too thick to flow back down into the blades.
• Use the tamper to push foods down if they stick to the walls on cold settings.
• Use a lower speed to ensure food isn't thrown up the side of the walls.
• Add more liquid.The blender is tripping
the GFCI Outlet.The base of the pitcher has gotten wet from immersion in water or from spraying water directly at the bottom of the pitcher.
Let the blender sit upright for 24 hours in a dry location to allow the bottom to drain the excess water.
Liquid is coming out
between the lid
and pitcher.The lid gasket is placed on incorrectly.
Remove the lid from the pitcher. Remove the lid gasket from the lid, flip it, and replace back on the lid.
Bubbles are coming
out of the top of the lid
during the heated wash
cycle.There was too much soap added, not enough water, or heavy concentrated soap used.
Ensure 3 cups (750 mL) water is in the pitcher and add a splash of vegetable oil to reduce bubbles.
Ensure only 1–2 drops of liquid dish soap or 1 tsp (5 mL) of dishwashing powder was used.
Heavily concentrated dish soaps may bubble more.There is overflow
during heated settings.1. You are cooking in a high-altitude area.
2. The pitcher is filled past the max-fill line.
3. You are cooking a high-starch food like rice, pasta, or beans.
1. Use the boil-over guard in place of the vented lid cap when cooking at a high-altitude with a heated setting.
2. Do not overfill the pitcher.
3. The blender wasn't designed for cooking rice, pasta, or beans. Cook these foods separately and mix them in after the heated cycle is complete.
The noise reducing
motor plug is looking
worn.It will naturally wear down with use after approximately 500 blending cycles.
Replace the current noise reducing motor plug with the replacement that was included with the blender.
To replace the plug, turn off and unplug the blender. Remove the pitcher from the base. Grip one of the fins on the plug and pull up. Place the new plug in by lining up the holes on the bottom with the prongs in the center.
If you need another replacement, visit pamperedchef.com or pamperedchef.ca.
If the problem persists or for any unresolved issues, stop using the product and contact Solution Center at (888) 687–2433 (United States) or (800) 342–2433 (Canada) for assistance.
GUARANTEE
- Three-year guarantee for noncommercial use. Refer to sales receipt for details.
Made in China
Use & Care

- Please read all instructions. Save these instructions.
- This unit is for household use, it is not intended for commercial use.
- Do not use outdoors. Intended for countertop use only.
- Do not place the unit on, near, or inside an external heat source. (Ex. hot gas or electric burner and a heated oven.)
- Only use the pitcher provided with this product. Do not use the pitcher with or in other appliances. (Ex. oven, microwave, stovetop, grill, refrigerator, or dishwasher), as this may cause deformations, which can negatively affect future performance of the unit.
- Keep out of the reach of children and individuals whose physical, sensory, or mental abilities may prevent safe use of the product.
- To protect against electrical shock, do not immerse or operate the unit, cord, or plugs in water or other liquid.
- Unplug from outlet when not in use and before cleaning by hand.
- Prior to cleaning by hand, allow the product to come to room temperature and the blade to come to a stop before putting on or taking off the lid, vented lid cap, or pitcher.
- Do not operate the unit if any part of the base, lid, pitcher, or plug is damaged or if the unit malfunctions or has been damaged in any manner. Call the Solution Center at (888) 687-2433 (United States) or (800) 342-2433 (Canada) for assistance.
- Only use accessories that are sold by Pampered Chef and are recommended for use with this unit. The use of accessory attachments not sold or recommended by Pampered Chef may cause injuries. Any accessory that has been damaged in any manner should not be used.
- Do not let cord hang over edge of a countertop.
- Do not let the core touch hot surfaces.
- Do not use the product for anything other than the intended use as outlined in this use and care.
- Extreme caution must be used when handling this unit, especially if it contains hot contents. Spilling or splashing of hot contents could result in burn injuries.
- To disconnect, flip the on/off switch to off. After turning the appliance off, unplug from the outlet when not in use before assembling or disassembling parts and before cleaning by hand. To unplug, grasp the plug and pull from the outlet. Never pull from the power cord.
- Use the pitcher handle and helper handle when lifting the pitcher as glass may be hot.
- When opening the lid and the vented lid cap, lift them away from your body to release the steam away from you.
- Use caution when pouring hot contents into vessels or drains as not all foods are drain appropriate.
- When making nut butters or oil-based foods, do not run the blender for more than 1 minute after the mixture turns into a paste in the pitcher. Processing for longer periods can cause motor overheating.
PLEASE READ ALL INSTRUCTIONS THOROUGHLY

- Hot contents can cause serious burns. Content temperatures can cause serious scalds in less than 1 second.

- Do not touch hot surfaces without appropriate heat-resistant hand protection (Ex. oven mitt and pot holder) on.

- When blending hot liquids or ingredients use caution and stand away from the blender, as hot steam or splashing liquids may come out of the lid opening.
- During use, keep hands and exposed skin away from spraying or escaping steam from the lid openings, as this may cause scalding and burns.
- When using a heated setting, always keep the vented lid cap in place. Do not cover with a cloth or other item.
- After use, remove the lid away from your body to allow steam to escape away from your face.

- Inspect the lid safety switch on the handle for any food or debris that may be caught and could interfere with the operation of the switch. If the switch is not operating properly, this may cause serious product damage or injury. You will hear a click when the safety switch is engaged.
- The pitcher is heavy. Use care when lifting and pouring contents.
- Always start custom blending on a lower speed before turning the speed up to prevent splashing.
- Never fill the unit over the 6-cup (1.4-L) line for hot foods and the 7-cup (1.75-L) line for cold foods. See the "Hot" and "Cold" markers on the pitcher and the illustration on p. 11 for maximum fill lines.
- Position the product away from any overhangs, walls, and table or countertop edges.
- Make sure all lid components are properly assembled and the lid is properly closed before operating. See the Important Before Use section for assembly instructions (p. 10).


- To properly close the lid, ensure the lid's notches are fully locked onto pitcher's tabs.
- Always operate the product with the lid and vented cap firmly in place. The vented lid cap should only be removed when adding the ingredients during a non-heated setting and before using the tamper. Never remove the vented lid cap while a heated setting is running.

- Do not move this product while it's in use.
- Keep the cord away from children.
- A short power-supply cord is used to reduce the risk of it being grabbed by children, becoming entangled, or getting tripped over. For child safety, never drape the cord over the edge of a counter. Never use the outlet below a counter or with an extension cord.

- After use, do not touch the metal nut underneath the pitcher as it may be hot for up to an hour after a blending cycle.

- Keep body parts and unauthorized utensils (Ex. silverware, spatulas, ladles, wooden spoons, etc.) out of the pitcher while blending to reduce the risk of injury to person or damage to the blender.
- The tamper provided is an authorized accessory of this product. This accessory must only be used during a non-heated setting. The tamper provided must be used only when the main part of the lid is in place and the vented lid cap is removed. (See the Tamper Section.)
- The blades are sharp. Avoid contact with moving blades. Do not remove the blade from the pitcher. Use caution when cleaning. Never attempt to operate with damaged blades.
- Do not leave or store anything like spoons, forks, or the vented lid cap in the container (even when not in use) as this will damage the blades and other components when starting the machine and may cause injury.
- Do not deep fy in the product. It is dangerous and may cause a thermal event, serious product damage, or injury.
- Do not operate the product on an unstable surface.
- Never operate the product on or near flammable materials such as newspapers or paper plates.
- Do not operate the product adjacent to or inside of water (Ex. sinks, pools, lakes, etc.).

- Do not put foreign objects into gaps and crevices of the unit. This may cause electric shock or a thermal event, which could result in death or serious injury.
ELECTRICAL HAZARDS- Failure to abide by these specific instructions may cause electrical shock or a thermal event and could lead to death or serious injury:
- Only use with the provide removable pitcher.
- Always unplug when not in use.
- Do not use anything other than a 120V–60Hz power outlet.
- Do not immerse, submerge, or sprinkle with liquids.
- Do not attempt to modify the plug in any way.
- If the plug fits loosely into the outlet, or if the outlet feels warm, do not use that outlet.
- Do not insert or remove the plug with wet hands. In order to avoid injuries due to electric shock, make sure hands are dry before plugging and unplugging the unit.
- Do not plug into a power strip or an outlet with another appliance. The product should be used with a dedicated outlet; do not share the outlet with other appliances. A ground socket of more than 15A rated current shall be used alone.

- This unit has a polarized plug (one blade is wider than the other). To reduce the risk of electric shock, this plug is intended to fit into a polarized outlet only one way. If the plug does not fit fully into the outlet, reverse the plug. If it still does not fit, contact a qualified electrician.
- Persons with pacemakers or users of hearing aids of cochlear implants should consult with authorized medical personnel before use. Refer to the instructions of medical equipment providers.


- Before moving the product, ensure the pitcher is cool and the lid is secure. Then, separate the pitcher from the base.
- Do not use excessive force with this product. It could cause damage, break, or injure the user.
- Never remove the pitcher while in a blending or heating cycle.
- Do not store the product in direct sunlight.
- When cooking in high-altitude areas, use the boil-over guard in place of the vented lid cap with heated settings.
PARTS

Lid
A. Vented lid cap
B. Lid gasket
C. Lid notches
Pitcher
D. Blade
E. Heating element
F. Pitcher handle
G. Lid safety switch
H. Helper handle
I. Max-fill line (Cold)
J. Max-fill line (Hot)
K. Pitcher electrical interface
L. Metal nut
M. Pitcher tabs
Base
N. LED display
O. Wheel
P. Noise reducing motor plug
Q. On/off switch
R. Electrical cord/plug
S. Base electrical interface
Accessories
T. Tamper
U. Strainer bag
V. Dual-sided cleaning brush
W. Boil-over guard
(Note: Use it for high-altitude cooking.)
X. Noise reducing motor plug replacement


1. Cancel Button
Use the button to cancel any operation at any time while the product is in use and you will be brought to the setting.
2. Pulse Button
Press the button to pulse the ingredients in the setting.
3. Wheel
Rotate the wheel to move through the settings, change the blender speed, change the temperature, or press the wheel to start and pause.
4. Blend Icon
Any time the blades are moving, the icon will be lit.
5. Heat Icon
Any time the heating element is on, the icon will be lit.
6. Thermometer Icon
Any time the temperature reads above 140°F (60°C), the thermometer icon will be lit .
WARNING: When this icon is lit, contents will be hot enough to scald.
7. Speed/Temperature Display
In cold settings, the speed will be displayed. In hot settings, the temperature will be displayed.
To switch from Fahrenheit to Celsius, press and hold both the and buttons at the same time for 3 seconds.
8. Time Display
In the cold setting, the time will automatically display. After the temperature is reached in a hot setting, the time will display.
BLENDER STATUS
Preheating
While the blender heats up, 12 dashes will show moving in a circular pattern.Pause
If you paused a function, the display screen will blink.
Complete
When a preset or custom function is complete, the LED display will show "End". Hit the Cancel button, remove the lid, or remove the pitcher to return to the Custom Blend setting.CLEANING

- CAUTION: Do not submerge the base of pitcher in water. This pitcher contains electrical components.
- WARNING: After running the blender's Heated Wash cycle, unplug the power cord and let the product cool completely before storing it as the hot glass pitcher may damage other products.
- WARNING: Use care when cleaning by hand. Blades are sharp and can lead to serious injury.
- Clean before using for the first time and after each use.
- Lid, vented lid cap, lid gasket, tamper, and boil-over guard: Dishwasher-safe on the top rack only.
- Dual-Sided Cleaning Brush: Dishwasher-safe in the utensil basket.
- Strainer bag: Hand wash and air dry.
- Pitcher: Use the blender’s Heated Wash cycle to clean the interior (refer to the Heated Wash cycle in the Initial Test Run section on p. 10). Use a damp cloth to clean the exterior.
- To deep clean: Minerals in water may deposit at the bottom of the pitcher. Periodic deep cleaning will ensure the longevity of the blender.
- Add 1 cup (250 mL/8 oz.) of white vinegar or citric acid like lemon juice and 1 cup (250 mL/8 oz.) of warm water to the pitcher.
- Allow the solution to sit for at least 1 hour.
- Empty the solution from the pitcher and rinse with warm, clear water.
- For stubborn stains, unplug the blender and add 1 cup (250 mL/8 oz.) of white vinegar to the pitcher, then scrub with a sponge. Repeat this process as necessary.
- For residue on the bottom of the pitcher, use a soft bristle brush to clean.
- NOTE: Blades are not meant to be removed. Do not attempt to disassemble.
- To deep clean: Minerals in water may deposit at the bottom of the pitcher. Periodic deep cleaning will ensure the longevity of the blender.
- Base: Wipe clean with a damp cloth.
- Make sure to keep liquids away from electrical interface.
- Do not use harsh chemicals, scouring pads, or other abrasive cleaners.
- When the blender is in storage or not in use, do not fold or kink the power cord.
- Make sure the base of the pitcher is dry and clean before placing it on the blender base.
- Do not store foods in the pitcher.
IMPORTANT BEFORE USE
Before first use:
1. Remove all packaging.
2. Read through this document.
3. Clean each part and run the blender on the Heated Wash setting before the first use and after each use. See the Initial Test Run section below for more information.Before each use:

• Inspect the lid, pitcher, base, and plug for any damage. Do not operate if any of these parts are damaged.
WARNING: Inspect the lid safety switch on the handle for any food or debris that may be caught and could interfere with the operation of the switch. If the lid safety switch is not operating properly, this may cause serious product damage or injury.• Ensure there are no foreign objects in the pitcher.
• Ensure the lid gasket is properly oriented on lid.
• Properly seat and lock the vented lid cap into the lid. • Properly close the lid by ensuring the lid's notches are fully locked onto pitcher's tabs. The blender will not start if the lid is not seated on the pitcher correctly. See troubleshooting if "Lid" appears and the lid or pitcher is not place properly.
INITIAL TEST RUNBefore using for the first time, we recommend running the heated wash cycle to clean the pitcher and lid. This also helps you become familiar with the product and ensure it is working properly. The heated wash cycle will take an average of 5–10 minutes to complete.
- Place the pitcher on the base with the handle positioned to the right.
- Plug in the blender. Turn on the blender with the on/off switch on the right side of the unit. You will see the LED display light up. Ensure the product is plugged into its own dedicated outlet.
- Fill the pitcher with 3 cups (750 mL) of warm water and 1–2 drops of liquid dish soap or 1 tsp (5 mL) of dishwashing powder.
- Place the lid on the pitcher.
- Vented lid cap: Align the slots on the lid with the tabs on the vented lid cap. Place in and turn counterclockwise to close. Check that the vented lid cap is on the lid completely.
- Lid: Properly close the lid by ensuring the lid’s notches are fully locked onto pitcher’s tabs. The lid’s safety switch prevents the product from starting when the lid is not seated properly on the pitcher. If the lid is not correctly aligned, the blender won’t start and will display “Lid”. You will hear a click when the safety switch is engaged.
- The product will automatically be set to when turned on. Turn the wheel until the blue light is lit above the setting.
- Press the wheel. There will be three slow beeps. The LED display will show the current temperature at the top of the display with 12 dashes moving in a circular pattern below it. This notes that the unit is preheating.
- Once the temperature is reached, the display will show a run time and begin counting down. During the Heated Wash cycle, some bubbles may appear, this is normal and expected. The more concentrated the soap is, the more bubbles it will yield. Bubbles should not spill over the side. If you’re using highly concentrated soap and bubbles start to bubble over, press the wheel to pause the Heated Wash cycle, remove the lid, and add about 1 tsp (5 mL) of vegetable oil to reduce bubbling.
- When blending is complete, three audible beeps will sound. The blender will continue to beep two times every 1 minute until is pressed or the pitcher is removed from the base. Some bubbles may form on top of the lid, that’s OK.
- To remove the pitcher from the base, ensure the lid is secure on the pitcher. When facing the front of the blender, use the pitcher handle to tilt the pitcher slightly to the left and lift away from the base. Discard the soapy water and rinse with clean water.
- Now you're all set to blend!
PREPARING TO COOK

1. Place the pitcher on the base with the handle positioned to the right side. 
2. Fill the pitcher.
WARNING: The total amount of food or liquid contents should never exceed the 6-cup (1.4-L) line for hot foods and the 7-cup (1.75-L) line for cold foods. Overfilling the pitcher may cause spills, damage to the unit, or other dangerous accidents.

3. Put the lid on and close completely.
Vented lid cap: Align the slots on the lid with the tabs on the vented lid cap. Place in and turn counterclockwise to close. Check that the vented lid cap is on the lid completely.
Lid: Properly close the lid by ensuring the lid's notches are fully locked onto the pitcher's tabs. The lid and pitcher are intended to prevent the product from starting when they are not seated properly. If the lid is not correctly aligned or the pitcher is not on properly, the blender won't start and will display "Lid". you will hear a click when the safety switch is engaged.HOW TO USE CUSTOM SETTINGS
Custom Blend
- Follow the steps in the Preparing to Cook section above.
- Plug in the unit. Turn on the blender with the on/off switch on the right side of the unit. You will see the LED display light up. Ensure the product is plugged into its own dedicated outlet.
- The unit will be automatically set to Custom Blend when it’s turned on.
- Press the wheel to enter or use the pulse button to begin blending right away.
- The LED display will show the blending speed (1–9). Turn the wheel to the desired blending speed.
- Custom Blend will shut off after 3 minutes.
- Press the wheel to blend or press the pulse button for quick, short bursts.
- Once done, turn the unit off and allow the pitcher to be cool to the touch.
- Ensure the lid is secure. Then, remove the pitcher from the base.
Note: When the pitcher has hot contents, the blender will slowly increase the speed to keep the contents from splashing out of the lid. Stand away from the blender while blending.
Custom Heated Blend
- Follow the steps in the Preparing to Cook section above.
- Plug in the unit. Turn on the blender with the on/off switch on the right side of the unit. You will see the LED display light up. Ensure the product is plugged into its own dedicated outlet.
- Turn the wheel so lights up on the LED display and press the wheel to start.
- The LED display will show the temperature blinking on top of the screen. Turn the wheel to the desired temperature and press the wheel to set the temperature. It will no longer blink, and the temperature will be solidly lit.
- The LED display will then show the time blinking. Turn wheel to the desired cook time and press the wheel to confirm. The time will then be solidly lit, and the unit will begin heating.
- There will be three slow beeps. The LED display will show the current temperature at the top of the display with 12 dashes moving in a circular pattern below it. This notes that the unit is preheating.
- NOTE: Until the contents reach the necessary temperature, the blender will occasionally mix the food to prevent scorching.
- Once the temperature is reached, the heat icon will appear. The displayed temperature will maintain, and the countdown timer will begin. DO NOT touch the pitcher’s hot glass.
- When the timer is complete, three audible beeps will sound. The blender will continue to beep two times every 1 minute until is pressed or the pitcher is removed from the base. Wait until the pitcher is cool to the touch before removing from the base.
HOW TO USE PRESET SETTINGS
- Follow steps in the Preparing to Cook section (p. 11).
- Plug in the unit. Turn on the blender with the on/off switch on the right side of the unit. You will see the LED display light up. Ensure the product is plugged into its own dedicated outlet.
- Turn the wheel to select your setting (see the chart below). Once the blue light is above the selected setting, press the wheel. When using a preset setting, you cannot adjust the time, blending speed, heat, or use the pulse button.
NOTE: The preset time cannot change. The overall estimated run time includes the time it takes the blender to come to temperature, if needed.
Setting Preset Time Overall
Estimated
Run TimeNotes NON-HEATED
SETTINGSmoothie 1 minute 1 minute This setting is designed to work for a 12–16 oz. (350–475 mL) serving. When making a larger batch, run the setting twice. Grind 2 minutes
20 seconds2 minutes
20 secondsWhen grinding difficult foods like nut butters, do not use the tamper for more than 30 seconds at a time and no more than 1 minute after a paste has formed. Otherwise the motor will overheat and automatically stop operating. If the motor stops, turn off the blender and allow it to cool down for 1 hour. If this issue persists, please see the Troubleshooting Chart (p. 15).
Do not blend any nut butters back-to-back.
Alt. Milk 5 minutes 5 minutes For best results, strain after blending using the included Strainer Bag. Refer to the Deluxe Cooking Blender Cooking Guide for more details. HEATED SETTING
(Use a minimum of 1/4 cup (60 mL) liquid)Heated Puree 30 seconds* 15–20 minutes Softens and purees hard and soft raw vegetables when used with a minimum of 1/2 cup (125 mL) water.
NOTE: Using lesser amounts of liquids may cause scorching on the bottom of the pitcher.
High-fat ingredients like cream and cheese will cause scorching. When including these ingredients, add them after the cycle is complete. See recipes in the Deluxe Cooking Blender Cooking Guide for further instructions.
Sauce The program runs until it reaches the target temperature. Stage one: 176˚ F (80˚C)
Stage two: 205˚F (96˚C)30–40 minutes This setting has two stages. The first stage heats the blender's contents gently and at a lower temperature to make foods like hot chocolate and custards.
The second stage is for thickened sauces like gravy. This is when you add in a thickener.Here's how to use the Sauce setting:
Stage One
Add your sauce ingredients according to the recipe.
ILLUSTRATION 1
Stage Two
The blender will pause and display "Add". Some recipes will be done at this time. If what you're making is done, press Cancel. Refer to your recipe if you're unsure if it's done.
If your sauce is using a thickener like a roux or cornstarch, open the vented lid cap carefully and add it at this point. Replace and lock the vented lid cap; press the wheel to resume cooking. The blender will heat up to 205˚F (96˚C).Jam The program runs until it reaches 220˚F (104˚C), or for a maximum of 40 minutes.* 45–50 minutes Stage One
For use with fruit jams, start the program with Pectin and fresh fruit. Do not add in sugar at this time. If using a fruit with lower water content like rhubarb or frozen peaches, add 1/4 cup (60 mL) water.
ILLUSTRATION 2
Stage Two
When the contents reach boiling, the program will beep, pause, and display "Add".
Open the vented lid cap carefully, do not touch the glass, and add the sugar. Replace and lock the cap; press the wheel to resume cooking.Refer to the Deluxe Cooking Blender Cooking Guide for details.
Soup 15 minutes
36 seconds25–30 minutes Cooks and purees hard and soft raw vegetables into soup when used with liquid.
High-fat ingredients like cream and cheese can cause scorching. When including these ingredients, add them after the cycle is complete.
See recipes in the Deluxe Cooking Blender Cooking Guide for further instructions.
Heated Wash 2 minutes
18 seconds*5–10 minutes Fill the pitcher with water to the 3-cup (750-mL) line and add 1–2 drops of liquid dish soap or 1 tsp (5 mL) of dishwashing powder. Using more than this amount may cause foam to run down the sides of the pitcher. Some residue may still remain in the pitcher from blending certain foods like hard cheese or dried-on dairy. Use the included Dual-Sided Cleaning Brush or a sponge to scrub any remaining hard-to-remove residue.
See the Cleaning section (p. 9) for further instructions.
*This preset timer starts when the product has reached cooking temperature.
FOOD TAMPERING
WARNING: Do not use the tamper with hot contents or during heated cycles. Damage to the product or serious injury may occur.
A food tamper is provided with the blender as an authorized accessory for the product. Use it only when blending cold food and liquid ingredients. During blending, you may use the tamper to push down food from the sides of the pitcher or release air bubbles that may form.
How to Tamper Ingredients
1. Remove the vented lid cap from the lid.
2. Insert the food tamper through the lid opening. During blending, do not tamper for longer than 30 consecutive seconds to prevent the motor from overheating. If the motor starts to struggle spinning, stop tampering to prevent the motor from overheating.

3. Push food down from the sides of the pitcher toward the blades.
Note: The guard near the top of the tamper prevents the tamper from coming into contact with the blades. When inserted in the lid opening, the tamper should not come in contact with the blades from any angle.WARNING: Rotating blades can cause death, serious injury, or damage. Only use the tamper included with your blender. Do not force the tamper deeper into the pitcher. Do not reach into the pitcher with hands or utensils while the blender is running.
TROUBLESHOOTING
The cases in the following tables do not always indicate a faulty blender.
Problem Possible Reason Solution There's a smoky smell on the initial use. Protective coatings are applied during manufacturing. The smell may be from these coatings wearing off. These coatings are non-toxic. This can occur on the first use and is considered normal and harmless. If the smoky smell persists or visual smoke is observed, stop using and contact the Solution Center. The program is running, but the motor isn't working. The motor has overheated. Overusing the tamper or blending very thick foods for too long like nut butters can cause the motor to overheat. Unplug the product and let it cool down for an hour. If the motor still doesn't work, stop using and contact the Solution Center.
Do not blend any nut butters back-to-back.
The display shows "Err 1 or 2". The thermometer is malfunctioning. Take the pitcher off the base and place it back on the motor. The display shows "Err 3". The heating element in the pitcher is overheating. Make sure that there is food in the pitcher before starting and there is enough liquid added when using a heated function. The display shows "Lid". The lid or pitcher is not placed on correctly. Ensure all notches on the lid are aligned properly with the pitcher and the lid is rotated in the fully locked position.
You will hear a click when the safety switch is engaged.
Ensure the pitcher is fully seated onto the base.
The blender will not power on. The on/off switch is not turned on. Turn on the blender with the on/off switch located on the right side of the base.
The power cord is not plugged into the outlet. Ensure the cord is plugged fully into the outlet.
Check the blender on a different outlet.
The contents stop
blending.The contents are too thick. • Add liquid to the recipe.
• Use the tamper to mix contents.
• Pulse food.The motor overheated. Unplug the product and let it cool down for an hour. The food is too watery. The food is overprocessed. Pulse the food on the Custom Blend setting to prevent over blending. Add additional food to thicken. There is too much liquid. Reduce the liquid in the recipe. See How to Use Preset Settings (p. 12–14) for recommended amounts of liquid. Add additional food to thicken. The food is scorched
on the bottom of
the pitcher.There wasn't enough liquid used.
The foods used on the Soup or Heated Puree setting contained high-fat/high-sugar.
To clean, make a salt and oil paste with 1 cup (250 mL) salt and 1/2 cup (125 mL) oil. Pour it in the blender, lock the lid, and select the Custom Blend setting. Blend on the lowest speed to break up the burnt-on food. Rinse and run a Heated Wash cycle (p. 14).
A soft bristled brush can also be used to scrape any burnt-on food after the pitcher has cooled down.
If you're still having difficulty removing scorched food, stop using and contact the Solution Center.
The food isn't
fully blending.The speed is too high for the food being blended.
There isn't enough liquid, or the food is too thick to flow back down into the blades.
• Use the tamper to push foods down if they stick to the walls on cold settings.
• Use a lower speed to ensure food isn't thrown up the side of the walls.
• Add more liquid.The blender is tripping
the GFCI Outlet.The base of the pitcher has gotten wet from immersion in water or from spraying water directly at the bottom of the pitcher.
Let the blender sit upright for 24 hours in a dry location to allow the bottom to drain the excess water.
Liquid is coming out
between the lid
and pitcher.The lid gasket is placed on incorrectly.
Remove the lid from the pitcher. Remove the lid gasket from the lid, flip it, and replace back on the lid.
Bubbles are coming
out of the top of the lid
during the heated wash
cycle.There was too much soap added, not enough water, or heavy concentrated soap used.
Ensure 3 cups (750 mL) water is in the pitcher and add a splash of vegetable oil to reduce bubbles.
Ensure only 1–2 drops of liquid dish soap or 1 tsp (5 mL) of dishwashing powder was used.
Heavily concentrated dish soaps may bubble more.There is overflow
during heated settings.1. You are cooking in a high-altitude area.
2. The pitcher is filled past the max-fill line.
3. You are cooking a high-starch food like rice, pasta, or beans.
1. Use the boil-over guard in place of the vented lid cap when cooking at a high-altitude with a heated setting.
2. Do not overfill the pitcher.
3. The blender wasn't designed for cooking rice, pasta, or beans. Cook these foods separately and mix them in after the heated cycle is complete.
The noise reducing
motor plug is looking
worn.It will naturally wear down with use after approximately 500 blending cycles.
Replace the current noise reducing motor plug with the replacement that was included with the blender.
To replace the plug, turn off and unplug the blender. Remove the pitcher from the base. Grip one of the fins on the plug and pull up. Place the new plug in by lining up the holes on the bottom with the prongs in the center.
If you need another replacement, visit pamperedchef.com or pamperedchef.ca.
If the problem persists or for any unresolved issues, stop using the product and contact Solution Center at (888) 687–2433 (United States) or (800) 342–2433 (Canada) for assistance.
GUARANTEE
- Three-year guarantee for noncommercial use. Refer to sales receipt for details.
Made in China


 Canada (en)
 Germany (de)
 Austria (de)