Flex+ Multi-Prep Set
3 Cordless Prep Tools in One
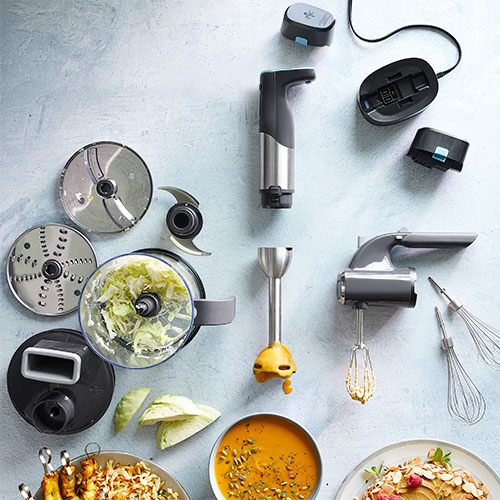
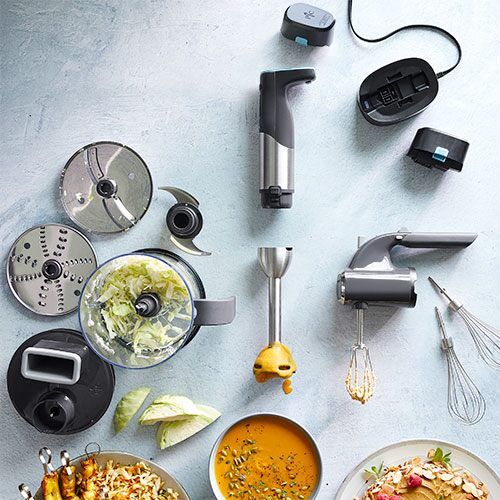
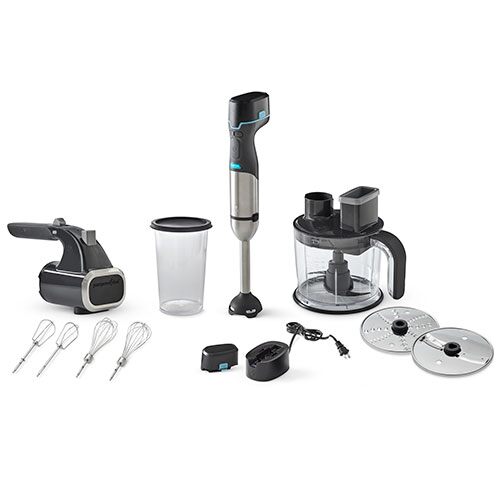
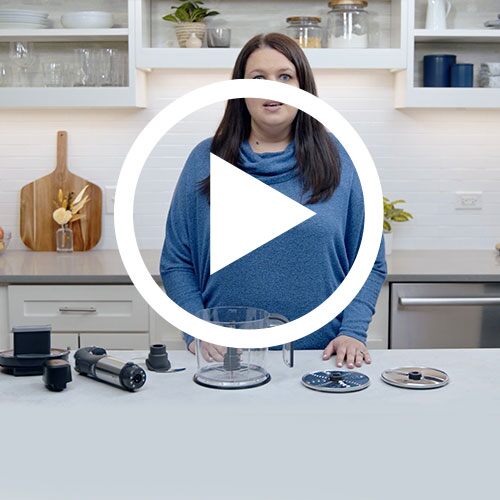
Slicing, chopping, grating, pureeing, emulsifying, mixing, and blending doesn’t have to be time-consuming or frustrating. With the Flex+, you get three complete cordless, time-saving prep tools in one: an immersion blender, 6-cup (1.5-L) food processor, and a hand mixer, so you can quickly, effortlessly, and safely whip up whatever you’re making, anytime, anywhere.
Just click the power handle to one of the attachments, choose a blade (food processor) or beaters/whisks (hand mixer), pop on one of the batteries, and you’re ready to go. We’ve included two rechargeable batteries to give you about 60 minutes of total run time.
The power handle has push-button control for comfortable one-handed operation. Five speeds (three for the hand mixer) easily adjust during use for flexibility and control over your recipe. Plus, indicator lights show how much battery life is left and the speed you’re using. A safety lock prevents the Flex+ from accidentally turning on.
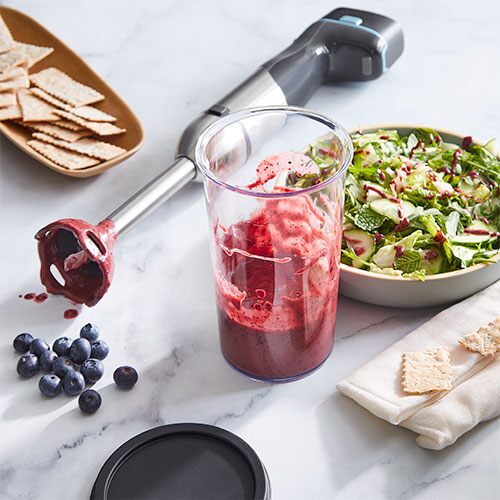
Immersion Blender
Big jobs or small, its slim size, stainless blade, and cookware-safe design means you control the texture of the foods you blend. It blends, emulsifies, froths, purees, and whips. You’ll enjoy velvety smooth soups and gravies, all kinds of sauces such as pesto, tomato, chimichurri, barbecue, homemade dips, dressings, marinades, mayonnaise, milkshakes, smoothies, and more. It includes a blending container to make homemade mayonnaise and dressings in under two minutes.
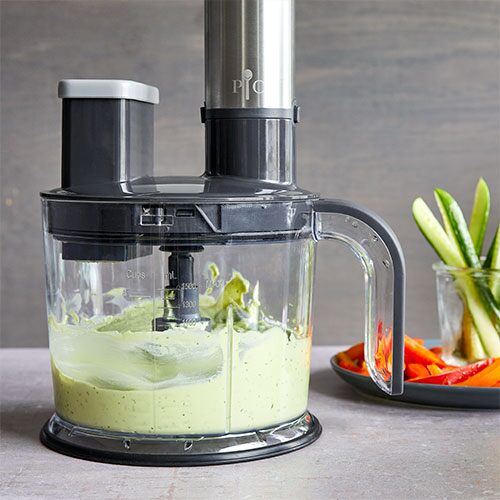
6-cup (1.5-L) Food Processor
Get fresh flavor in a flash without breaking a sweat. Choose one of the three blades based on what you’re making. The multiuse blade can cut foods to the size and texture you want, even purees. The grating blade is reversible so you can coarsely or finely grate fresh ingredients in no time like broccoli and Brussels sprouts for salads, cabbage for slaw, carrots for cake, and cheese for everything. The slicing blade slices and shaves veggies for salads and sautes, potatoes and zucchini for gratins, and apples or any firm produce. (Please note, the slicing blade won’t slice cheese.)
Hand Mixer
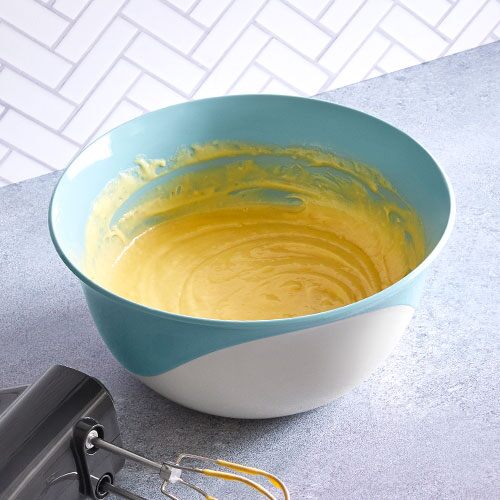
A baker’s and breakfast maker’s best friend. Mix, beat, incorporate, and whip together eggs, batters, meringues, mashed potatoes, whipped cream, frothy egg whites, and more. Includes two beaters and two whisks.
PRODUCT DETAILS
- Includes the power handle, two rechargeable lithium-ion batteries, charging station, immersion blender attachment, blending container with lid, hand mixer attachment, two beaters, two whisks, food processor attachment (bowl & center post, lid with gear box & splash guard) food pusher, reversible grating blade, reversible slicing blade, multiuse blade, and a cooking guide.
- Immersion blender: 17" (44 cm)
- 6-cup (1.5-L) food processor: 17" (44 cm)
- Hand mixer: 13½" (34 cm)
HOW TO CLEAN
- Dishwasher-safe: immersion blender attachment, blending container and lid, beaters, whisks, food processor bowl and center post, splash guard, food pusher, multiuse blade, reversible grating blade, and reversible slice blade.
- The food processor gear box can be handwashed if it isn’t submerged.
- Wipe clean: power handle, hand mixer attachment, rechargeable batteries, and charging station. Only use a dry cloth on the battery and charging station connectors.
-
Use & Care
Use & Care
Use & Care
IMPORTANT SAFEGUARDS
- Please read all instructions before using. Save these instructions. When using electrical appliances, basic safety precautions should always be followed, including the following:
- 1. This unit should not be used by children or by persons with reduced physical sensory, or mental capabilities, or lack of experience and knowledge. To avoid possible accidental injury, close supervision is required when used near children. Children should be supervised to ensure that they do not play with the appliance.
- 2. This unit should not be used by individuals whose physical, sensory, or intellectual disability may prevent safe usage.
- 3. To avoid personal injury, ensure the unit is in the Off position and the battery is removed before cleaning, attaching or removing accessories (blades, beaters, etc.), and/or attachments, or any other use.
- 4. Do not use while you are tired or under the influence of drugs, alcohol, or medication. A moment of inattention while operating may result in serious personal injury.
- 5. Do not operate near loose clothing, jewelry, hair, etc.
- 6. Use extreme caution when handling the power handle, especially when blending hot contents. Spilling or splashing of hot contents could result in burns. To reduce spilling and splashing, use a tall container or blend small quantities at a time.
- 7. To protect against electrical shock, do not immerse or operate the unit, batteries, charging stations and cord, or plugs in or around water or other liquids.
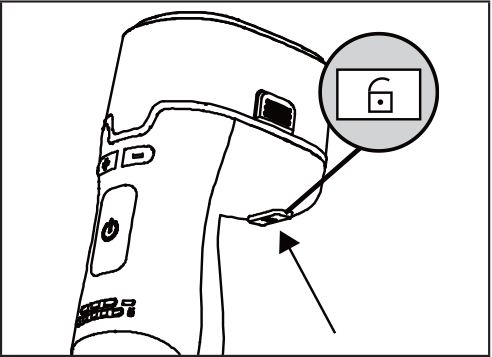
8. To prevent unintentional starting, never press the safety lock button until you are ready to use the unit. Note: The safety lock button will allow the unit to be used within 5 seconds after being pressed. - 9. To reduce the risk of injury, always operate the unit and accessories on a flat surface.
- 10. The power handle, batteries, Hand Mixer attachment, food processor lid gear box, and charging station are not water-resistant
- 11. Do not operate the unit, parts, or accessories if they are damaged cord or plug, or after the appliance malfunctions, or is dropped or damaged in any manner. If damaged or if any part of the unit malfunctions, call the Solution Center at (888) 687-2433 (U.S.) or (800) 342-2433 (Canada) for assistance.
- 12. The blades on the attachments are very sharp; always handle carefully. Never directly handle the blades.
- 13. Avoid contact with moving parts. Keep hands, hair, clothing, as well as spatulas and other utensils away from the attachments and blending container during operation to reduce the risk of injury or damage to the unit. You can use a kitchen scraper, but only when the unit is not operating and the battery is not connected.
- 14. Always use caution when storing the blades. Keep sharp edges away from you, your hands, and your fingers.
- 15. The charging station should be plugged into an indoor electrical outlet and away from sources of water and hot surfaces including the stove.
- 16. Do not remove the Immersion Blender from the ingredients during operation; keep submerged in the food while operating. To avoid injury, ensure the appliance is turned off and has come to a complete stop before removing.
- 17. Do not use an extension cord to charge the battery; plug the charging station directly into an electrical outlet.
- 18. Ensure the unit is fully assembled before using. Do not operate this unit unless mixing, processing, or blending food.
- 19. Do not blend or process fruit pits, bones, or any hard ingredients as these can damage the blades.
- 20. When running a heavy load (e.g. dense dough or large chunks of food, etc.), don’t operate for more than 1 minute continuously. To continue mixing, let the appliance rest for 1 minute before operating it again to avoid stalling or overheating.
- 21. The food processor bowl is not oven-, freezer-, microwave-, or grill-safe. Do not process hot or boiling liquids in the food processor bowl; let liquids cool before placing into the food processor bowl.
- 22. To reduce the risk of injury, never attempt to place the food processor multiuse blade on the center pole without first properly seating the center post in the food processor bowl. Once the center post is properly seated, place the blade gently onto the top of the center post; it should slide down into place. The multiuse blade should self-locate at the base of the center post.(See the How to Use the 6-cup (1.5-L) Food Processor section for assembly instructions.)
- 23. Do not operate the 6-cup (1.5-L) Food Processor attachment unless the lid is securely locked in place. Do not attempt to remove the lid until the blade has completely stopped rotating.
- 24. Check the food processor bowl for foreign objects before using.
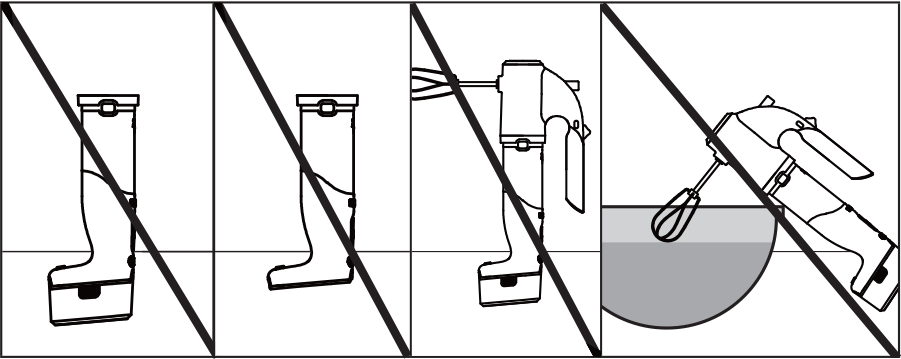
25. Use caution when setting the Hand Mixer down. Only rest the Hand Mixer on its side when not in use to prevent possible injury to user and/or damage to the unit or property; do not leave it in a bowl. Never stand the Hand Mixer up on the attached battery. - 26. Do not touch any metal parts of the unit during or after use as they may be hot to touch and cause injury.
- 27. Do not use any of the Pampered Chef Flex+ attachments or accessories with glass vessels to prevent possible injury to the user or damage to the unit or property.
- 28. Use only Pampered Chef Flex+ attachments and accessories intended for use with the food processor bowl. Do not use the food processor bowl as a mixing bowl. Do not use the Hand Mixer attachment, Immersion Blender attachment, or any unapproved attachments or accessories in the food processor bowl
- 29. Make sure the unit and proper attachments and accessories are completely and properly assembled before operating. See the How to Use sections for proper assembly of each attachment.
- 30. Do not place the unit, accessories, cord, or plug on, near, or inside an external heat source (e.g., on a hot gas, or electric burner, or in a heated oven).
- 31. Do not place the unit near the edge of a surface during operation. Ensure the surface is level and clear of liquids and debris.
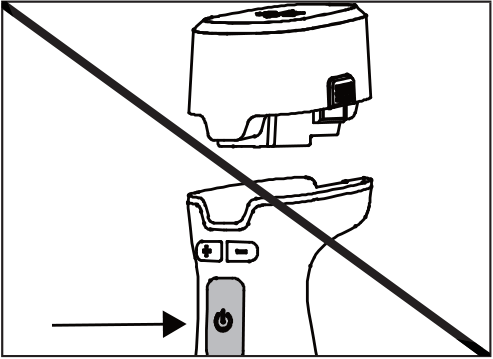
32. Ensure the power button on the power handle is not pressed while attaching or removing the battery, accessories, or attachments. - 33. Only use Pampered Chef Flex+ attachments and accessories that are recommended for use with this product. The use of attachments or accessories with this product not recommended or sold by Pampered Chef may cause fire, electric shock, or injury to the user or unit. Any approved attachment or accessory that has been damaged in any manner should not be used.
- 34. Do not let the charging station cord hang over the edge of a countertop or table or touch hot surfaces.
- 35. When using the Immersion Blender to blend hot food in a saucepan, remove the saucepan from the heat source and ensure the unit is also kept away from any heat source.
- 36. Do not use with or in other appliances or small appliances (e.g., stand mixer, oven, microwave, stovetop, grill, refrigerator, etc.), as this may cause deformations which can negatively affect future performance of the unit or injury to the user.
- 37. Do not use, mount, or store the unit over or near a portion of a heating or cooking appliance, sink, or washbasin.
- 38. Use only with the charger provided with the appliance. Do not attempt to use the charging station with any other product. Also, do not attempt to charge the battery with any other charger.
- 39. Unplug the charging station from the outlet when not in use and before wiping down. Once the battery is fully charged, unplug from the outlet when not in use. To unplug, grasp the plug and pull from the outlet. Never pull from the power cord.
- 40. Keep the charging station free of water, food, oil, and dust.
- 41. Keep the battery connectors safe from water, food, oil, and dust.
- 42. Prior to cleaning, allow all the parts of the unit, including the blade, whisk, or beater, to come to a complete stop before removing.
- 43. This product contains lithium-ion batteries which must be recycled at the end of the battery’s life and disposed of properly. See the Charging and Battery Life section.
- 44. If the battery becomes hot, do not touch or handle it until it has cooled down.
- 45. Keep the unit’s batteries away from fire or other sources of heat, as batteries can explode if subjected to temperatures above 265°F (130°C). Do not incinerate or compost batteries even if it is severely damaged. See the Charging and Battery Life section.
- 46. If there is any leakage from the battery, immediately stop use and do not touch.
- 47. Leaks from the battery cells can occur under extreme conditions and can cause irritation or burns to your skin. If the liquid gets on skin, wash the affected area quickly with soap and water or neutralize the affected area with a mild acid such as lemon juice or vinegar. If the liquid gets into your eyes, flush your eyes immediately with clean water for a minimum of 10 minutes and seek medical attention.
- 48. Do not use a battery if it’s damaged. Damaged batteries may exhibit unpredictable behavior resulting in fire, explosion, and risk of injury. If any part of the unit is damaged, call the Solution Center at (888) 687-2433 (U.S.) or (800) 342-2433 (Canada) for assistance.
- 49. Do not modify or attempt to repair the battery as it may result in injury.
- 50. Always store and charge the batteries at room temperature (approximately 72°F/22°C) and keep out of direct sunlight.
- 51. Do not use or attempt to operate the unit by any method other than the intended uses and methods outlined in this use and care.
- 52. Illuminated lights on the charging station, power handle, or Hand Mixer attachment indicate that the unit is ready to operate. See the How to Use the Hand Mixer section for details.
- 53. Always assemble the food processor lid and ensure it’s locked into place before use.
- 54. If food becomes lodged around the blades, in the blade guard, or in any part, release the power button and allow the unit and any moving parts to come to a complete stop. Remove the battery. You can use a spatula or bvc kitchen scraper to dislodge the food. Do not use your fingers or a metal utensil as the blades are sharp.
- 55. Do not push food into the food chute on the 6-cup (1.5-L) Food Processor with your fingers or other utensils; always use the food pusher provided. Never force food into the blades. Only light pressure is needed when using the food pusher.
- 56. Do not fill the food processor bowl above the marked max fill line to avoid risk of injury.
- 57. Never force parts of the unit together.
- 58. The blending container is not oven-, freezer-, microwave-, or grill-safe; do not use with boiling liquids.
- 59. This unit is for household use only; it is not intended for commercial use.
- 60. Do not use outdoors. Intended for countertop use only.
- 61. For product questions, call the Solution Center at (888) 687-2433 (U.S.) or (800) 342-2433 (Canada) for assistance.
ELECTRICAL HAZARDS
- Failure to abide by these specific instructions may cause electrical shock or fire, smoldering, smoke, burns, or other personal injuries and could lead to death or serious injury.
- • Only use with the provided parts.
- • Always remove the battery and/or unplug when not in use.
- • Do not use anything other than a 120V–60Hz power outlet.
- • Do not immerse, submerge, or sprinkle the charging station, batteries, power handle, or Hand Mixer attachment with liquids.
- • Do not insert or remove the plug with wet hands. In order to avoid injuries due to electric shock, make sure your hands are dry before plugging and unplugging the unit.
- • Do not use the unit with wet hands.
- • Do not attempt to modify the plug in any way.
- • Regularly inspect the unit before using. Do not use the charging station if the power supply cord, plug, or the unit becomes damaged in any way.
- • Do not operate any appliance with a damaged battery, cord, or plug, or after the appliance malfunctions or is dropped or damaged in any manner. If any of these occur, call the Solution Center at (888) 687-2433 (U.S.) or (800) 342-2433 (Canada) for assistance.
- • If the plug fits loosely into the outlet or if the outlet feels warm, do not use that outlet.
- • Do not plug into a power strip or an outlet with another appliance. A grounded socket of 15A or more rated current should be used.
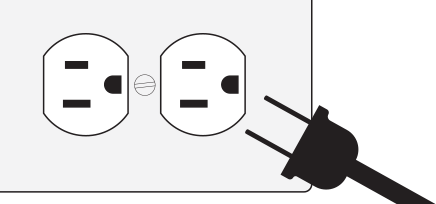
• This unit has a polarized plug (one blade is wider than the other). To reduce the risk of electric shock, this plug is intended to fit into a polarized outlet only one way. If the plug does not fit fully into the outlet, reverse the plug. If it still does not fit, contact a qualified electrician. - • Persons with various external or implanted medical devices (such as pacemakers, hearing aids, cochlear implants, etc.) should consult with authorized medical professionals before use. Refer to the instructions of medical equipment providers.
PARTS
A. Charging station B. Light 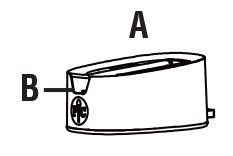
C. Two rechargeable batteries D. Releasing tabs 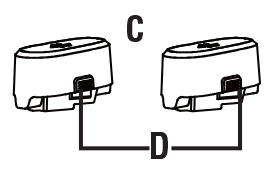
E. Power handle F. Speed adjustment (1–5)
G. Battery life indicator light
H. Speed indicator light
I. Releasing tabs
J. Power button
K. Safety lock button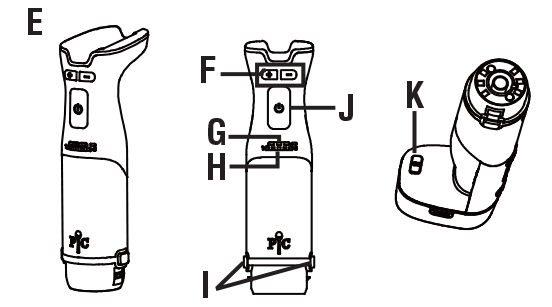
L. Immersion Blender M. Connection end
N. Blending head
O. Blending container with lid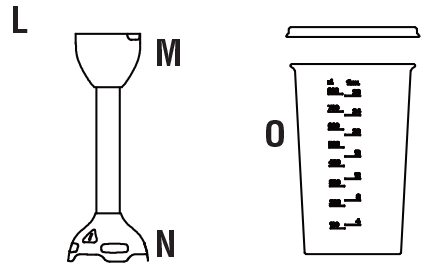
P. Hand Mixer Q. Safety switch
R. Speed adjust button (1–3)
S. Ejector button
T. Blue indicator light
U. Two beaters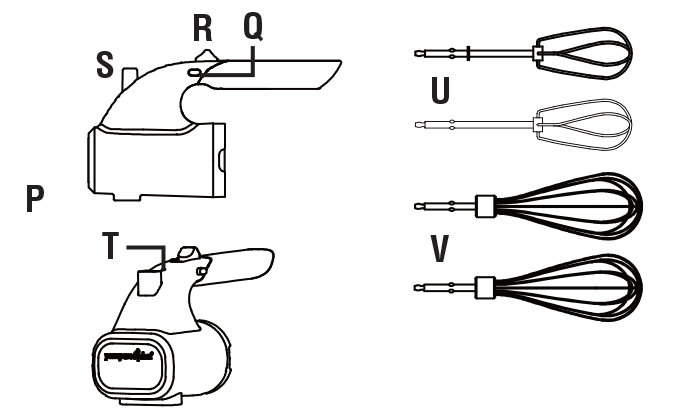
W. 6-cup (1.5-L) Food Processor X. Food pusher
Y. Food processor lid
Z. Gear box
AA. Splash guard
BB. Splash guard gasket
CC. Multiuse blade
DD Center post
EE. Food processor bowl
FF. Nonslip foot ring
GG. Reversible grating blade (coarse/fine)
HH. Reversible slicing blade (thick/thin)
WHICH ATTACHMENT SHOULD I USE?
Attachment Best For Notes Immersion Blender Milkshakes, smoothies (with fresh fruit, not frozen), blended coffee drinks, soups, purees, sauces Some suction to the bottom of a vessel is normal with immersion blenders. To minimize, tip the blade at an angle away from you before fully submerging and blending food and leave some space between the blending head and the bottom of the vessel. Not recommended for hard foods such as frozen fruit and ice. Hand Mixer with whisks Cream, egg whites To incorporate air, gradually increase the speed from low to high. Hand Mixer with beaters Batters, doughs To prevent splashing, start at a low speed when adding ingredients then increase to a higher speed. 6-cup (1.5-L) Food Processor with the multiuse blade Dips, doughs, sauces, vegetables, fruits With heavy loads such as dough, we recommend pulsing. 6-cup (1.5-L) Food Processor with the reversible grating blade Vegetables, fruits, cheeses Do not use force when grating, only use a light touch and let gravity do the work. 6-cup (1.5-L) Food Processor with the reversible slicing blade Vegetables, fruits Do not use with cheese or hard foods. Do not use force when slicing fruits and vegetables, only use a light touch and let gravity do the work. CLEANING
Before cleaning any part of this unit, unplug from the power source, and remove the battery, attachment, and any accessories.
Wipe clean Charging station, power handle, Hand Mixer attachment, batteries (only use a dry cloth on or around the connectors) Hand wash; do not submerge Food processor lid Dishwasher-safe when placed away from the heating element Blending container and lid, beaters, whisks, splash guard, splash guard gasket, food processor bowl, food processor center post, multiuse blade, reversible grating blade, reversible slicing blade, and food pusher.
Immersion Blender attachment: Hand washing with warm, soapy water and a nylon scrub brush is recommended. Keep fingers away from blade. If preferred, Immersion Blender attachment may be dishwashed.Note: Allow all pieces to dry completely before using or storing.
Food processor bowl:
- • Over time and continued use, the bowl may show some scratching; this is normal.
- • Coffee, tomatoes, and citrus products may cause slight discoloration, so it’s best to wash and rinse the bowl after each use.
- • If food gets into the handle of the bowl, rinse immediately. If food has dried inside the handle, soak in warm soapy water and then rinse.
- • The nonslip foot ring can be removed for cleaning if necessary.
BEFORE THE FIRST USE
- Before using for the first time, we recommend you clean and dry all the parts according to the cleaning instructions above, and read all the operating instructions completely.
- The batteries in your Flex+ have not been fully charged and must be charged until the green indicator light on charging station illuminates. If the light is red, the battery is not yet fully charged.
CHARGING AND BATTERY LIFE
The batteries must be charged until the green indicator light on the charging base is illuminated. When the battery is fully charged it will run intermittently for approximately 30 minutes. Please note the running time varies depending upon the thickness and texture of what is being blended or processed. It takes approximately 2–2.5 hours for the battery to charge fully. You can "quick charge" the battery to get 5 minutes of run time by charging in the charging station for 30 minutes.
Battery Life Indicator Lights Battery Power 
3 blue lights 66–100% 
2 blue lights 33–66% 
1 blue light Less than 33% battery life. Charge soon. Notes:
- • Do not leave the battery uncharged for an extended period of time (e.g. several months) as it will affect the life of the rechargeable battery.
- Do not throw batteries in the garbage. Contact your local waste collection agency for proper recycling/disposal information for your area.
HOW TO ATTACH A BATTERY TO THE POWER HANDLE
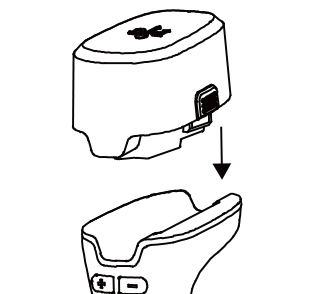
Position the connector side of battery over the power handle aligning the two releasing tabs. 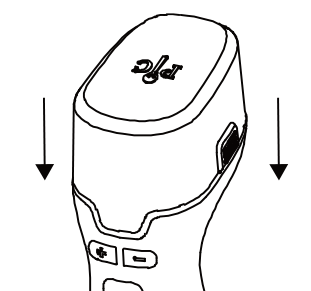
Press the battery into place until you hear a click. If the battery does not seat properly, call the Solution Center at (888) 687-2433 (U.S.) or (800) 342-2433 (Canada) for assistance. HOW TO REMOVE A BATTERY FROM THE POWER HANDLE

Squeeze both releasing tabs on the battery at the same time. 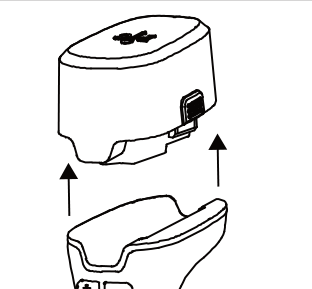
While the releasing tabs are pressed, lift the battery away from the power handle. HOW TO USE THE IMMERSION BLENDER (MIXING AND BLENDING)
How to Assemble/Disassemble
SAFEGUARD
Add the attachment to the power handle first, then add the battery. Ensure the power button on the power handle is not pressed while attaching or removing the battery.
To assemble: 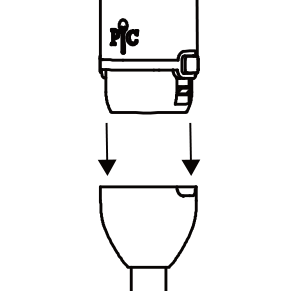
1. While holding the power handle, position the stainless-steel, non-blade end of the Immersion Blender attachment to align the two releasing tabs with the notches on the top of the Immersion Blender attachment. 
2. Once aligned, push together until you hear a click. Make sure the Immersion Blender attachment is clicked into place and secure before using; the releasing tabs will pop out and will not be flush. 3. Place the battery as noted in How to Attach a Battery to the Power Handle section. To disassemble: 1. Ensure the unit is off and the blade is fully stopped. 2. Remove the battery according to the How to Remove Battery from Power Handle section. 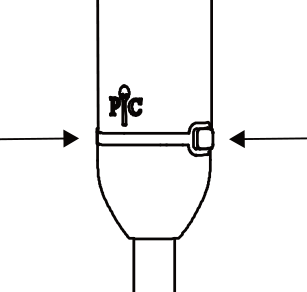
3. Press the two releasing tabs at the same time at the connection point of the Immersion Blender attachment to the power handle. 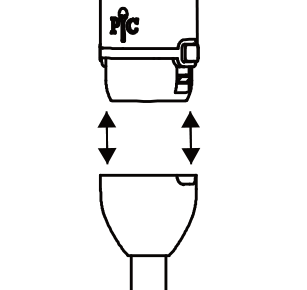
4. While holding the two releasing tabs down, pull the power handle and Immersion Blender attachment in opposite directions. HOW TO USE
1. Ensure the battery and Immersion Blender attachment are correctly assembled according to the instructions above. 2. Place the food to be blended into a mixing bowl, pot, blending container, or saucepan. The vessel must be no more than half full when blending liquids or purees to reduce the risk of splattering. 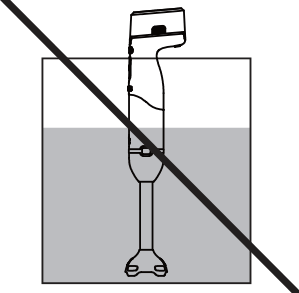
3. To reduce the risk of splattering, fully submerge the blending head into the food. Do not submerge beyond the thin arm of the attachment. 
4. Click the safety lock button one time. Illuminated lights indicate the unit is ready to operate. 5. Press the power button to turn the Immersion Blender on. Note: Press the power button within 5 seconds after pressing the safety lock button or else the unit will not run. The power button must be held for the duration of operation. If selecting a higher speed, start on a slow speed and then increase to a higher speed to avoid splattering and overprocessing. 6. Work through the ingredients in the vessel with a gentle raising and lowering motion. Never force the the blending head through the ingredients: Let it do the work for you. 7. When done blending, release the power button. When removing the Immersion Blender attachment from the vessel, ensure the blade comes to a complete stop before lifting out of the food. 8. Remove the battery before removing the Immersion Blender attachment. Tips:
- • The head of the Immersion Blender attachment allows foods to be processed directly in a pot or saucepan.
- • The safety lock button will allow the unit to be used within 5 seconds after being pressed.
- • The speed will reset to the lowest speed after 10 minutes of non-use.
- • It is normal for there to be some suction of the blade to the bottom of mixing vessel. To minimize this, make sure there is space between the blending head and the bottom of the vessel.
- • Ensure the blade is tipped away from you at an angle before fully submerging and blending food.
- • When using with a heavy load (dense or large chunks of food, etc.), do not operate the Immersion Blender attachment continuously for more than 1 minute. Allow the motor to rest for 1 minute between each use.
- • The Immersion Blender attachment blends foods and liquids quickly, so it’s easy to over-process. Stop and check the food throughout blending.
- • When using with the blending container, make sure the container is on a dry, flat, and stable surface.
- • Warm all liquids to be added to soups and purees; this will ensure even blending.
- • Remove the saucepan or pot from the heat source before processing.
- • Ensure the unit is kept away from any heat source.
- • Let foods cool slightly before blending. Cool foods to about 140°F (60°C). Do not use to blend boiling food.
HOW TO USE THE HAND MIXER (BEATERS AND WHISKS)
How to Assemble/Disassemble
SAFEGUARD
Add the attachment to the power handle first, add the accessories (beaters or whisks), then add the battery. Ensure the power handle and Hand Mixer are turned off before assembling the Hand Mixer or adding the accessories (beaters or whisks). Never use two different types of accessories (beater and whisk) at the same time. This may cause damage and is not covered under the warranty.
To assemble: 1.Make sure the speed adjust button on the Hand Mixer attachment is off. 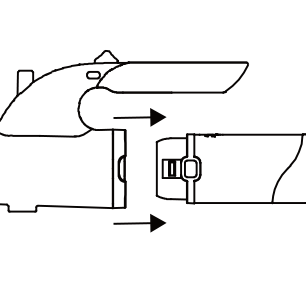
2. Slide the Hand Mixer attachment onto the power handle. Align the two releasing tabs on both sides. Once aligned, push together until you hear a click. Make sure the Hand Mixer attachment is clicked into place and secure before using; the releasing tabs will pop out and will not be flush. The power handle will only attach to the Hand Mixer attachment one way. 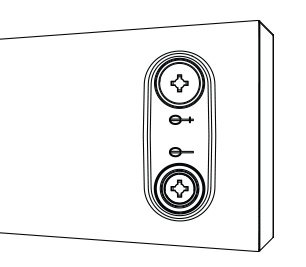
3. Choosing and using a Hand Mixer accessory:
• Beaters: These are ideal for cake batters and cookie doughs. One of the beaters has a collar that needs to be inserted into the larger opening of the Hand Mixer.
• Whisks: These are best for whipped cream, eggs, and meringues. Neither of the whisks have a collar and can be inserted into either opening of the Hand Mixer attachment.
4. Insert the Hand Mixer accessory by aligning the shaft to the two holes on the Hand Mixer attachment. Press in until you hear a click. 5. Attach the battery as noted in the How to Attach a Battery to the Power Handle section. Illuminated lights indicate the unit is ready to operate. 6. The white speed light will blink three times to indicate the attachment is connected properly. The indicator light on the Hand Mixer will light blue. 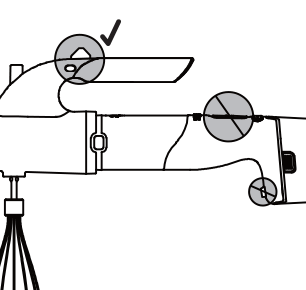
7. To start the Hand Mixer, push and hold in the safety switch on the left side of the unit and adjust the speed. The safety switch will reactivate after each use. Note: When the Hand Mixer attachment is attached to the power handle, the Hand Mixer safety switch needs to be pressed to use. You do not need to press the safety lock button on the power handle to use the Hand Mixer. To disassemble: 1. If the mixer is running, stop the mixer by sliding the speed adjust button to Off. Make sure the accessories (beaters or whisks) come to a complete stop while still in the food. 2. Remove the battery following the How to Remove a Battery From the Power Handle section. 3. Hold the Hand Mixer slightly over the mixing bowl and press the ejector button to release the accessories from the mixer and remove. 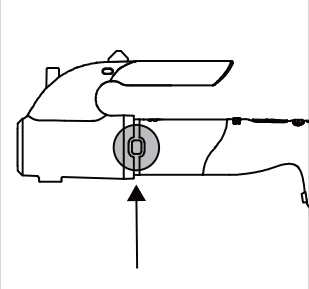
4. Press the two releasing tabs at the same time at the connection point of the Hand Mixer attachment to the power handle. 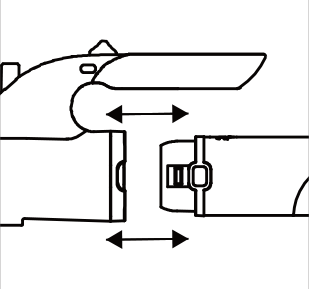
5. While holding the two releasing tabs down, pull the power handle and Hand Mixer attachment in opposite directions. HOW TO USE
- 1. Ensure the battery, Hand Mixer attachment, and accessories are correctly assembled according to the instructions above.
- 2. Make sure the speed adjust button is in the Off position.
- 3. Once the accessories (beaters or whisks) are submerged in the food, push and hold in the safety switch on the left side of the unit and slowly adjust the speed to the desired setting. Adjusting the power speed too quickly can result in splashing ingredients.
- 4. Once mixing is done, slowly adjust the speed to Off.
HOW TO USE THE 6-CUP (1.5-L) FOOD PROCESSOR (CHOPPING, GRATING, AND SLICING)
CAUTION
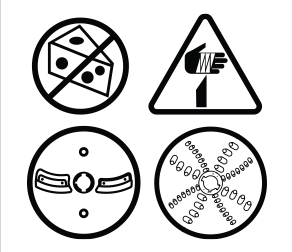
• Do not process hard foods such as ice, coffee beans, hard candy, or chocolate chunks in the food processor bowl as damage to the blades may occur.
• Do not use the food processor reversible slicing blade with cheese or hard foods.
• Do not process boiling or hot foods in the food processor bowl.
• Never remove the blades from the food processor bowl before processing is complete and the blades have come to a complete stop.SAFEGUARDS
- • The blades are sharp, handle carefully.
- • Add the accessories first, then add the battery.
- • Ensure the power button on the power handle is not pressed while attaching or removing the battery.
To assemble: 
1. Ensure the gear box and splash guard are connected. 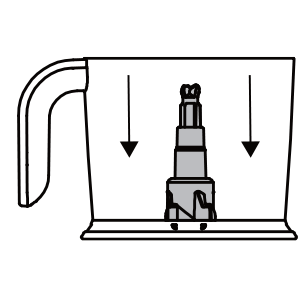
2. Place the center post into the food processor bowl over the center pole. Note: The center post will never be used alone; always choose one blade from step 3 below. 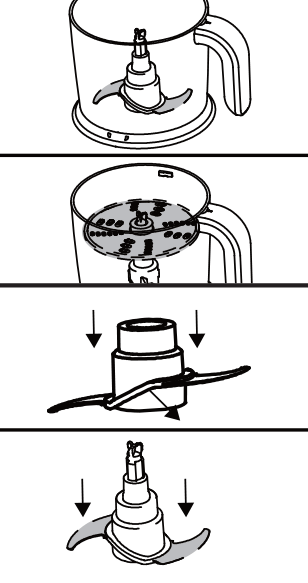
3. Choose one of the food processor blades and place over the center post: The reversible blades will rest toward the top of the center post, and the multiuse blade will slide down the center post toward the base. Never use more than one food processor blade at a time.
• Multiuse blade: Using care, allow the blade to slowly slide over the center post and become seated at the bottom of the center post. The blade should self-locate at the base of the center post.
• Reversible grating blade: Ensure the side being used (coarse or fine) is face up.
• Reversible slicing blade: Ensure the side being used (thick or thin) is face up.
4. If applicable, insert food into the food processor bowl. There are two notches on the sides of the food processor bowl. Align these with the notches on the lid and twist counterclockwise to lock into place. There are also unlock and lock symbols on the lid for reference. 5. Make sure the power handle is off. 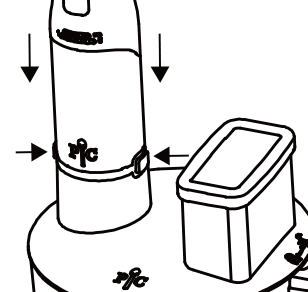
6. Align the releasing tabs on the port on the lid with the power handle. Once aligned, push together until you hear a click. Make sure the food processor lid is clicked into place and secure before using; the releasing tabs will pop out and will not be flush. 7. Attach the battery to the power handle. See the How to Attach a Battery to the Power Handle section. To disassemble: 1. Once the power button is released and the blades are at a complete stop, remove the power handle from the lid by pressing and holding the releasing tabs on both sides and lifting. Always disconnect the power handle from the food processor lid before removing the lid from the food processor bowl. 2. Remove the food pusher from the lid. 3. Twist the lid clockwise to a stop and then lift. 4. Remove the blade from the food processor bowl with caution as blades are extremely sharp.To remove the reversible slicing or grating blade, pick up by the plastic part, then pull the removable center post away from the accessory. For the multiuse blade, remove the center post and blade from the unit. With extreme caution, grab the center post with one hand and gently hold the plastic top of the blade with the other hand. Slowly turn the center post counterclockwise and then push to release the blade. HOW TO USE
- 1. Once assembled, insert food through the food chute.
- 2. Holding the power handle, press the safety lock button. Illuminated lights on the power handle indicate the unit is ready to operate and will show the battery life and speed level. Within five seconds, press and hold the power button down to power the blade. If you do not press the power button within five seconds, you’ll need to press the safety lock button again.
- 3. Use the food pusher, and only the food pusher, to push food into the blades. Press lightly on the food pusher: Do not use force. Let the 6-cup (1.5-L) Food Processor do the work. Keep your hands and utensils out of the food chute. Do not exceed the max fill line.
- 4. Once you’re done slicing, grating, or processing, release the power button and let the blades come to a complete stop.
- 5. Press and hold both releasing tabs on the power handle and lift up to remove the power handle from the food processor lid.
- 6. Twist the food processor lid clockwise and lift. Carefully remove the blade and set aside.
Tips:
- • The bottom of the food processor bowl features a nonslip foot ring to keep the bowl stable. However, we recommend that you hold the power handle with one hand and the food processor bowl and lid or food pusher with the other hand while operating.
- • Before processing, cut foods into uniform sizes to ensure quicker, even, and more consistent results.
- • The safety lock button lets you use the unit within 5 seconds after being pressed.
- • The 6-cup (1.5-L) Food Processor cuts foods quickly so be sure to check the food during use.
- • The speed will reset to the lowest speed after 10 minutes of use.
TROUBLESHOOTING
The cases described in the following tables do not always indicate a faulty unit.
Problem Possible Reason(s) Solution The blade doesn’t turn when processing or the unit has shut off. There may be too much food in the bowl. Remove some food from the bowl. Pieces of food are too large. Reduce the size of the pieces. The battery wasn’t fully charged. Place the battery on the charging station until fully charged. When using with a heavy load, an additional charged battery may be required. Replace the power handle with a fully charged battery. The battery or motor shut off to prevent overheating. 1. Remove the battery.
2. Ensure there is not too much food in the bowl or that the food is not too large. See above.
3. Allow the unit to cool down for several minutes before reinstalling the battery.
4. Reinstall the battery.Unable to lock the food processor lid into place. The center post may be out of position. Remove the lid, straighten the center post vertically, and replace the lid. Food may be stuck under the food processor blade, preventing the lid from locking into place. Carefully remove the blade and food from the vessel. Once the food is cleared, carefully insert the center post/blade and place the food back in. The lid is not properly aligned. There are two notches on opposite sides of the food processor bowl. Align with notches on the lid and twist counterclockwise to lock into place. The splash guard is not properly seated in the food processor lid. Remove the splash guard and snap into place to reinstall. Attach the lid to bowl. There are two notches on opposite sides of the food processor bowl. Align with the notches on the lid and twist counterclockwise to lock into place. Part of the unit is not attached correctly. Something is not properly aligned. Ensure everything is lined up correctly and then press firmly to click into place or seat properly. There’s food or debris at the connection point. Remove the food or debris. The 6-cup (1.5-L) Food Processor slows down when using the reversible grating blade. Grating has exceeded the max fill level. Empty the bowl and continue to grate. There’s too much force being used when grating. Use a light touch with the food pusher, allowing gravity to do most of the work. The 6-cup (1.5-L) Food Processor slows down when using the reversible slicing blade. There’s too much force being used when slicing. Reduce the force on food pusher. Little or no force is needed: Let gravity do the work for you.
Note: Never use the slicing blade with cheese.The unit does not turn on. The battery is too low. Charge the battery. If the battery is not charged after 2.5 hours of charging, contact the Solution Center. One of the parts is not attached correctly. Double check each part and attach correctly. The unit is on but isn’t moving. The safety lock button has not been pressed. If operation hasn’t started within 5 seconds after pressing the safety lock button, the unit will not start. Press the safety lock button and begin using within 5 seconds. The battery is too low. Charge the battery. If the battery is not charged after 2.5 hours of charging, contact the Solution Center. There is a red light flashing during charging. The battery temperature is too high, so the charging station stopped charging. 1. Remove the power cord from the power outlet and remove the battery from charging station.
2. Allow the charging station and battery to cool for 30 minutes.
3. Plug the charging station back into the power outlet.
4. Place the battery back in the charging station.The blades (Immersion Blender attachment, grating blade, slicing blade, multiuse blade) aren’t sharp. Something too hard, such as ice, bone, fruit pits, hard candy, or other hard food, was processed. Don’t test blade sharpness by hand or touch. Blades cannot be re-sharpened. Purchase a replacement part. If the problem persists or for any unresolved issues, stop using the product and contact Solution Center at (888) 687–2433 (U.S.) or (800) 342–2433 (Canada) for assistance.
GUARANTEE
- • One-year guarantee for noncommercial use.
Made in China
Guarantee
Use & Care
IMPORTANT SAFEGUARDS
- Please read all instructions before using. Save these instructions. When using electrical appliances, basic safety precautions should always be followed, including the following:
- 1. This unit should not be used by children or by persons with reduced physical sensory, or mental capabilities, or lack of experience and knowledge. To avoid possible accidental injury, close supervision is required when used near children. Children should be supervised to ensure that they do not play with the appliance.
- 2. This unit should not be used by individuals whose physical, sensory, or intellectual disability may prevent safe usage.
- 3. To avoid personal injury, ensure the unit is in the Off position and the battery is removed before cleaning, attaching or removing accessories (blades, beaters, etc.), and/or attachments, or any other use.
- 4. Do not use while you are tired or under the influence of drugs, alcohol, or medication. A moment of inattention while operating may result in serious personal injury.
- 5. Do not operate near loose clothing, jewelry, hair, etc.
- 6. Use extreme caution when handling the power handle, especially when blending hot contents. Spilling or splashing of hot contents could result in burns. To reduce spilling and splashing, use a tall container or blend small quantities at a time.
- 7. To protect against electrical shock, do not immerse or operate the unit, batteries, charging stations and cord, or plugs in or around water or other liquids.

8. To prevent unintentional starting, never press the safety lock button until you are ready to use the unit. Note: The safety lock button will allow the unit to be used within 5 seconds after being pressed. - 9. To reduce the risk of injury, always operate the unit and accessories on a flat surface.
- 10. The power handle, batteries, Hand Mixer attachment, food processor lid gear box, and charging station are not water-resistant
- 11. Do not operate the unit, parts, or accessories if they are damaged cord or plug, or after the appliance malfunctions, or is dropped or damaged in any manner. If damaged or if any part of the unit malfunctions, call the Solution Center at (888) 687-2433 (U.S.) or (800) 342-2433 (Canada) for assistance.
- 12. The blades on the attachments are very sharp; always handle carefully. Never directly handle the blades.
- 13. Avoid contact with moving parts. Keep hands, hair, clothing, as well as spatulas and other utensils away from the attachments and blending container during operation to reduce the risk of injury or damage to the unit. You can use a kitchen scraper, but only when the unit is not operating and the battery is not connected.
- 14. Always use caution when storing the blades. Keep sharp edges away from you, your hands, and your fingers.
- 15. The charging station should be plugged into an indoor electrical outlet and away from sources of water and hot surfaces including the stove.
- 16. Do not remove the Immersion Blender from the ingredients during operation; keep submerged in the food while operating. To avoid injury, ensure the appliance is turned off and has come to a complete stop before removing.
- 17. Do not use an extension cord to charge the battery; plug the charging station directly into an electrical outlet.
- 18. Ensure the unit is fully assembled before using. Do not operate this unit unless mixing, processing, or blending food.
- 19. Do not blend or process fruit pits, bones, or any hard ingredients as these can damage the blades.
- 20. When running a heavy load (e.g. dense dough or large chunks of food, etc.), don’t operate for more than 1 minute continuously. To continue mixing, let the appliance rest for 1 minute before operating it again to avoid stalling or overheating.
- 21. The food processor bowl is not oven-, freezer-, microwave-, or grill-safe. Do not process hot or boiling liquids in the food processor bowl; let liquids cool before placing into the food processor bowl.
- 22. To reduce the risk of injury, never attempt to place the food processor multiuse blade on the center pole without first properly seating the center post in the food processor bowl. Once the center post is properly seated, place the blade gently onto the top of the center post; it should slide down into place. The multiuse blade should self-locate at the base of the center post.(See the How to Use the 6-cup (1.5-L) Food Processor section for assembly instructions.)
- 23. Do not operate the 6-cup (1.5-L) Food Processor attachment unless the lid is securely locked in place. Do not attempt to remove the lid until the blade has completely stopped rotating.
- 24. Check the food processor bowl for foreign objects before using.

25. Use caution when setting the Hand Mixer down. Only rest the Hand Mixer on its side when not in use to prevent possible injury to user and/or damage to the unit or property; do not leave it in a bowl. Never stand the Hand Mixer up on the attached battery. - 26. Do not touch any metal parts of the unit during or after use as they may be hot to touch and cause injury.
- 27. Do not use any of the Pampered Chef Flex+ attachments or accessories with glass vessels to prevent possible injury to the user or damage to the unit or property.
- 28. Use only Pampered Chef Flex+ attachments and accessories intended for use with the food processor bowl. Do not use the food processor bowl as a mixing bowl. Do not use the Hand Mixer attachment, Immersion Blender attachment, or any unapproved attachments or accessories in the food processor bowl
- 29. Make sure the unit and proper attachments and accessories are completely and properly assembled before operating. See the How to Use sections for proper assembly of each attachment.
- 30. Do not place the unit, accessories, cord, or plug on, near, or inside an external heat source (e.g., on a hot gas, or electric burner, or in a heated oven).
- 31. Do not place the unit near the edge of a surface during operation. Ensure the surface is level and clear of liquids and debris.

32. Ensure the power button on the power handle is not pressed while attaching or removing the battery, accessories, or attachments. - 33. Only use Pampered Chef Flex+ attachments and accessories that are recommended for use with this product. The use of attachments or accessories with this product not recommended or sold by Pampered Chef may cause fire, electric shock, or injury to the user or unit. Any approved attachment or accessory that has been damaged in any manner should not be used.
- 34. Do not let the charging station cord hang over the edge of a countertop or table or touch hot surfaces.
- 35. When using the Immersion Blender to blend hot food in a saucepan, remove the saucepan from the heat source and ensure the unit is also kept away from any heat source.
- 36. Do not use with or in other appliances or small appliances (e.g., stand mixer, oven, microwave, stovetop, grill, refrigerator, etc.), as this may cause deformations which can negatively affect future performance of the unit or injury to the user.
- 37. Do not use, mount, or store the unit over or near a portion of a heating or cooking appliance, sink, or washbasin.
- 38. Use only with the charger provided with the appliance. Do not attempt to use the charging station with any other product. Also, do not attempt to charge the battery with any other charger.
- 39. Unplug the charging station from the outlet when not in use and before wiping down. Once the battery is fully charged, unplug from the outlet when not in use. To unplug, grasp the plug and pull from the outlet. Never pull from the power cord.
- 40. Keep the charging station free of water, food, oil, and dust.
- 41. Keep the battery connectors safe from water, food, oil, and dust.
- 42. Prior to cleaning, allow all the parts of the unit, including the blade, whisk, or beater, to come to a complete stop before removing.
- 43. This product contains lithium-ion batteries which must be recycled at the end of the battery’s life and disposed of properly. See the Charging and Battery Life section.
- 44. If the battery becomes hot, do not touch or handle it until it has cooled down.
- 45. Keep the unit’s batteries away from fire or other sources of heat, as batteries can explode if subjected to temperatures above 265°F (130°C). Do not incinerate or compost batteries even if it is severely damaged. See the Charging and Battery Life section.
- 46. If there is any leakage from the battery, immediately stop use and do not touch.
- 47. Leaks from the battery cells can occur under extreme conditions and can cause irritation or burns to your skin. If the liquid gets on skin, wash the affected area quickly with soap and water or neutralize the affected area with a mild acid such as lemon juice or vinegar. If the liquid gets into your eyes, flush your eyes immediately with clean water for a minimum of 10 minutes and seek medical attention.
- 48. Do not use a battery if it’s damaged. Damaged batteries may exhibit unpredictable behavior resulting in fire, explosion, and risk of injury. If any part of the unit is damaged, call the Solution Center at (888) 687-2433 (U.S.) or (800) 342-2433 (Canada) for assistance.
- 49. Do not modify or attempt to repair the battery as it may result in injury.
- 50. Always store and charge the batteries at room temperature (approximately 72°F/22°C) and keep out of direct sunlight.
- 51. Do not use or attempt to operate the unit by any method other than the intended uses and methods outlined in this use and care.
- 52. Illuminated lights on the charging station, power handle, or Hand Mixer attachment indicate that the unit is ready to operate. See the How to Use the Hand Mixer section for details.
- 53. Always assemble the food processor lid and ensure it’s locked into place before use.
- 54. If food becomes lodged around the blades, in the blade guard, or in any part, release the power button and allow the unit and any moving parts to come to a complete stop. Remove the battery. You can use a spatula or bvc kitchen scraper to dislodge the food. Do not use your fingers or a metal utensil as the blades are sharp.
- 55. Do not push food into the food chute on the 6-cup (1.5-L) Food Processor with your fingers or other utensils; always use the food pusher provided. Never force food into the blades. Only light pressure is needed when using the food pusher.
- 56. Do not fill the food processor bowl above the marked max fill line to avoid risk of injury.
- 57. Never force parts of the unit together.
- 58. The blending container is not oven-, freezer-, microwave-, or grill-safe; do not use with boiling liquids.
- 59. This unit is for household use only; it is not intended for commercial use.
- 60. Do not use outdoors. Intended for countertop use only.
- 61. For product questions, call the Solution Center at (888) 687-2433 (U.S.) or (800) 342-2433 (Canada) for assistance.
ELECTRICAL HAZARDS
- Failure to abide by these specific instructions may cause electrical shock or fire, smoldering, smoke, burns, or other personal injuries and could lead to death or serious injury.
- • Only use with the provided parts.
- • Always remove the battery and/or unplug when not in use.
- • Do not use anything other than a 120V–60Hz power outlet.
- • Do not immerse, submerge, or sprinkle the charging station, batteries, power handle, or Hand Mixer attachment with liquids.
- • Do not insert or remove the plug with wet hands. In order to avoid injuries due to electric shock, make sure your hands are dry before plugging and unplugging the unit.
- • Do not use the unit with wet hands.
- • Do not attempt to modify the plug in any way.
- • Regularly inspect the unit before using. Do not use the charging station if the power supply cord, plug, or the unit becomes damaged in any way.
- • Do not operate any appliance with a damaged battery, cord, or plug, or after the appliance malfunctions or is dropped or damaged in any manner. If any of these occur, call the Solution Center at (888) 687-2433 (U.S.) or (800) 342-2433 (Canada) for assistance.
- • If the plug fits loosely into the outlet or if the outlet feels warm, do not use that outlet.
- • Do not plug into a power strip or an outlet with another appliance. A grounded socket of 15A or more rated current should be used.

• This unit has a polarized plug (one blade is wider than the other). To reduce the risk of electric shock, this plug is intended to fit into a polarized outlet only one way. If the plug does not fit fully into the outlet, reverse the plug. If it still does not fit, contact a qualified electrician. - • Persons with various external or implanted medical devices (such as pacemakers, hearing aids, cochlear implants, etc.) should consult with authorized medical professionals before use. Refer to the instructions of medical equipment providers.
PARTS
A. Charging station B. Light 
C. Two rechargeable batteries D. Releasing tabs 
E. Power handle F. Speed adjustment (1–5)
G. Battery life indicator light
H. Speed indicator light
I. Releasing tabs
J. Power button
K. Safety lock button
L. Immersion Blender M. Connection end
N. Blending head
O. Blending container with lid
P. Hand Mixer Q. Safety switch
R. Speed adjust button (1–3)
S. Ejector button
T. Blue indicator light
U. Two beaters
W. 6-cup (1.5-L) Food Processor X. Food pusher
Y. Food processor lid
Z. Gear box
AA. Splash guard
BB. Splash guard gasket
CC. Multiuse blade
DD Center post
EE. Food processor bowl
FF. Nonslip foot ring
GG. Reversible grating blade (coarse/fine)
HH. Reversible slicing blade (thick/thin)
WHICH ATTACHMENT SHOULD I USE?
Attachment Best For Notes Immersion Blender Milkshakes, smoothies (with fresh fruit, not frozen), blended coffee drinks, soups, purees, sauces Some suction to the bottom of a vessel is normal with immersion blenders. To minimize, tip the blade at an angle away from you before fully submerging and blending food and leave some space between the blending head and the bottom of the vessel. Not recommended for hard foods such as frozen fruit and ice. Hand Mixer with whisks Cream, egg whites To incorporate air, gradually increase the speed from low to high. Hand Mixer with beaters Batters, doughs To prevent splashing, start at a low speed when adding ingredients then increase to a higher speed. 6-cup (1.5-L) Food Processor with the multiuse blade Dips, doughs, sauces, vegetables, fruits With heavy loads such as dough, we recommend pulsing. 6-cup (1.5-L) Food Processor with the reversible grating blade Vegetables, fruits, cheeses Do not use force when grating, only use a light touch and let gravity do the work. 6-cup (1.5-L) Food Processor with the reversible slicing blade Vegetables, fruits Do not use with cheese or hard foods. Do not use force when slicing fruits and vegetables, only use a light touch and let gravity do the work. CLEANING
Before cleaning any part of this unit, unplug from the power source, and remove the battery, attachment, and any accessories.
Wipe clean Charging station, power handle, Hand Mixer attachment, batteries (only use a dry cloth on or around the connectors) Hand wash; do not submerge Food processor lid Dishwasher-safe when placed away from the heating element Blending container and lid, beaters, whisks, splash guard, splash guard gasket, food processor bowl, food processor center post, multiuse blade, reversible grating blade, reversible slicing blade, and food pusher.
Immersion Blender attachment: Hand washing with warm, soapy water and a nylon scrub brush is recommended. Keep fingers away from blade. If preferred, Immersion Blender attachment may be dishwashed.Note: Allow all pieces to dry completely before using or storing.
Food processor bowl:
- • Over time and continued use, the bowl may show some scratching; this is normal.
- • Coffee, tomatoes, and citrus products may cause slight discoloration, so it’s best to wash and rinse the bowl after each use.
- • If food gets into the handle of the bowl, rinse immediately. If food has dried inside the handle, soak in warm soapy water and then rinse.
- • The nonslip foot ring can be removed for cleaning if necessary.
BEFORE THE FIRST USE
- Before using for the first time, we recommend you clean and dry all the parts according to the cleaning instructions above, and read all the operating instructions completely.
- The batteries in your Flex+ have not been fully charged and must be charged until the green indicator light on charging station illuminates. If the light is red, the battery is not yet fully charged.
CHARGING AND BATTERY LIFE
The batteries must be charged until the green indicator light on the charging base is illuminated. When the battery is fully charged it will run intermittently for approximately 30 minutes. Please note the running time varies depending upon the thickness and texture of what is being blended or processed. It takes approximately 2–2.5 hours for the battery to charge fully. You can "quick charge" the battery to get 5 minutes of run time by charging in the charging station for 30 minutes.
Battery Life Indicator Lights Battery Power 
3 blue lights 66–100% 
2 blue lights 33–66% 
1 blue light Less than 33% battery life. Charge soon. Notes:
- • Do not leave the battery uncharged for an extended period of time (e.g. several months) as it will affect the life of the rechargeable battery.
- Do not throw batteries in the garbage. Contact your local waste collection agency for proper recycling/disposal information for your area.
HOW TO ATTACH A BATTERY TO THE POWER HANDLE

Position the connector side of battery over the power handle aligning the two releasing tabs. 
Press the battery into place until you hear a click. If the battery does not seat properly, call the Solution Center at (888) 687-2433 (U.S.) or (800) 342-2433 (Canada) for assistance. HOW TO REMOVE A BATTERY FROM THE POWER HANDLE

Squeeze both releasing tabs on the battery at the same time. 
While the releasing tabs are pressed, lift the battery away from the power handle. HOW TO USE THE IMMERSION BLENDER (MIXING AND BLENDING)
How to Assemble/Disassemble
SAFEGUARD
Add the attachment to the power handle first, then add the battery. Ensure the power button on the power handle is not pressed while attaching or removing the battery.
To assemble: 
1. While holding the power handle, position the stainless-steel, non-blade end of the Immersion Blender attachment to align the two releasing tabs with the notches on the top of the Immersion Blender attachment. 
2. Once aligned, push together until you hear a click. Make sure the Immersion Blender attachment is clicked into place and secure before using; the releasing tabs will pop out and will not be flush. 3. Place the battery as noted in How to Attach a Battery to the Power Handle section. To disassemble: 1. Ensure the unit is off and the blade is fully stopped. 2. Remove the battery according to the How to Remove Battery from Power Handle section. 
3. Press the two releasing tabs at the same time at the connection point of the Immersion Blender attachment to the power handle. 
4. While holding the two releasing tabs down, pull the power handle and Immersion Blender attachment in opposite directions. HOW TO USE
1. Ensure the battery and Immersion Blender attachment are correctly assembled according to the instructions above. 2. Place the food to be blended into a mixing bowl, pot, blending container, or saucepan. The vessel must be no more than half full when blending liquids or purees to reduce the risk of splattering. 
3. To reduce the risk of splattering, fully submerge the blending head into the food. Do not submerge beyond the thin arm of the attachment. 
4. Click the safety lock button one time. Illuminated lights indicate the unit is ready to operate. 5. Press the power button to turn the Immersion Blender on. Note: Press the power button within 5 seconds after pressing the safety lock button or else the unit will not run. The power button must be held for the duration of operation. If selecting a higher speed, start on a slow speed and then increase to a higher speed to avoid splattering and overprocessing. 6. Work through the ingredients in the vessel with a gentle raising and lowering motion. Never force the the blending head through the ingredients: Let it do the work for you. 7. When done blending, release the power button. When removing the Immersion Blender attachment from the vessel, ensure the blade comes to a complete stop before lifting out of the food. 8. Remove the battery before removing the Immersion Blender attachment. Tips:
- • The head of the Immersion Blender attachment allows foods to be processed directly in a pot or saucepan.
- • The safety lock button will allow the unit to be used within 5 seconds after being pressed.
- • The speed will reset to the lowest speed after 10 minutes of non-use.
- • It is normal for there to be some suction of the blade to the bottom of mixing vessel. To minimize this, make sure there is space between the blending head and the bottom of the vessel.
- • Ensure the blade is tipped away from you at an angle before fully submerging and blending food.
- • When using with a heavy load (dense or large chunks of food, etc.), do not operate the Immersion Blender attachment continuously for more than 1 minute. Allow the motor to rest for 1 minute between each use.
- • The Immersion Blender attachment blends foods and liquids quickly, so it’s easy to over-process. Stop and check the food throughout blending.
- • When using with the blending container, make sure the container is on a dry, flat, and stable surface.
- • Warm all liquids to be added to soups and purees; this will ensure even blending.
- • Remove the saucepan or pot from the heat source before processing.
- • Ensure the unit is kept away from any heat source.
- • Let foods cool slightly before blending. Cool foods to about 140°F (60°C). Do not use to blend boiling food.
HOW TO USE THE HAND MIXER (BEATERS AND WHISKS)
How to Assemble/Disassemble
SAFEGUARD
Add the attachment to the power handle first, add the accessories (beaters or whisks), then add the battery. Ensure the power handle and Hand Mixer are turned off before assembling the Hand Mixer or adding the accessories (beaters or whisks). Never use two different types of accessories (beater and whisk) at the same time. This may cause damage and is not covered under the warranty.
To assemble: 1.Make sure the speed adjust button on the Hand Mixer attachment is off. 
2. Slide the Hand Mixer attachment onto the power handle. Align the two releasing tabs on both sides. Once aligned, push together until you hear a click. Make sure the Hand Mixer attachment is clicked into place and secure before using; the releasing tabs will pop out and will not be flush. The power handle will only attach to the Hand Mixer attachment one way. 
3. Choosing and using a Hand Mixer accessory:
• Beaters: These are ideal for cake batters and cookie doughs. One of the beaters has a collar that needs to be inserted into the larger opening of the Hand Mixer.
• Whisks: These are best for whipped cream, eggs, and meringues. Neither of the whisks have a collar and can be inserted into either opening of the Hand Mixer attachment.
4. Insert the Hand Mixer accessory by aligning the shaft to the two holes on the Hand Mixer attachment. Press in until you hear a click. 5. Attach the battery as noted in the How to Attach a Battery to the Power Handle section. Illuminated lights indicate the unit is ready to operate. 6. The white speed light will blink three times to indicate the attachment is connected properly. The indicator light on the Hand Mixer will light blue. 
7. To start the Hand Mixer, push and hold in the safety switch on the left side of the unit and adjust the speed. The safety switch will reactivate after each use. Note: When the Hand Mixer attachment is attached to the power handle, the Hand Mixer safety switch needs to be pressed to use. You do not need to press the safety lock button on the power handle to use the Hand Mixer. To disassemble: 1. If the mixer is running, stop the mixer by sliding the speed adjust button to Off. Make sure the accessories (beaters or whisks) come to a complete stop while still in the food. 2. Remove the battery following the How to Remove a Battery From the Power Handle section. 3. Hold the Hand Mixer slightly over the mixing bowl and press the ejector button to release the accessories from the mixer and remove. 
4. Press the two releasing tabs at the same time at the connection point of the Hand Mixer attachment to the power handle. 
5. While holding the two releasing tabs down, pull the power handle and Hand Mixer attachment in opposite directions. HOW TO USE
- 1. Ensure the battery, Hand Mixer attachment, and accessories are correctly assembled according to the instructions above.
- 2. Make sure the speed adjust button is in the Off position.
- 3. Once the accessories (beaters or whisks) are submerged in the food, push and hold in the safety switch on the left side of the unit and slowly adjust the speed to the desired setting. Adjusting the power speed too quickly can result in splashing ingredients.
- 4. Once mixing is done, slowly adjust the speed to Off.
HOW TO USE THE 6-CUP (1.5-L) FOOD PROCESSOR (CHOPPING, GRATING, AND SLICING)
CAUTION

• Do not process hard foods such as ice, coffee beans, hard candy, or chocolate chunks in the food processor bowl as damage to the blades may occur.
• Do not use the food processor reversible slicing blade with cheese or hard foods.
• Do not process boiling or hot foods in the food processor bowl.
• Never remove the blades from the food processor bowl before processing is complete and the blades have come to a complete stop.SAFEGUARDS
- • The blades are sharp, handle carefully.
- • Add the accessories first, then add the battery.
- • Ensure the power button on the power handle is not pressed while attaching or removing the battery.
To assemble: 
1. Ensure the gear box and splash guard are connected. 
2. Place the center post into the food processor bowl over the center pole. Note: The center post will never be used alone; always choose one blade from step 3 below. 
3. Choose one of the food processor blades and place over the center post: The reversible blades will rest toward the top of the center post, and the multiuse blade will slide down the center post toward the base. Never use more than one food processor blade at a time.
• Multiuse blade: Using care, allow the blade to slowly slide over the center post and become seated at the bottom of the center post. The blade should self-locate at the base of the center post.
• Reversible grating blade: Ensure the side being used (coarse or fine) is face up.
• Reversible slicing blade: Ensure the side being used (thick or thin) is face up.
4. If applicable, insert food into the food processor bowl. There are two notches on the sides of the food processor bowl. Align these with the notches on the lid and twist counterclockwise to lock into place. There are also unlock and lock symbols on the lid for reference. 5. Make sure the power handle is off. 
6. Align the releasing tabs on the port on the lid with the power handle. Once aligned, push together until you hear a click. Make sure the food processor lid is clicked into place and secure before using; the releasing tabs will pop out and will not be flush. 7. Attach the battery to the power handle. See the How to Attach a Battery to the Power Handle section. To disassemble: 1. Once the power button is released and the blades are at a complete stop, remove the power handle from the lid by pressing and holding the releasing tabs on both sides and lifting. Always disconnect the power handle from the food processor lid before removing the lid from the food processor bowl. 2. Remove the food pusher from the lid. 3. Twist the lid clockwise to a stop and then lift. 4. Remove the blade from the food processor bowl with caution as blades are extremely sharp.To remove the reversible slicing or grating blade, pick up by the plastic part, then pull the removable center post away from the accessory. For the multiuse blade, remove the center post and blade from the unit. With extreme caution, grab the center post with one hand and gently hold the plastic top of the blade with the other hand. Slowly turn the center post counterclockwise and then push to release the blade. HOW TO USE
- 1. Once assembled, insert food through the food chute.
- 2. Holding the power handle, press the safety lock button. Illuminated lights on the power handle indicate the unit is ready to operate and will show the battery life and speed level. Within five seconds, press and hold the power button down to power the blade. If you do not press the power button within five seconds, you’ll need to press the safety lock button again.
- 3. Use the food pusher, and only the food pusher, to push food into the blades. Press lightly on the food pusher: Do not use force. Let the 6-cup (1.5-L) Food Processor do the work. Keep your hands and utensils out of the food chute. Do not exceed the max fill line.
- 4. Once you’re done slicing, grating, or processing, release the power button and let the blades come to a complete stop.
- 5. Press and hold both releasing tabs on the power handle and lift up to remove the power handle from the food processor lid.
- 6. Twist the food processor lid clockwise and lift. Carefully remove the blade and set aside.
Tips:
- • The bottom of the food processor bowl features a nonslip foot ring to keep the bowl stable. However, we recommend that you hold the power handle with one hand and the food processor bowl and lid or food pusher with the other hand while operating.
- • Before processing, cut foods into uniform sizes to ensure quicker, even, and more consistent results.
- • The safety lock button lets you use the unit within 5 seconds after being pressed.
- • The 6-cup (1.5-L) Food Processor cuts foods quickly so be sure to check the food during use.
- • The speed will reset to the lowest speed after 10 minutes of use.
TROUBLESHOOTING
The cases described in the following tables do not always indicate a faulty unit.
Problem Possible Reason(s) Solution The blade doesn’t turn when processing or the unit has shut off. There may be too much food in the bowl. Remove some food from the bowl. Pieces of food are too large. Reduce the size of the pieces. The battery wasn’t fully charged. Place the battery on the charging station until fully charged. When using with a heavy load, an additional charged battery may be required. Replace the power handle with a fully charged battery. The battery or motor shut off to prevent overheating. 1. Remove the battery.
2. Ensure there is not too much food in the bowl or that the food is not too large. See above.
3. Allow the unit to cool down for several minutes before reinstalling the battery.
4. Reinstall the battery.Unable to lock the food processor lid into place. The center post may be out of position. Remove the lid, straighten the center post vertically, and replace the lid. Food may be stuck under the food processor blade, preventing the lid from locking into place. Carefully remove the blade and food from the vessel. Once the food is cleared, carefully insert the center post/blade and place the food back in. The lid is not properly aligned. There are two notches on opposite sides of the food processor bowl. Align with notches on the lid and twist counterclockwise to lock into place. The splash guard is not properly seated in the food processor lid. Remove the splash guard and snap into place to reinstall. Attach the lid to bowl. There are two notches on opposite sides of the food processor bowl. Align with the notches on the lid and twist counterclockwise to lock into place. Part of the unit is not attached correctly. Something is not properly aligned. Ensure everything is lined up correctly and then press firmly to click into place or seat properly. There’s food or debris at the connection point. Remove the food or debris. The 6-cup (1.5-L) Food Processor slows down when using the reversible grating blade. Grating has exceeded the max fill level. Empty the bowl and continue to grate. There’s too much force being used when grating. Use a light touch with the food pusher, allowing gravity to do most of the work. The 6-cup (1.5-L) Food Processor slows down when using the reversible slicing blade. There’s too much force being used when slicing. Reduce the force on food pusher. Little or no force is needed: Let gravity do the work for you.
Note: Never use the slicing blade with cheese.The unit does not turn on. The battery is too low. Charge the battery. If the battery is not charged after 2.5 hours of charging, contact the Solution Center. One of the parts is not attached correctly. Double check each part and attach correctly. The unit is on but isn’t moving. The safety lock button has not been pressed. If operation hasn’t started within 5 seconds after pressing the safety lock button, the unit will not start. Press the safety lock button and begin using within 5 seconds. The battery is too low. Charge the battery. If the battery is not charged after 2.5 hours of charging, contact the Solution Center. There is a red light flashing during charging. The battery temperature is too high, so the charging station stopped charging. 1. Remove the power cord from the power outlet and remove the battery from charging station.
2. Allow the charging station and battery to cool for 30 minutes.
3. Plug the charging station back into the power outlet.
4. Place the battery back in the charging station.The blades (Immersion Blender attachment, grating blade, slicing blade, multiuse blade) aren’t sharp. Something too hard, such as ice, bone, fruit pits, hard candy, or other hard food, was processed. Don’t test blade sharpness by hand or touch. Blades cannot be re-sharpened. Purchase a replacement part. If the problem persists or for any unresolved issues, stop using the product and contact Solution Center at (888) 687–2433 (U.S.) or (800) 342–2433 (Canada) for assistance.
GUARANTEE
- • One-year guarantee for noncommercial use.
Made in China
Guarantee


 Canada (en)
 Germany (de)
 Austria (de)